GPTLR SERIES (2008 Release) - Maxon
GPTLR SERIES (2008 Release) - Maxon
GPTLR SERIES (2008 Release) - Maxon

Create successful ePaper yourself
Turn your PDF publications into a flip-book with our unique Google optimized e-Paper software.
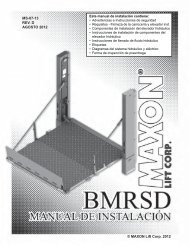
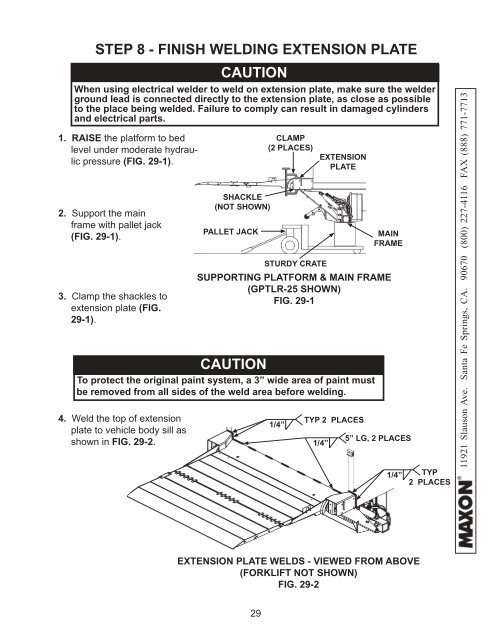
STEP 8 - FINISH WELDING EXTENSION PLATE<br />
CAUTION<br />
When using electrical welder to weld on extension plate, make sure the welder<br />
ground lead is connected directly to the extension plate, as close as possible<br />
to the place being welded. Failure to comply can result in damaged cylinders<br />
and electrical parts.<br />
1. RAISE the platform to bed<br />
level under moderate hydraulic<br />
pressure (FIG. 29-1).<br />
2. Support the main<br />
frame with pallet jack<br />
(FIG. 29-1).<br />
3. Clamp the shackles to<br />
extension plate (FIG.<br />
29-1).<br />
4. Weld the top of extension<br />
plate to vehicle body sill as<br />
shown in FIG. 29-2.<br />
SHACKLE<br />
(NOT SHOWN)<br />
PALLET JACK<br />
CLAMP<br />
(2 PLACES)<br />
1/4”<br />
EXTENSION<br />
PLATE<br />
STURDY CRATE<br />
SUPPORTING PLATFORM & MAIN FRAME<br />
(<strong>GPTLR</strong>-25 SHOWN)<br />
FIG. 29-1<br />
CAUTION<br />
To protect the original paint system, a 3” wide area of paint must<br />
be removed from all sides of the weld area before welding.<br />
TYP 2 PLACES<br />
1/4”<br />
MAIN<br />
FRAME<br />
5” LG, 2 PLACES<br />
1/4”<br />
TYP<br />
2 PLACES<br />
11921 Slauson Ave. Santa Fe Springs, CA. 90670 (800) 227-4116 FAX (888) 771-7713<br />
EXTENSION PLATE WELDS - VIEWED FROM ABOVE<br />
(FORKLIFT NOT SHOWN)<br />
FIG. 29-2<br />
29