GPTLR SERIES (2008 Release) - Maxon
GPTLR SERIES (2008 Release) - Maxon
GPTLR SERIES (2008 Release) - Maxon

You also want an ePaper? Increase the reach of your titles
YUMPU automatically turns print PDFs into web optimized ePapers that Google loves.
STEP 1 - WELD LIFTGATE TO VEHICLE - Continued<br />
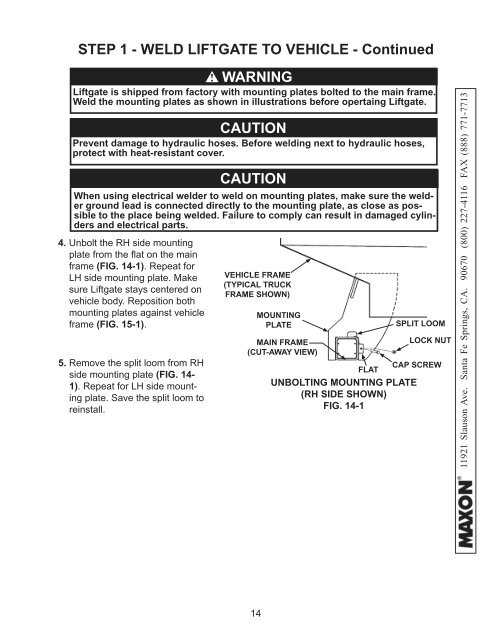
4. Unbolt the RH side mounting<br />
plate from the fl at on the main<br />
frame (FIG. 14-1). Repeat for<br />
LH side mounting plate. Make<br />
sure Liftgate stays centered on<br />
vehicle body. Reposition both<br />
mounting plates against vehicle<br />
frame (FIG. 15-1).<br />
5. Remove the split loom from RH<br />
side mounting plate (FIG. 14-<br />
1). Repeat for LH side mounting<br />
plate. Save the split loom to<br />
reinstall.<br />
WARNING<br />
!<br />
Liftgate is shipped from factory with mounting plates bolted to the main frame.<br />
Weld the mounting plates as shown in illustrations before opertaing Liftgate.<br />
CAUTION<br />
Prevent damage to hydraulic hoses. Before welding next to hydraulic hoses,<br />
protect with heat-resistant cover.<br />
CAUTION<br />
When using electrical welder to weld on mounting plates, make sure the welder<br />
ground lead is connected directly to the mounting plate, as close as possible<br />
to the place being welded. Failure to comply can result in damaged cylinders<br />
and electrical parts.<br />
VEHICLE FRAME<br />
(TYPICAL TRUCK<br />
FRAME SHOWN)<br />
MOUNTING<br />
PLATE<br />
MAIN FRAME<br />
(CUT-AWAY VIEW)<br />
SPLIT LOOM<br />
LOCK NUT<br />
CAP SCREW<br />
FLAT<br />
UNBOLTING MOUNTING PLATE<br />
(RH SIDE SHOWN)<br />
FIG. 14-1<br />
11921 Slauson Ave. Santa Fe Springs, CA. 90670 (800) 227-4116 FAX (888) 771-7713<br />
14