ecoTEC pro - Vaillant
ecoTEC pro - Vaillant
ecoTEC pro - Vaillant

Create successful ePaper yourself
Turn your PDF publications into a flip-book with our unique Google optimized e-Paper software.
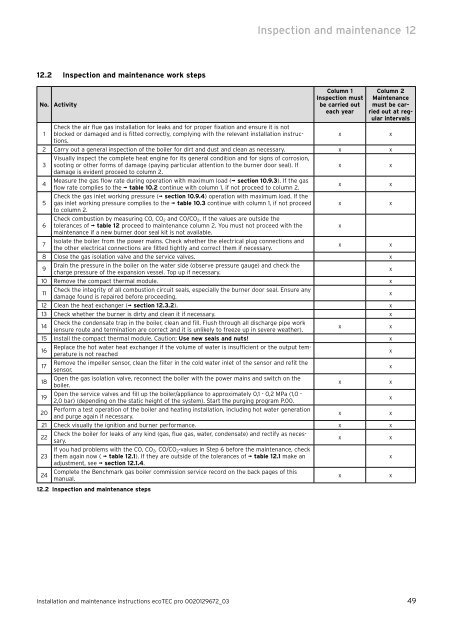
12.2 Inspection and maintenance work steps<br />
No. Activity<br />
Inspection and maintenance 12<br />
Column 1<br />
Inspection must<br />
be carried out<br />
each year<br />
Column 2<br />
Maintenance<br />
must be carried<br />
out at regular<br />
intervals<br />
1<br />
Check the air flue gas installation for leaks and for <strong>pro</strong>per fixation and ensure it is not<br />
blocked or damaged and is fitted correctly, complying with the relevant installation instructions.<br />
x x<br />
2 Carry out a general inspection of the boiler for dirt and dust and clean as necessary.<br />
Visually inspect the complete heat engine for its general condition and for signs of corrosion,<br />
x x<br />
3 sooting or other forms of damage (paying particular attention to the burner door seal). If<br />
damage is evident <strong>pro</strong>ceed to column 2.<br />
x x<br />
4<br />
Measure the gas flow rate during operation with maximum load (¬ section 10.9.3). If the gas<br />
flow rate complies to the ¬ table 10.2 continue with column 1, if not <strong>pro</strong>ceed to column 2.<br />
Check the gas inlet working pressure (¬ section 10.9.4) operation with maximum load. If the<br />
x x<br />
5 gas inlet working pressure complies to the ¬ table 10.3 continue with column 1, if not <strong>pro</strong>ceed<br />
to column 2.<br />
x x<br />
Check combustion by measuring CO, CO2 and CO/CO2. If the values are outside the<br />
6 tolerances of ¬ table 12 <strong>pro</strong>ceed to maintenance column 2. You must not <strong>pro</strong>ceed with the<br />
maintenance if a new burner door seal kit is not available.<br />
x<br />
7<br />
Isolate the boiler from the power mains. Check whether the electrical plug connections and<br />
the other electrical connections are fitted tightly and correct them if necessary.<br />
x x<br />
8 Close the gas isolation valve and the service valves. x<br />
9<br />
Drain the pressure in the boiler on the water side (observe pressure gauge) and check the<br />
charge pressure of the expansion vessel. Top up if necessary.<br />
x<br />
10 Remove the compact thermal module. x<br />
11<br />
Check the integrity of all combustion circuit seals, especially the burner door seal. Ensure any<br />
damage found is repaired before <strong>pro</strong>ceeding.<br />
x<br />
12 Clean the heat exchanger (¬ section 12.3.2). x<br />
13 Check whether the burner is dirty and clean it if necessary. x<br />
14<br />
Check the condensate trap in the boiler, clean and fill. Flush through all discharge pipe work<br />
(ensure route and termination are correct and it is unlikely to freeze up in severe weather).<br />
x x<br />
15 Install the compact thermal module. Caution: Use new seals and nuts! x<br />
16<br />
Replace the hot water heat exchanger if the volume of water is insufficient or the output temperature<br />
is not reached<br />
x<br />
17<br />
Remove the impeller sensor, clean the filter in the cold water inlet of the sensor and refit the<br />
sensor.<br />
x<br />
18<br />
Open the gas isolation valve, reconnect the boiler with the power mains and switch on the<br />
boiler.<br />
x x<br />
19<br />
Open the service valves and fill up the boiler/appliance to ap<strong>pro</strong>ximately 0,1 - 0,2 MPa (1,0 -<br />
2,0 bar) (depending on the static height of the system). Start the purging <strong>pro</strong>gram P.00.<br />
x<br />
20<br />
Perform a test operation of the boiler and heating installation, including hot water generation<br />
and purge again if necessary.<br />
x x<br />
21 Check visually the ignition and burner performance. x x<br />
22<br />
Check the boiler for leaks of any kind (gas, flue gas, water, condensate) and rectify as necessary.<br />
x x<br />
If you had <strong>pro</strong>blems with the CO, CO2, CO/CO2-values in Step 6 before the maintenance, check<br />
23 them again now ( ¬ table 12.1). If they are outside of the tolerances of ¬ table 12.1 make an<br />
adjustment, see ¬ section 12.1.4.<br />
x<br />
24<br />
Complete the Benchmark gas boiler commission service record on the back pages of this<br />
manual.<br />
x x<br />
12.2 Inspection and maintenance steps<br />
Installation and maintenance instructions <strong>ecoTEC</strong> <strong>pro</strong> 0020129672_03 49