

CSP Gateway Configuration Guide - InterSystems Documentation
CSP Gateway Configuration Guide - InterSystems Documentation
CSP Gateway Configuration Guide - InterSystems Documentation

You also want an ePaper? Increase the reach of your titles
YUMPU automatically turns print PDFs into web optimized ePapers that Google loves.
<strong>CSP</strong> Web <strong>Gateway</strong> Management Page<br />
file in /Accounts/Invoices and there is no configuration for /Accounts/Invoices, the <strong>CSP</strong> <strong>Gateway</strong> uses the configuration<br />
defined for /Accounts. If this is not defined, the configuration for the default path of / is used.<br />
2.1.9.1 Adding an Application Path<br />
To configure the path to an application:<br />
1. On the Web <strong>Gateway</strong> Management page, click Application Access.<br />
2. Click Add Application. Note that many parameters have default settings.<br />
3. In the Application Path text box enter a unique path for the application. This path is the path which appears in the<br />
application URLs.<br />
Note:<br />
A Caché installation creates a new /csp configuration. If you have configured /csp as your application, your<br />
configuration is overwritten when you install a new build of Caché. To maintain your application configuration,<br />
enter a path other than /csp.<br />
Any directory under /csp works fine, such as /csp/myapplication, but the path cannot contain any dots (periods).<br />
These lead to ambiguity for the <strong>CSP</strong> <strong>Gateway</strong>. In this example: /csp/samples/menu.csp/csp/aaa/bbb/ccc.cls,<br />
the <strong>CSP</strong> <strong>Gateway</strong> could either interpret this as a request for /csp/samples/menu.csp/csp/aaa/bbb/ccc.cls or as<br />
a REST request for/csp/samples/menu.csp (where PATH_INFO is /csp/aaa/bbb/ccc.cls). The <strong>Gateway</strong>,<br />
working in the web server environment, has no way of resolving these ambiguities.<br />
<strong>CSP</strong> is case sensitive. Specify your path names consistently when you are configuring <strong>CSP</strong>.<br />
4. Enter the other configuration path and server parameters (described in the tables below) for this application.<br />
5. When you have finished, click Save <strong>Configuration</strong>. Changes you make to the application configuration take effect as<br />
new user sessions are created for that application path. Existing users are unaffected.<br />
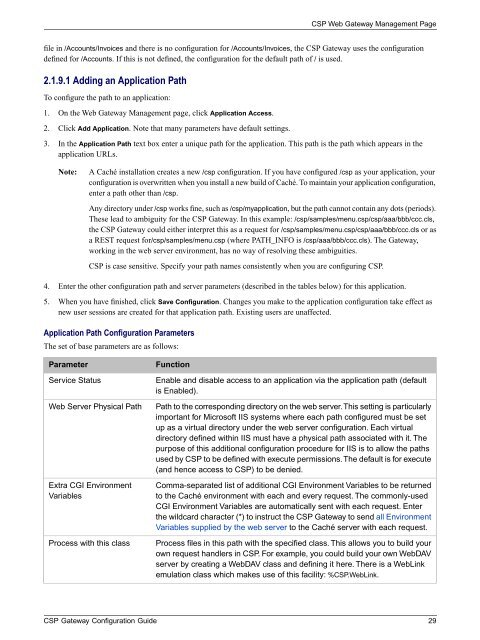
Application Path <strong>Configuration</strong> Parameters<br />
The set of base parameters are as follows:<br />
Parameter<br />
Service Status<br />
Web Server Physical Path<br />
Extra CGI Environment<br />
Variables<br />
Process with this class<br />
Function<br />
Enable and disable access to an application via the application path (default<br />
is Enabled).<br />
Path to the corresponding directory on the web server.This setting is particularly<br />
important for Microsoft IIS systems where each path configured must be set<br />
up as a virtual directory under the web server configuration. Each virtual<br />
directory defined within IIS must have a physical path associated with it. The<br />
purpose of this additional configuration procedure for IIS is to allow the paths<br />
used by <strong>CSP</strong> to be defined with execute permissions.The default is for execute<br />
(and hence access to <strong>CSP</strong>) to be denied.<br />
Comma-separated list of additional CGI Environment Variables to be returned<br />
to the Caché environment with each and every request. The commonly-used<br />
CGI Environment Variables are automatically sent with each request. Enter<br />
the wildcard character (*) to instruct the <strong>CSP</strong> <strong>Gateway</strong> to send all Environment<br />
Variables supplied by the web server to the Caché server with each request.<br />
Process files in this path with the specified class. This allows you to build your<br />
own request handlers in <strong>CSP</strong>. For example, you could build your own WebDAV<br />
server by creating a WebDAV class and defining it here. There is a WebLink<br />
emulation class which makes use of this facility: %<strong>CSP</strong>.WebLink.<br />
<strong>CSP</strong> <strong>Gateway</strong> <strong>Configuration</strong> <strong>Guide</strong> 29


