Bill Acceptor
Bill Acceptor
Bill Acceptor

You also want an ePaper? Increase the reach of your titles
YUMPU automatically turns print PDFs into web optimized ePapers that Google loves.
CHAPTER 4 Trouble Shooting and Diagnostics<br />
4-2. Trouble Shooting<br />
4-2-1. General Problems<br />
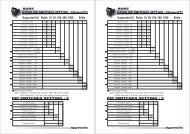
Symptoms/Error Messages Possible Causes Corrective Action<br />
<strong>Bill</strong> <strong>Acceptor</strong> is not working<br />
(does not take any bills).<br />
<strong>Bill</strong> is jamming often.<br />
Low acceptance rates.<br />
No external power is applied to the<br />
bill acceptor<br />
Wrong or inappropriate connections<br />
Software is not downloaded.<br />
Sensor/MAG/CPU/Power Supply<br />
board failure.<br />
Entrance Sensor is not working or<br />
foreign object in the entrance.<br />
Drive belts are dirty or damaged.<br />
Pressure roller spring is loose or<br />
missing.<br />
Foreign object in the transport path<br />
and inside the Cash Box.<br />
<strong>Bill</strong> guide is not inappropriate.<br />
<strong>Bill</strong> is wider than 72 mm or narrower<br />
than 65mm<br />
(out of DBV-30X specifications).<br />
Dirt and stain on the rollers, belts and<br />
lenses.<br />
Sensors need to be clean and adjust.<br />
The unit has been disassembled and<br />
the Adjustment is not done after it is<br />
reassembled.<br />
Using wrong software or old version<br />
software.<br />
<strong>Bill</strong>s are not to be accepted in this<br />
software.<br />
Verify that the appropriate input voltage and<br />
ground are connected to appropriate pins on<br />
the main connector.<br />
Check the connections of all harnesses and<br />
connectors. Check for any bent, missing or<br />
damaged pins in the connectors. Check the<br />
specified voltage is used in appropriate pin.<br />
Download the correct software. Refer to<br />
chapter 5 for download instructions.<br />
Refer to 5-2. Diagnostics and conduct Running<br />
Test. If the test result is NG, replace<br />
Sensor/MAG/CPU/Power Supply board. Make<br />
sure to adjust the sensors after Sensor<br />
/MAG/CPU/Power Supply board is replaced.<br />
Remove the foreign object and clean the<br />
sensor. Perform the acceptor sensor test. Refer<br />
to 4-3-6. <strong>Acceptor</strong> Sensor Test. If the test result<br />
is NG, replace CPU board. Refer to 3-1. How<br />
to Remove the Circuit Board.<br />
Clean the drive belts and the pressure rollers.<br />
Replace as necessary. Refer to 2-5.<br />
Preventive Maintenance.<br />
Check the pressure roller springs with finger<br />
and replace as necessary.<br />
Clean the transport path and the cash box to<br />
remove the foreign object. Refer to 2-5.<br />
Preventive Maintenance.<br />
Seat the transport unit all the way back so that<br />
the latches of transport unit release levers are<br />
locked in the frame.<br />
Use only bills within DBV-30X specifications.<br />
Clean the transport path. Refer to 2-5.<br />
Preventive Maintenance.<br />
Clean the transport path. Refer to 2-5.<br />
Preventive Maintenance.<br />
Follow the instructions on 5-1. Adjustment to<br />
adjust the sensors.<br />
Make sure to adjust the sensors after reassemble<br />
the DBV-30X.<br />
Make sure if the programmed software is the<br />
latest version and it supports the bills you wish to<br />
be accepted.<br />
Check the specifications, and make sure the bills<br />
are to be accepted in the software (check<br />
denomination/issuing year).<br />
4 - 4