Operator's Manual-AVEA - Static Content
Operator's Manual-AVEA - Static Content
Operator's Manual-AVEA - Static Content

You also want an ePaper? Increase the reach of your titles
YUMPU automatically turns print PDFs into web optimized ePapers that Google loves.
Service <strong>Manual</strong> 85<br />
Chapter 7 Removal & Replacement<br />
WARNIINGS<br />
• Disconnect all electrical power, air, and oxygen sources before attempting<br />
any disassembly. Failure to do so could result in injury to the service<br />
technician or damage to equipment.<br />
• After replacement of any assembly(ies), always repeat the Operational<br />
Verification Procedure (refer to chapter 3), then allow a "burn-in" period and<br />
repeat the Operational Verification Procedure.<br />
Interior Access<br />
1. If connected, remove cables leading to RS-232 and Analog outputs ports of the<br />
ventilator.<br />
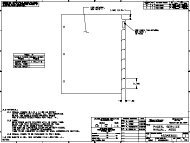
2. Remove the seven screws indicated in Figure 8-1.<br />
3. Slide the cover off of the unit applying slight pressure to the outside bottom<br />
portion of the cover.<br />
4. Remove the two screws indicated in Figure 8-2. The standoff tubes will drop<br />
free when the screws are removed.<br />
NOTE<br />
The front portion will swing forward freely when the screws are removed. Take care<br />
to ensure that the front swings slowly to avoid damage to the unit.<br />
5. The front portion of the unit will drop forward, stopping when the end of the<br />
retaining cord is reached. See Figure 8-3.<br />
Flow Valve Assembly Removal<br />
1. Disconnect hoses and connectors to the assembly.<br />
2. Remove the four screws from the flow valve bracket, indicated in Figure 8-4.<br />
3. Remove the Flow Valve Assembly from the unit.<br />
4. To install, reverse removal procedure.<br />
Control PCB Removal<br />
1. Disconnect all hoses and connectors from the board.<br />
2. Remove screw shown in Figure 8-5.<br />
3. Lift board carefully from four retainer points.<br />
4. Remove board from unit.<br />
5. To install, reverse removal procedure.<br />
L2342 Revision B November 2004