Competence.Work Parquet - 1926 Wood Flooring
Competence.Work Parquet - 1926 Wood Flooring
Competence.Work Parquet - 1926 Wood Flooring

Create successful ePaper yourself
Turn your PDF publications into a flip-book with our unique Google optimized e-Paper software.
68<br />
PARKETT-HANDBUCH<br />
8. THE INSTALLATION OF BAUWERK PARQUET<br />
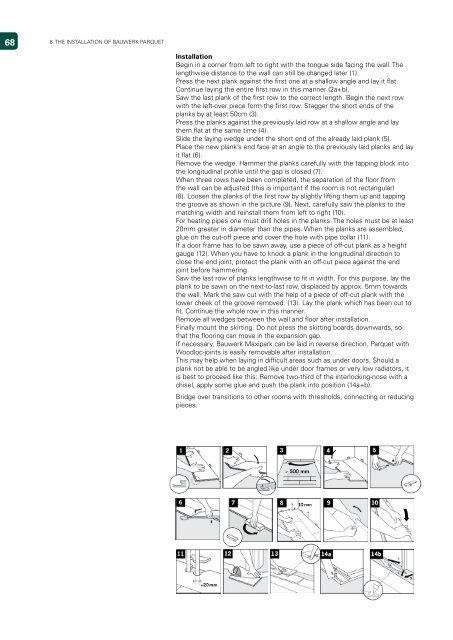
Installation<br />
Begin in a corner from left to right with the tongue side facing the wall. The<br />
lengthwise distance to the wall can still be changed later (1).<br />
Press the next plank against the first one at a shallow angle and lay it flat.<br />
Continue laying the entire first row in this manner (2a+b).<br />
Saw the last plank of the first row to the correct length. Begin the next row<br />
with the left-over piece form the first row. Stagger the short ends of the<br />
planks by at least 50cm (3).<br />
Press the planks against the previously laid row at a shallow angle and lay<br />
them flat at the same time (4).<br />
Slide the laying wedge under the short end of the already laid plank (5).<br />
Place the new plank’s end face at an angle to the previously laid planks and lay<br />
it flat (6).<br />
Remove the wedge. Hammer the planks carefully with the tapping block into<br />
the longitudinal profile until the gap is closed (7).<br />
When three rows have been completed, the separation of the floor from<br />
the wall can be adjusted (this is important if the room is not rectangular)<br />
(8). Loosen the planks of the first row by slightly lifting them up and tapping<br />
the groove as shown in the picture (9). Next, carefully saw the planks to the<br />
matching width and reinstall them from left to right (10).<br />
For heating pipes one must drill holes in the planks. The holes must be at least<br />
20mm greater in diameter than the pipes. When the planks are assembled,<br />
glue on the cut-off piece and cover the hole with pipe collar (11).<br />
If a door frame has to be sawn away, use a piece of off-cut plank as a height<br />
gauge (12). When you have to knock a plank in the longitudinal direction to<br />
close the end joint, protect the plank with an off-cut piece against the end<br />
joint before hammering.<br />
Saw the last row of planks lengthwise to fit in width. For this purpose, lay the<br />
plank to be sawn on the next-to-last row, displaced by approx. 5mm towards<br />
the wall. Mark the saw cut with the help of a piece of off-cut plank with the<br />
lower cheek of the groove removed. (13). Lay the plank which has been cut to<br />
fit. Continue the whole row in this manner.<br />
Remove all wedges between the wall and floor after installation.<br />
Finally mount the skirting. Do not press the skirting boards downwards, so<br />
that the flooring can move in the expansion gap.<br />
If necessary, Bauwerk Maxipark can be laid in reverse direction. <strong>Parquet</strong> with<br />
<strong>Wood</strong>loc-joints is easily removable after installation.<br />
This may help when laying in difficult areas such as under doors. Should a<br />
plank not be able to be angled like under door frames or very low radiators, it<br />
is best to proceed like this: Remove two-third of the interlocking-nose with a<br />
chisel, apply some glue and push the plank into position (14a+b).<br />
Bridge over transitions to other rooms with thresholds, connecting or reducing<br />
pieces.