Competence.Work Parquet - 1926 Wood Flooring
Competence.Work Parquet - 1926 Wood Flooring
Competence.Work Parquet - 1926 Wood Flooring

You also want an ePaper? Increase the reach of your titles
YUMPU automatically turns print PDFs into web optimized ePapers that Google loves.
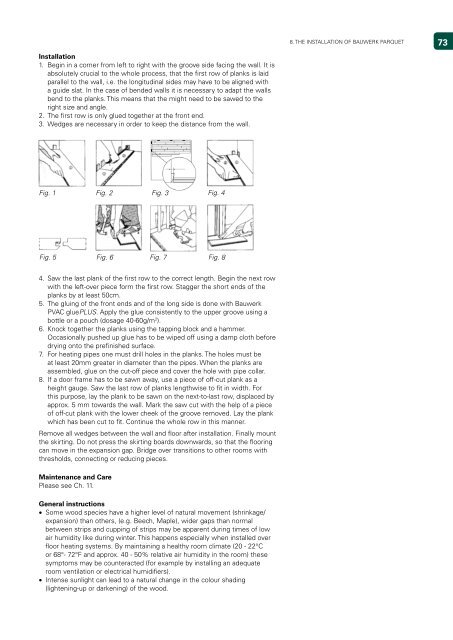
Installation<br />
1. Begin in a corner from left to right with the groove side facing the wall. It is<br />
absolutely crucial to the whole process, that the first row of planks is laid<br />
parallel to the wall, i.e. the longitudinal sides may have to be aligned with<br />
a guide slat. In the case of bended walls it is necessary to adapt the walls<br />
bend to the planks. This means that the might need to be sawed to the<br />
right size and angle.<br />
2. The first row is only glued together at the front end.<br />
3. Wedges are necessary in order to keep the distance from the wall.<br />
Fig. 1 Fig. 2<br />
Fig. 5<br />
4. Saw the last plank of the first row to the correct length. Begin the next row<br />
with the left-over piece form the first row. Stagger the short ends of the<br />
planks by at least 50cm.<br />
5. The gluing of the front ends and of the long side is done with Bauwerk<br />
PVAC gluePLUS. Apply the glue consistently to the upper groove using a<br />
bottle or a pouch (dosage 40-60g/m2 ).<br />
6. Knock together the planks using the tapping block and a hammer.<br />
Occasionally pushed up glue has to be wiped off using a damp cloth before<br />
drying onto the prefinished surface.<br />
7. For heating pipes one must drill holes in the planks. The holes must be<br />
at least 20mm greater in diameter than the pipes. When the planks are<br />
assembled, glue on the cut-off piece and cover the hole with pipe collar.<br />
8. If a door frame has to be sawn away, use a piece of off-cut plank as a<br />
height gauge. Saw the last row of planks lengthwise to fit in width. For<br />
this purpose, lay the plank to be sawn on the next-to-last row, displaced by<br />
approx. 5 mm towards the wall. Mark the saw cut with the help of a piece<br />
of off-cut plank with the lower cheek of the groove removed. Lay the plank<br />
which has been cut to fit. Continue the whole row in this manner.<br />
Remove all wedges between the wall and floor after installation. Finally mount<br />
the skirting. Do not press the skirting boards downwards, so that the flooring<br />
can move in the expansion gap. Bridge over transitions to other rooms with<br />
thresholds, connecting or reducing pieces.<br />
Maintenance and Care<br />
Please see Ch. 11.<br />
Fig. 3<br />
Fig. 4<br />
Fig. 6 Fig. 7<br />
Fig. 8<br />
General instructions<br />
• Some wood species have a higher level of natural movement (shrinkage/<br />
expansion) than others, (e.g. Beech, Maple), wider gaps than normal<br />
between strips and cupping of strips may be apparent during times of low<br />
air humidity like during winter. This happens especially when installed over<br />
floor heating systems. By maintaining a healthy room climate (20 - 22°C<br />
or 68°- 72°F and approx. 40 - 50% relative air humidity in the room) these<br />
symptoms may be counteracted (for example by installing an adequate<br />
room ventilation or electrical humidifiers).<br />
• Intense sunlight can lead to a natural change in the colour shading<br />
(lightening-up or darkening) of the wood.<br />
8. THE INSTALLATION OF BAUWERK PARQUET<br />
7