Competence.Work Parquet - 1926 Wood Flooring
Competence.Work Parquet - 1926 Wood Flooring
Competence.Work Parquet - 1926 Wood Flooring

You also want an ePaper? Increase the reach of your titles
YUMPU automatically turns print PDFs into web optimized ePapers that Google loves.
100<br />
PARKETT-HANDBUCH<br />
12. REPAIRS AND RENOVATION<br />
6<br />
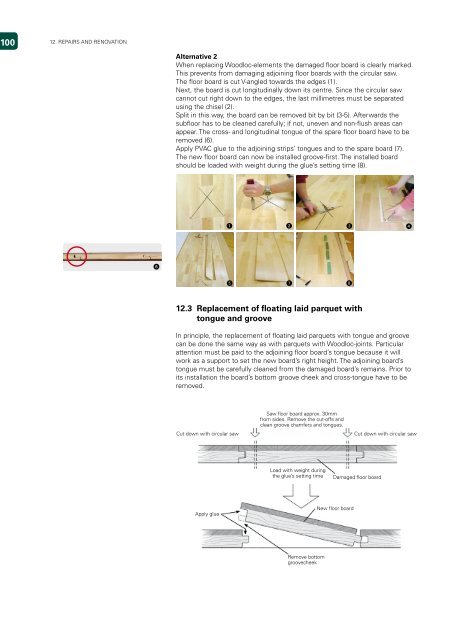
Alternative 2<br />
When replacing <strong>Wood</strong>loc-elements the damaged floor board is clearly marked.<br />
This prevents from damaging adjoining floor boards with the circular saw.<br />
The floor board is cut V-angled towards the edges (1).<br />
Next, the board is cut longitudinally down its centre. Since the circular saw<br />
cannot cut right down to the edges, the last millimetres must be separated<br />
using the chisel (2).<br />
Split in this way, the board can be removed bit by bit (3-5). Afterwards the<br />
subfloor has to be cleaned carefully; if not, uneven and non-flush areas can<br />
appear. The cross- and longitudinal tongue of the spare floor board have to be<br />
removed (6).<br />
Apply PVAC glue to the adjoining strips’ tongues and to the spare board (7).<br />
The new floor board can now be installed groove-first. The installed board<br />
should be loaded with weight during the glue’s setting time (8).<br />
1 2 3 4<br />
5 7 8<br />
12. Replacement of floating laid parquet with<br />
tongue and groove<br />
In principle, the replacement of floating laid parquets with tongue and groove<br />
can be done the same way as with parquets with <strong>Wood</strong>loc-joints. Particular<br />
attention must be paid to the adjoining floor board’s tongue because it will<br />
work as a support to set the new board’s right height. The adjoining board’s<br />
tongue must be carefully cleaned from the damaged board’s remains. Prior to<br />
its installation the board’s bottom groove cheek and cross-tongue have to be<br />
removed.<br />
Cut down with circular saw<br />
Apply glue<br />
Saw floor board approx. 30mm<br />
from sides. Remove the cut-offs and<br />
clean groove chamfers and tongues.<br />
Load with weight during<br />
the glue’s setting time Damaged floor board<br />
Remove bottom<br />
groovecheek<br />
New floor board<br />
Cut down with circular saw