IronPort - daily management guide - AsyncOS 7.6.1

You also want an ePaper? Increase the reach of your titles
YUMPU automatically turns print PDFs into web optimized ePapers that Google loves.
Configuring the Cisco <strong>IronPort</strong> Spam Quarantines Feature<br />
4-18<br />
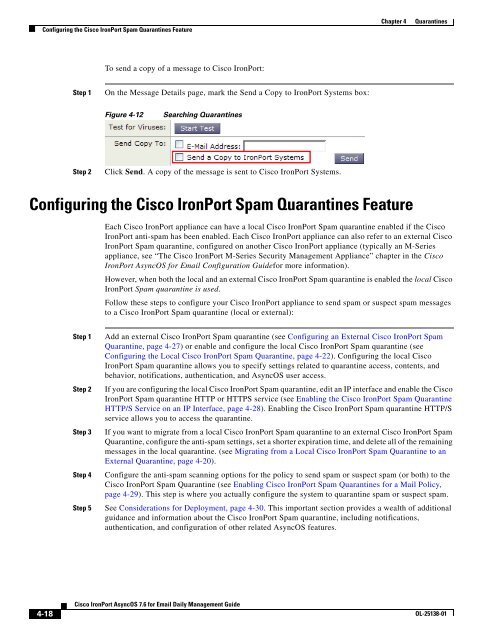
To send a copy of a message to Cisco <strong>IronPort</strong>:<br />
Step 1 On the Message Details page, mark the Send a Copy to <strong>IronPort</strong> Systems box:<br />
Figure 4-12 Searching Quarantines<br />
Step 2 Click Send. A copy of the message is sent to Cisco <strong>IronPort</strong> Systems.<br />
Configuring the Cisco <strong>IronPort</strong> Spam Quarantines Feature<br />
Cisco <strong>IronPort</strong> <strong>AsyncOS</strong> 7.6 for Email Daily Management Guide<br />
Chapter 4 Quarantines<br />
Each Cisco <strong>IronPort</strong> appliance can have a local Cisco <strong>IronPort</strong> Spam quarantine enabled if the Cisco<br />
<strong>IronPort</strong> anti-spam has been enabled. Each Cisco <strong>IronPort</strong> appliance can also refer to an external Cisco<br />
<strong>IronPort</strong> Spam quarantine, configured on another Cisco <strong>IronPort</strong> appliance (typically an M-Series<br />
appliance, see “The Cisco <strong>IronPort</strong> M-Series Security Management Appliance” chapter in the Cisco<br />
<strong>IronPort</strong> <strong>AsyncOS</strong> for Email Configuration Guidefor more information).<br />
However, when both the local and an external Cisco <strong>IronPort</strong> Spam quarantine is enabled the local Cisco<br />
<strong>IronPort</strong> Spam quarantine is used.<br />
Follow these steps to configure your Cisco <strong>IronPort</strong> appliance to send spam or suspect spam messages<br />
to a Cisco <strong>IronPort</strong> Spam quarantine (local or external):<br />
Step 1 Add an external Cisco <strong>IronPort</strong> Spam quarantine (see Configuring an External Cisco <strong>IronPort</strong> Spam<br />
Quarantine, page 4-27) or enable and configure the local Cisco <strong>IronPort</strong> Spam quarantine (see<br />
Configuring the Local Cisco <strong>IronPort</strong> Spam Quarantine, page 4-22). Configuring the local Cisco<br />
<strong>IronPort</strong> Spam quarantine allows you to specify settings related to quarantine access, contents, and<br />
behavior, notifications, authentication, and <strong>AsyncOS</strong> user access.<br />
Step 2 If you are configuring the local Cisco <strong>IronPort</strong> Spam quarantine, edit an IP interface and enable the Cisco<br />
<strong>IronPort</strong> Spam quarantine HTTP or HTTPS service (see Enabling the Cisco <strong>IronPort</strong> Spam Quarantine<br />
HTTP/S Service on an IP Interface, page 4-28). Enabling the Cisco <strong>IronPort</strong> Spam quarantine HTTP/S<br />
service allows you to access the quarantine.<br />
Step 3 If you want to migrate from a local Cisco <strong>IronPort</strong> Spam quarantine to an external Cisco <strong>IronPort</strong> Spam<br />
Quarantine, configure the anti-spam settings, set a shorter expiration time, and delete all of the remaining<br />
messages in the local quarantine. (see Migrating from a Local Cisco <strong>IronPort</strong> Spam Quarantine to an<br />
External Quarantine, page 4-20).<br />
Step 4 Configure the anti-spam scanning options for the policy to send spam or suspect spam (or both) to the<br />
Cisco <strong>IronPort</strong> Spam Quarantine (see Enabling Cisco <strong>IronPort</strong> Spam Quarantines for a Mail Policy,<br />
page 4-29). This step is where you actually configure the system to quarantine spam or suspect spam.<br />
Step 5 See Considerations for Deployment, page 4-30. This important section provides a wealth of additional<br />
guidance and information about the Cisco <strong>IronPort</strong> Spam quarantine, including notifications,<br />
authentication, and configuration of other related <strong>AsyncOS</strong> features.<br />
OL-25138-01