- Page 1:
Cervical Cancer PreventionGuideline
- Page 5:
TABLE OF CONTENTSPREFACE AND ACKNOW
- Page 8:
How to High-Level Disinfect Surgica
- Page 11 and 12:
Table C-2Figure C-1Preparing a Dilu
- Page 13 and 14:
PREFACE AND ACKNOWLEDGMENTSThis ref
- Page 15 and 16:
ONEINTRODUCTIONMAGNITUDE OF THE PRO
- Page 17 and 18:
IntroductionFigure 1-3. Incidence o
- Page 19 and 20:
Introductionprevalence areas, a sta
- Page 21 and 22:
Table 1-2. Reduction in Cumulative
- Page 23 and 24:
Introductiontheir performance was t
- Page 25 and 26:
Introductionlesions, or a false pos
- Page 27 and 28:
IntroductionCompared to other metho
- Page 29 and 30:
Introductionsignificantly to women
- Page 31 and 32:
IntroductionBelinson JL et al. 2001
- Page 33 and 34:
IntroductionMitchell MF et al. 1998
- Page 35 and 36:
IntroductionYlitalo N et al. 1999.
- Page 37 and 38:
TWOHUMAN PAPILLOMAVIRUS AND CERVICA
- Page 39 and 40:
Human Papillomavirus and Cervical C
- Page 41 and 42:
Human Papillomavirus and Cervical C
- Page 43 and 44:
Human Papillomavirus and Cervical C
- Page 45 and 46:
Human Papillomavirus and Cervical C
- Page 47 and 48:
THREEPATHOPHYSIOLOGY OF CERVICAL CA
- Page 49 and 50:
With the onset of puberty, whichis
- Page 51 and 52:
Pathophysiology of Cervical Cancerp
- Page 53 and 54: Pathophysiology of Cervical CancerP
- Page 55 and 56: Pathophysiology of Cervical CancerI
- Page 57 and 58: Pathophysiology of Cervical CancerR
- Page 59 and 60: FOURTALKING WITH WOMEN ABOUTCERVICA
- Page 61 and 62: Talking with Women About Cervical C
- Page 63 and 64: Talking with Women About Cervical C
- Page 65 and 66: Talking with Women About Cervical C
- Page 67 and 68: Talking with Women About Cervical C
- Page 69 and 70: FIVEPREVENTING INFECTIONS INHEALTHC
- Page 71 and 72: Preventing Infections in Healthcare
- Page 73 and 74: Preventing Infections in Healthcare
- Page 75 and 76: Preventing Infections in Healthcare
- Page 77 and 78: Preventing Infections in Healthcare
- Page 79 and 80: SIXCLIENT ASSESSMENT AND VIA TESTIN
- Page 81 and 82: Client Assessment and VIA TestingFi
- Page 83 and 84: Client Assessment and VIA TestingIN
- Page 85 and 86: Client Assessment and VIA Testingst
- Page 87 and 88: Client Assessment and VIA Testingsp
- Page 89 and 90: Client Assessment and VIA Testingth
- Page 91 and 92: SEVENTREATMENT AND FOLLOWUPBACKGROU
- Page 93 and 94: Treatment and Followupregardless of
- Page 95 and 96: Treatment and FollowupFigure 7-1. L
- Page 97 and 98: Treatment and FollowupTable 7-6. Co
- Page 99 and 100: Treatment and FollowupFigure 7-2 is
- Page 101 and 102: Treatment and Followup• Regulator
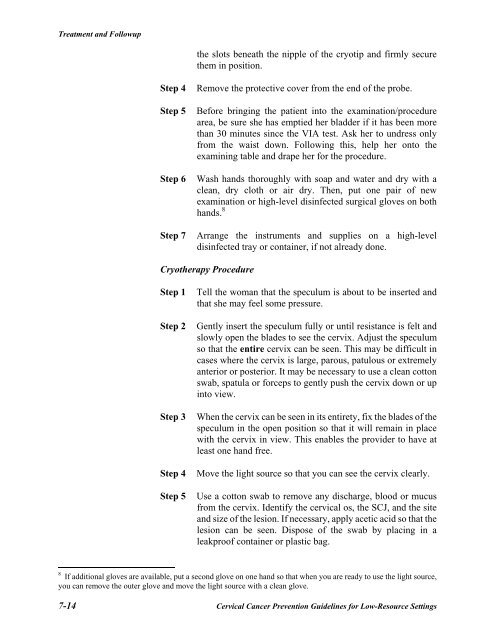
- Page 103: Treatment and FollowupCRYOTHERAPY P
- Page 107 and 108: Treatment and FollowupNote: When CO
- Page 109 and 110: Treatment and FollowupStep 5Advise
- Page 111 and 112: Treatment and FollowupBerget A, B A
- Page 113 and 114: APPENDIX ATESTS FOR CERVICAL CANCER
- Page 115 and 116: Tests for Cervical Cancer Screening
- Page 117 and 118: Tests for Cervical Cancer Screening
- Page 119 and 120: Tests for Cervical Cancer Screening
- Page 121 and 122: APPENDIX BSCREENING TEST QUALITIES
- Page 123 and 124: Screening Test Qualities and Their
- Page 125 and 126: APPENDIX CINFECTION PREVENTION PROC
- Page 127 and 128: Infection Prevention Processesfor m
- Page 129 and 130: Infection Prevention Processeswith
- Page 131 and 132: Infection Prevention ProcessesFigur
- Page 133 and 134: Table C-4. Preparing and Using Chem
- Page 135 and 136: Infection Prevention ProcessesStora
- Page 137 and 138: Infection Prevention Processes• h
- Page 139 and 140: APPENDIX DTECHNICAL OVERVIEW OF THE
- Page 141 and 142: Technical Overview of the Cryothera
- Page 143 and 144: Figure D-5. Removing Protector Tube
- Page 145 and 146: Technical Overview of the Cryothera
- Page 147 and 148: Figure D-11. Gas Cylinder Secured t
- Page 149 and 150: APPENDIX ETROUBLESHOOTING WITH THEC
- Page 151 and 152: Table E-1. Following-Up on Commonly
- Page 153 and 154: APPENDIX FPROCESSING SURGICAL GLOVE
- Page 155 and 156:
Processing Surgical GlovesTable F-1
- Page 157 and 158:
Processing Surgical GlovesSTEP 10:
- Page 159 and 160:
APPENDIX GPERFORMING BREAST AND PEL
- Page 161 and 162:
Performing Breast and Pelvic Examin
- Page 163 and 164:
Figure G-2. Breast Puckering or Dim
- Page 165 and 166:
Figure G-5. Checking for Nipple Dis
- Page 167 and 168:
Performing Breast and Pelvic Examin
- Page 169 and 170:
Performing Breast and Pelvic Examin
- Page 171 and 172:
Performing Breast and Pelvic Examin
- Page 173 and 174:
Performing Breast and Pelvic Examin
- Page 175 and 176:
Performing Breast and Pelvic Examin
- Page 177 and 178:
Performing Breast and Pelvic Examin
- Page 179 and 180:
Performing Breast and Pelvic Examin
- Page 181 and 182:
Figure G-18. Speculum in Place with
- Page 183 and 184:
Performing Breast and Pelvic Examin
- Page 185 and 186:
Performing Breast and Pelvic Examin
- Page 187 and 188:
Performing Breast and Pelvic Examin
- Page 189 and 190:
Performing Breast and Pelvic Examin
- Page 191 and 192:
Performing Breast and Pelvic Examin
- Page 193 and 194:
Performing Breast and Pelvic Examin
- Page 195 and 196:
Performing Breast and Pelvic Examin
- Page 197 and 198:
Performing Breast and Pelvic Examin
- Page 199 and 200:
Performing Breast and Pelvic Examin
- Page 201 and 202:
Performing Breast and Pelvic Examin
- Page 203 and 204:
Performing Breast and Pelvic Examin
- Page 205 and 206:
APPENDIX HPERCEIVED BARRIERS TO PRO
- Page 207 and 208:
AVAILABILITY OF BASIC SUPPLIES AND
- Page 209 and 210:
GLOSSARYAcetic AcidAcetowhite Chang
- Page 211 and 212:
PatulousSquamocolumnarJunction (SCJ
- Page 213 and 214:
ADDITIONAL READINGAlliance for Cerv
- Page 216:
innovating to save liveswww.jhpiego


