- Page 2 and 3:
DEAR VOLVO OWNERTHANK YOU FOR CHOOS
- Page 4 and 5:
Contents03 Climate controlGeneral i
- Page 6 and 7:
Contents09 Maintenance and serviceV
- Page 8 and 9:
IntroductionVolvo Cars and the envi
- Page 10 and 11:
IntroductionVolvo Cars and the envi
- Page 12 and 13:
SAFETY01
- Page 14 and 15:
01 SafetySeatbelts 01Seatbelt remin
- Page 16 and 17:
01 SafetyAirbag system 01Warning sy
- Page 18 and 19:
01 SafetyAirbags (SRS) 01SRS system
- Page 20 and 21:
01 SafetyActivating/deactivating th
- Page 22 and 23:
01 SafetySide airbags (SIPS bags) 0
- Page 24 and 25:
01 SafetyInflatable Curtain (IC) 01
- Page 26 and 27:
01 SafetyWHIPS 01Do not obstruct th
- Page 28 and 29:
01 SafetyWhen the systems deploy 01
- Page 30 and 31:
01 SafetyChild safety 01Location of
- Page 32 and 33:
01 SafetyChild safety 01Weight/age
- Page 34 and 35:
01 SafetyChild safety 01the belt is
- Page 36 and 37:
01 SafetyChild safety 01Mounting po
- Page 38 and 39:
INSTRUMENTS AND CONTROLS02
- Page 40 and 41:
02 Instruments and controlsOverview
- Page 42 and 43:
02 Instruments and controlsOverview
- Page 44 and 45:
02 Instruments and controlsCombined
- Page 46 and 47:
02 Instruments and controlsIndicato
- Page 48 and 49:
02 Instruments and controlsInformat
- Page 50 and 51:
02 Instruments and controlsSwitches
- Page 52 and 53:
02 Instruments and controlsLighting
- Page 54 and 55:
02 Instruments and controlsLeft-han
- Page 56 and 57:
02 Instruments and controlsRight-ha
- Page 58 and 59:
02 Instruments and controlsCruise c
- Page 60 and 61:
02 Instruments and controlsParking
- Page 62 and 63:
02 Instruments and controlsPower wi
- Page 64 and 65:
02 Instruments and controlsRearview
- Page 66 and 67:
02 Instruments and controlsRearview
- Page 68 and 69:
02 Instruments and controlsPower su
- Page 70 and 71:
CLIMATE CONTROL03
- Page 72 and 73:
03 Climate controlGeneral informati
- Page 74 and 75:
03 Climate controlElectronic Climat
- Page 76 and 77:
03 Climate controlFuel-driven heate
- Page 78 and 79:
03 Climate control0377
- Page 80 and 81:
INTERIOR04
- Page 82 and 83:
04 InteriorFront seatsPower seat (o
- Page 84 and 85:
04 InteriorInterior lightingVanity
- Page 86 and 87:
04 InteriorStorage spaces in the pa
- Page 88 and 89:
04 InteriorStorage spaces in the pa
- Page 90 and 91:
04 InteriorRear seatRear seats - se
- Page 92 and 93:
04 InteriorCargo areaExtending the
- Page 94 and 95:
04 InteriorCargo areaSafety netFitt
- Page 96 and 97:
04 InteriorCargo areaElectric socke
- Page 98 and 99:
04 Interior0497
- Page 100 and 101:
LOCKS AND ALARM05
- Page 102 and 103:
05 Locks and alarmKeys and remote c
- Page 104 and 105:
05 Locks and alarmLocking and unloc
- Page 106 and 107:
05 Locks and alarmLocking and unloc
- Page 108 and 109:
05 Locks and alarmChild safety lock
- Page 110 and 111:
05 Locks and alarmAlarm (option)Aut
- Page 112 and 113:
STARTING AND DRIVING06
- Page 114 and 115:
06 Starting and drivingGeneralDrivi
- Page 116 and 117: 06 Starting and drivingRefuellingFu
- Page 118 and 119: 06 Starting and drivingStarting the
- Page 120 and 121: 06 Starting and drivingAutomatic ge
- Page 122 and 123: 06 Starting and drivingAutomatic ge
- Page 124 and 125: 06 Starting and drivingBrake system
- Page 126 and 127: 06 Starting and drivingStability an
- Page 128 and 129: 06 Starting and drivingParking assi
- Page 130 and 131: 06 Starting and drivingBlind Spot I
- Page 132 and 133: 06 Starting and drivingBlind Spot I
- Page 134 and 135: 06 Starting and drivingTowing and r
- Page 136 and 137: 06 Starting and drivingDriving with
- Page 138 and 139: 06 Starting and drivingTowing equip
- Page 140 and 141: 06 Starting and drivingDetachable t
- Page 142 and 143: 06 Starting and drivingDetachable t
- Page 144 and 145: 06 Starting and drivingDetachable t
- Page 146 and 147: 06 Starting and drivingLoadingLoad
- Page 148 and 149: 06 Starting and drivingAdjusting he
- Page 150 and 151: 06 Starting and driving06149
- Page 152 and 153: WHEELS AND TYRES07
- Page 154 and 155: 07 Wheels and tyresGeneralMore even
- Page 156 and 157: 07 Wheels and tyresTyre pressureRec
- Page 158 and 159: 07 Wheels and tyresWarning triangle
- Page 160 and 161: 07 Wheels and tyresWarning triangle
- Page 162 and 163: 07 Wheels and tyresChanging wheelsF
- Page 164 and 165: 07 Wheels and tyresTyre pressure mo
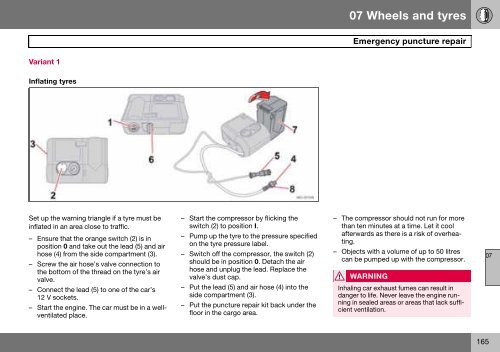
- Page 168 and 169: 07 Wheels and tyresEmergency punctu
- Page 170 and 171: 07 Wheels and tyresEmergency punctu
- Page 172 and 173: 07 Wheels and tyresEmergency punctu
- Page 174 and 175: 07 Wheels and tyres07173
- Page 176 and 177: CAR CARE08
- Page 178 and 179: 08 Car careCleaningPolishing and wa
- Page 180 and 181: 08 Car careTouching up paintworkPai
- Page 182 and 183: 08 Car care08181
- Page 184 and 185: MAINTENANCE AND SERVICE09
- Page 186 and 187: 09 Maintenance and serviceSelf-main
- Page 188 and 189: 09 Maintenance and serviceDiesel 09
- Page 190 and 191: 09 Maintenance and serviceOils and
- Page 192 and 193: 09 Maintenance and serviceOils and
- Page 194 and 195: 09 Maintenance and serviceBattery 0
- Page 196 and 197: 09 Maintenance and serviceBattery 0
- Page 198 and 199: 09 Maintenance and serviceReplacing
- Page 200 and 201: 09 Maintenance and serviceReplacing
- Page 202 and 203: 09 Maintenance and serviceReplacing
- Page 204 and 205: 09 Maintenance and serviceFuses09Re
- Page 206 and 207: 09 Maintenance and serviceFuses09Re
- Page 208 and 209: 09 Maintenance and serviceFuses0921
- Page 210 and 211: 09 Maintenance and serviceFuses0926
- Page 212 and 213: INFOTAINMENT SYSTEM10
- Page 214 and 215: 10 Infotainment systemControl panel
- Page 216 and 217:
10 Infotainment systemControl panel
- Page 218 and 219:
10 Infotainment systemAudio system
- Page 220 and 221:
10 Infotainment systemAudio system
- Page 222 and 223:
CLEAR10 Infotainment systemRadio fu
- Page 224 and 225:
10 Infotainment systemRadio functio
- Page 226 and 227:
10 Infotainment systemRadio functio
- Page 228 and 229:
10 Infotainment systemCD functionsF
- Page 230 and 231:
10 Infotainment systemPhone functio
- Page 232 and 233:
10 Infotainment systemPhone functio
- Page 234 and 235:
10 Infotainment systemPhone functio
- Page 236 and 237:
10 Infotainment systemPhone functio
- Page 238 and 239:
10 Infotainment systemMenu structur
- Page 240 and 241:
10 Infotainment systemMenu structur
- Page 242 and 243:
SPECIFICATIONS11
- Page 244 and 245:
11 SpecificationsDimensions and wei
- Page 246 and 247:
11 SpecificationsEngine oilAdverse
- Page 248 and 249:
11 SpecificationsFluids and lubrica
- Page 250 and 251:
11 SpecificationsFuelFuel consumpti
- Page 252 and 253:
11 SpecificationsElectrical systemG
- Page 254 and 255:
11 Specifications11253
- Page 256 and 257:
Alphabetical indexChildrenchild saf
- Page 258 and 259:
Alphabetical indexin the passenger
- Page 260 and 261:
Alphabetical indexSRS systemgeneral
- Page 262 and 263:
Alphabetical index261