CONVENTIONAL FIRE PANELS - Kotesa
CONVENTIONAL FIRE PANELS - Kotesa
CONVENTIONAL FIRE PANELS - Kotesa
- No tags were found...

Create successful ePaper yourself
Turn your PDF publications into a flip-book with our unique Google optimized e-Paper software.
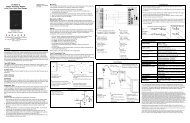
4. Using the Jumper (43), marked “1” on the PCB, setup the Extinguishment Module address:Jumper (43) IN = Extinguishment Module nr. 1;Jumper (43) OUT = Extinguishment Module nr. 2.The Jumper (59), marked “2” on the PCB, MUSTBE INSERTED.5. Using the Flat cables connect the ExtinguishmentModules as follows:6. if you are installing ONE Extinguishment Module— connect it to the Main Board, via the jacks (58and 63 respectively), as per Fig. 9a;if you are installing TWO Extinguishment Modules— connect Extinguishment Module nr. 1 to ExtinguishmentModule nr. 2, via the jacks (56) then,connect Extinguishment Module nr. 1 to the MainBoard, via the jacks (58 and 63 respectively), as perFig. 9b.The polarity of the Flat cable connectors must beobserved. Installing Expander Module Kit (for J424 ONLY)This Expander Module Kit comprises an 8 zone ExpanderModule and the Expander Control board. TheExpander Module contains most of the electronic circuitryand electrical terminals whereas the Expander Controlboard provides the LEDs and control keys forExpander Module zones.Install Expander Modules as follows: if you are installing ONE Expander Module Kit,mount the Expander Module (21) and the ExpanderControl board (10), as per Figure 11a; if you are installing TWO Expander Module Kits,mount Expander Module nr. 1 (21) and the ExpanderControl board (10) to the backplate then mountExpander Module nr. 2 (25) and the Expander Controlboard (7), as per Figure 11b.If you are installing ONE Expander Module Kit only,the location will be different to that shown in thediagram.319289285856 29 5627 6327 631313a)b)Figure 9 Connecting ONE Extinguishment Module (a)or TWO Extinguishment Modules (b)toaJ424 Controlpanel: 9) Main Control Board; 13) Main Board; 27) and29) Flat cable for the connection of the ExtinguishmentModules; 28) Extinguishment Module nr. 1; 31) ExtinguishmentModule nr. 2; 56) Jack for the connection tothe consecutive Extinguishment Module; 58) Jack forthe connection to the Main Board; 63) Jack for the connectionof Extinguishment Module nr. 1.93 94a) b) c) d) e)95 96 97 98 99 98 99 100 10093 94 93 9498 99 98 99 100 100Figure 10 Installing an Expander Module Kit: 93) Reverse locking supports; 94) Expander Module anchor holes;95) Long plastic spacer; 96) Expander Module placement screw; 97) Expander Module nut; 98) Expander Control Boardscrews; 99) Short plastic spacer; 100) Expander Control Board nut.22 Conventional Fire Panels J424/J408