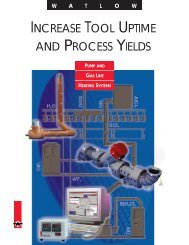
Watlow Series 922 User's Manual - Heaters Sensors Controls
Watlow Series 922 User's Manual - Heaters Sensors Controls
Watlow Series 922 User's Manual - Heaters Sensors Controls

Create successful ePaper yourself
Turn your PDF publications into a flip-book with our unique Google optimized e-Paper software.
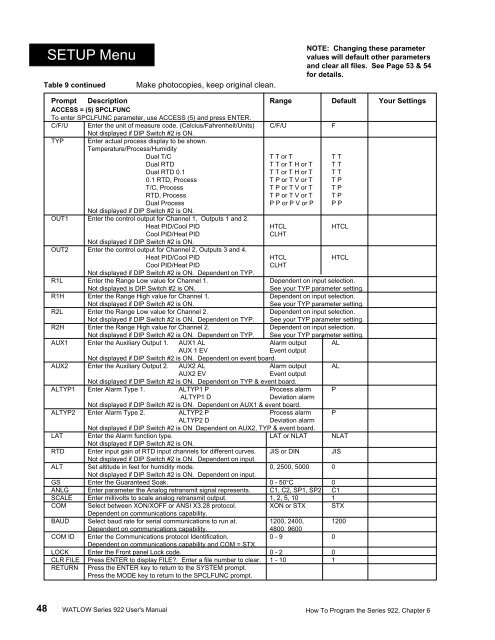
SETUP MenuTable 9 continuedMake photocopies, keep original clean.NOTE: Changing these parametervalues will default other parametersand clear all files. See Page 53 & 54for details.Prompt Description Range Default Your SettingsACCESS = (5) SPCLFUNCTo enter SPCLFUNC parameter, use ACCESS (5) and press ENTER.C/F/U Enter the unit of measure code. (Celcius/Fahrenheit/Units) C/F/U FNot displayed if DIP Switch #2 is ON.TYP Enter actual process display to be shown.Temperature/Process/HumidityDual T/C T T or T T TDual RTD T T or T H or T T TDual RTD 0.1 T T or T H or T T T0.1 RTD, Process T P or T V or T T PT/C, Process T P or T V or T T PRTD, Process T P or T V or T T PDual Process P P or P V or P P PNot displayed if DIP Switch #2 is ON.OUT1 Enter the control output for Channel 1, Outputs 1 and 2.Heat PID/Cool PID HTCL HTCLCool PID/Heat PIDCLHTNot displayed if DIP Switch #2 is ON.OUT2 Enter the control output for Channel 2, Outputs 3 and 4.Heat PID/Cool PID HTCL HTCLCool PID/Heat PIDCLHTNot displayed if DIP Switch #2 is ON. Dependent on TYP.R1L Enter the Range Low value for Channel 1. Dependent on input selection.Not displayed is DIP Switch #2 is ON.See your TYP parameter setting.R1H Enter the Range High value for Channel 1. Dependent on input selection.Not displayed if DIP Switch #2 is ON.See your TYP parameter setting.R2L Enter the Range Low value for Channel 2. Dependent on input selection.Not displayed if DIP Switch #2 is ON. Dependent on TYP. See your TYP parameter setting.R2H Enter the Range High value for Channel 2. Dependent on input selection.Not displayed if DIP Switch #2 is ON. Dependent on TYP. See your TYP parameter setting.AUX1 Enter the Auxiliary Output 1. AUX1 AL Alarm output ALAUX 1 EVEvent outputNot displayed if DIP Switch #2 is ON. Dependent on event board.AUX2 Enter the Auxiliary Output 2. AUX2 AL Alarm output ALAUX2 EVEvent outputNot displayed if DIP Switch #2 is ON. Dependent on TYP & event board.ALTYP1 Enter Alarm Type 1. ALTYP1 P Process alarm PALTYP1 DDeviation alarmNot displayed if DIP Switch #2 is ON. Dependent on AUX1 & event board.ALTYP2 Enter Alarm Type 2. ALTYP2 P Process alarm PALTYP2 DDeviation alarmNot displayed if DIP Switch #2 is ON Dependent on AUX2, TYP & event board.LAT Enter the Alarm function type. LAT or NLAT NLATNot displayed if DIP Switch #2 is ON.RTD Enter input gain of RTD input channels for different curves. JIS or DIN JISNot displayed if DIP Switch #2 is ON. Dependent on input.ALT Set altitude in feet for humidity mode. 0, 2500, 5000 0Not displayed if DIP Switch #2 is ON. Dependent on input.GS Enter the Guaranteed Soak. 0 - 50°C 0ANLG Enter parameter the Analog retransmit signal represents. C1, C2, SP1, SP2 C1SCALE Enter millivolts to scale analog retransmit output. 1, 2, 5, 10 1COM Select between XON/XOFF or ANSI X3.28 protocol. XON or STX STXDependent on communications capability.BAUD Select baud rate for serial communications to run at. 1200, 2400, 1200Dependent on communications capability. 4800, 9600COM ID Enter the Communications protocol Identification. 0 - 9 0Dependent on communications capability and COM = STX.LOCK Enter the Front panel Lock code. 0 - 2 0CLR FILE Press ENTER to display FILE?. Enter a file number to clear. 1 - 10 1RETURN Press the ENTER key to return to the SYSTEM prompt.Press the MODE key to return to the SPCLFUNC prompt.48 WATLOW <strong>Series</strong> <strong>922</strong> <strong>User's</strong> <strong>Manual</strong> How To Program the <strong>Series</strong> <strong>922</strong>, Chapter 6