Installation Manual - Fireplaces
Installation Manual - Fireplaces
Installation Manual - Fireplaces

You also want an ePaper? Increase the reach of your titles
YUMPU automatically turns print PDFs into web optimized ePapers that Google loves.
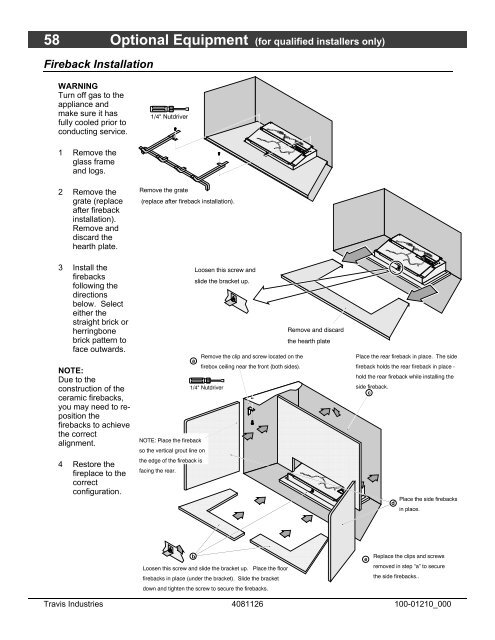
58 Optional Equipment (for qualified installers only)Fireback <strong>Installation</strong>WARNINGTurn off gas to theappliance andmake sure it hasfully cooled prior toconducting service.1/4" Nutdriver1 Remove theglass frameand logs. 2 Remove thegrate (replaceafter firebackinstallation).Remove anddiscard thehearth plate.3 Install thefirebacksfollowing thedirectionsbelow. Selecteither thestraight brick orherringbonebrick pattern toface outwards.NOTE:Due to theconstruction of theceramic firebacks,you may need to repositionthefirebacks to achievethe correctalignment.4 Restore thefireplace to thecorrectconfiguration.Remove the grate(replace after fireback installation).NOTE: Place the firebackso the vertical grout line onthe edge of the fireback isfacing the rear.Loosen this screw andslide the bracket up.aRemove the clip and screw located on thefirebox ceiling near the front (both sides).1/4" NutdriverbRemove and discardthe hearth plate Loosen this screw and slide the bracket up. Place the floorfirebacks in place (under the bracket). Slide the bracketdown and tighten the screw to secure the firebacks.Place the rear fireback in place. The sidefireback holds the rear fireback in place -hold the rear fireback while installing theside fireback.cePlace the side firebacksdin place.Replace the clips and screwsremoved in step “a” to securethe side firebacks..Travis Industries 4081126 100-01210_000