- Page 2 and 3:
Hacking and Penetration Testing wit
- Page 4 and 5:
Hacking and Penetration Testing wit
- Page 6 and 7:
Dedicated to my favorite wife, my f
- Page 8 and 9:
Contents Foreword..................
- Page 10 and 11:
Contents ix Network Hubs and Switch
- Page 12 and 13:
Foreword So I will start out this f
- Page 14 and 15:
Author Biography Dr. Philip Polstra
- Page 16 and 17:
Acknowledgments First and foremost,
- Page 18 and 19:
CHAPTER Meet the deck 1 INFORMATION
- Page 20 and 21:
The deck 3 FIGURE 1.1 Collection of
- Page 22 and 23:
The deck 5 FIGURE 1.4 Fern WiFi Cra
- Page 24 and 25:
The deck 7 MODES OF OPERATION One o
- Page 26 and 27:
The deck 9 stores data only on a lo
- Page 28 and 29:
Summary 11 I knew that The Deck, wh
- Page 30 and 31:
CHAPTER Meet the beagles 2 INFORMAT
- Page 32 and 33:
Texas instruments devices 15 FIGURE
- Page 34 and 35:
Texas instruments devices 17 proces
- Page 36 and 37:
Texas instruments devices 19 FIGURE
- Page 38 and 39:
Texas instruments devices 21 The AD
- Page 40 and 41:
Texas instruments devices 23 WHY NO
- Page 42 and 43:
Texas instruments devices 25 FIGURE
- Page 44 and 45:
CHAPTER Installing a base operating
- Page 46 and 47:
Introduction 29 FIGURE 3.2 QNX smar
- Page 48 and 49:
Introduction 31 FIGURE 3.4 Android
- Page 50 and 51:
Introduction 33 (http://openembedde
- Page 52 and 53:
Introduction 35 FIGURE 3.6 Arch Lin
- Page 54 and 55:
Introduction 37 Sabayon In the phys
- Page 56 and 57:
Introduction 39 Table 3.7 Fedora Pe
- Page 58 and 59:
Introduction 41 tar xJf debian*.xz
- Page 60 and 61:
Ubuntu options 43 supportive commun
- Page 62 and 63:
Creating a microSD Card 45 Device t
- Page 64 and 65:
Chapter 3 Appendix: digging deeper
- Page 66 and 67:
Chapter 3 Appendix: digging deeper
- Page 68 and 69:
Chapter 3 Appendix: digging deeper
- Page 70 and 71:
Chapter 3 Appendix: digging deeper
- Page 72 and 73:
CHAPTER Filling the toolbox 4 INFOR
- Page 74 and 75:
Adding a graphical environment 57 b
- Page 76 and 77: Adding a graphical environment 59 W
- Page 78 and 79: Adding a graphical environment 61 t
- Page 80 and 81: Adding tools the easy way 63 The li
- Page 82 and 83: Adding tools the easy way 65 check_
- Page 84 and 85: Adding tools the easy way 67 echo -
- Page 86 and 87: Adding tools the hard way 69 # chec
- Page 88 and 89: Adding tools the hard way 71 descri
- Page 90 and 91: Adding tools the hard way 73 FIGURE
- Page 92 and 93: Adding tools the hard way 75 FIGURE
- Page 94 and 95: Adding tools the hard way 77 FIGURE
- Page 96 and 97: Adding tools the hard way 79 FIGURE
- Page 98 and 99: Adding tools the hard way 81 FIGURE
- Page 100 and 101: Adding tools the hard way 83 FIGURE
- Page 102 and 103: Adding tools the hard way 85 dl_src
- Page 104 and 105: Starter set of tools 87 and possibl
- Page 106 and 107: Starter set of tools 89 #get John w
- Page 108 and 109: Starter set of tools 91 The company
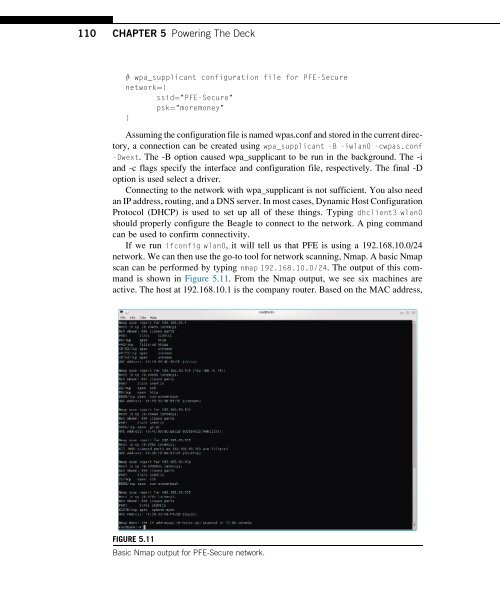
- Page 110 and 111: CHAPTER Powering The Deck 5 INFORMA
- Page 112 and 113: Power requirements 95 the city and
- Page 114 and 115: Power sources 97 WALL POWER When it
- Page 116 and 117: Power sources 99 Thanks to commonly
- Page 118 and 119: Power sources 101 Table 5.2 Duracel
- Page 120 and 121: Reducing power consumption 103 REDU
- Page 122 and 123: Penetration testing with a single b
- Page 124 and 125: Penetration testing with a single b
- Page 128 and 129: Penetration testing with a single b
- Page 130 and 131: Penetration testing with a single b
- Page 132 and 133: Penetration testing with a single b
- Page 134 and 135: Penetration testing with a single b
- Page 136 and 137: Penetration testing with a single b
- Page 138 and 139: Summary 121 site. In-depth testing
- Page 140 and 141: CHAPTER Input and output devices 6
- Page 142 and 143: Display options 125 FIGURE 6.1 LCD7
- Page 144 and 145: IEEE 802.11 wireless 127 The Alfa A
- Page 146 and 147: BeagleBone capes 129 FIGURE 6.4 UAR
- Page 148 and 149: BeagleBone capes 131 pull-up resist
- Page 150 and 151: BeagleBone capes 133 FIGURE 6.7 XBe
- Page 152 and 153: BeagleBone capes 135 Newly created
- Page 154 and 155: BeagleBone capes 137 Table 6.1 Cape
- Page 156 and 157: BeagleBone capes 139 If you don’t
- Page 158 and 159: Penetration testing with a single r
- Page 160 and 161: Penetration testing with a single r
- Page 162 and 163: Penetration testing with a single r
- Page 164 and 165: Penetration testing with a single r
- Page 166 and 167: Penetration testing with a single r
- Page 168 and 169: Penetration testing with a single r
- Page 170 and 171: Summary 153 if "done" in status.ite
- Page 172 and 173: CHAPTER Building an army of devices
- Page 174 and 175: Using IEEE 802.15.4 networking 157
- Page 176 and 177:
Configuring IEEE 802.15.4 modems 15
- Page 178 and 179:
Configuring IEEE 802.15.4 modems 16
- Page 180 and 181:
Configuring IEEE 802.15.4 modems 16
- Page 182 and 183:
Configuring IEEE 802.15.4 modems 16
- Page 184 and 185:
Remote control the easy way 167 FIG
- Page 186 and 187:
Remote control via python 169 seria
- Page 188 and 189:
Remote control via python 171 impor
- Page 190 and 191:
Remote control via python 173 elif
- Page 192 and 193:
Remote control via python 175 dnum
- Page 194 and 195:
Remote control via python 177 rc_na
- Page 196 and 197:
Remote control via python 179 The M
- Page 198 and 199:
Remote control via python 181 } [ "
- Page 200 and 201:
Remote control via python 183 Merel
- Page 202 and 203:
Saving power 185 on the modem. The
- Page 204 and 205:
Adding security 187 a different cha
- Page 206 and 207:
Expanding Your Reach 189 FIGURE 7.1
- Page 208 and 209:
Penetration testing with multiple d
- Page 210 and 211:
Penetration testing with multiple d
- Page 212 and 213:
Penetration testing with multiple d
- Page 214 and 215:
Penetration testing with multiple d
- Page 216 and 217:
Penetration testing with multiple d
- Page 218 and 219:
Penetration testing with multiple d
- Page 220 and 221:
Summary 203 # if IP and MAC aren’
- Page 222 and 223:
CHAPTER Keeping your army secret 8
- Page 224 and 225:
Hiding devices 207 FIGURE 8.2 At fi
- Page 226 and 227:
Hiding devices 209 FIGURE 8.4 Car d
- Page 228 and 229:
Hiding devices 211 FIGURE 8.7 Wirel
- Page 230 and 231:
Hiding devices 213 FIGURE 8.11 Unde
- Page 232 and 233:
Hiding devices 215 FIGURE 8.14 Unde
- Page 234 and 235:
FIGURE 8.17 Inside the Dalek Desk D
- Page 236 and 237:
FIGURE 8.21 The haxtar. The haxtar
- Page 238 and 239:
Installing devices 221 example, wea
- Page 240 and 241:
CHAPTER Adding air support 9 INFORM
- Page 242 and 243:
Building the AirDeck 225 Latte is s
- Page 244 and 245:
Building the AirDeck 227 what you a
- Page 246 and 247:
Using your aerial drone 229 Power i
- Page 248 and 249:
Using your aerial drone 231 Install
- Page 250 and 251:
Alternative aircraft 233 else { //
- Page 252 and 253:
CHAPTER Future directions 10 INFORM
- Page 254 and 255:
Closing thoughts 237 For reasons me
- Page 256 and 257:
Index Note: Page numbers followed b
- Page 258 and 259:
Index 241 configuration, 77-79, 83f
- Page 260:
Index 243 Python scripts, 143-144 w