

Hacking_and_Penetration_Testing_with_Low_Power_Devices

Create successful ePaper yourself
Turn your PDF publications into a flip-book with our unique Google optimized e-Paper software.
BeagleBone capes<br />
135<br />
Newly created GPIO devices are set to inputs as this is the safest option. They<br />
may be changed to outputs by echoing “out” to the /sys/class/gpio/gpiok/direction<br />
pseudo file. The keywords “high” <strong>and</strong> “low” may also be used to set a pin to output<br />
<strong>and</strong> simultaneously set its value. Using “out” will set the value to low, which would<br />
cause the XBee modem to reset in our case as the XBee reset pin is active low.<br />
The value of a GPIO k is set or read as appropriate using the /sys/class/gpio/<br />
gpiok/value pseudo file. Values are read using cat /sys/class/gpio/gpiok/value<br />
<strong>and</strong> written via echo n > /sys/class/gpio/gpiok/value, where n is 0 or 1. Note<br />
that output GPIO pins may also be read. The following script will set up the Beagle-<br />
Bone correctly to use the XBee reset <strong>and</strong> sleep functionality of the mini-cape. This<br />
script could also be run from /etc/rc.local to make this configuration persistent across<br />
reboots:<br />
#!/bin/bash<br />
# This script will setup the GPIO lines on P8 pins 7 & 9<br />
# which are used by for reset <strong>and</strong> sleep, respectively on the Xbee<br />
# mini-cape as described in the book<br />
# <strong>Hacking</strong> <strong>and</strong> <strong>Penetration</strong> <strong>Testing</strong> With <strong>Low</strong> <strong>Power</strong> <strong>Devices</strong><br />
# by Dr. Phil Polstra<br />
# pin P8-7 is gpio2[2] or gpio66<br />
# pin P8-9 is gpios[5] or gpio69<br />
# enable gpio66 as output <strong>and</strong> set to high to prevent Xbee reset<br />
echo 66 > /sys/class/gpio/export<br />
echo high > /sys/class/gpio/gpio66/direction<br />
# enable gpio69 as output <strong>and</strong> set to low to prevent Xbee sleep<br />
echo 69 > /sys/class/gpio/export<br />
echo low > /sys/class/gpio/gpio69/direction<br />
XBee CAPE<br />
Having presented an XBee mini-cape, the design is easily exp<strong>and</strong>ed to a proper full<br />
cape. The biggest change in going to the full cape is the addition of an appropriate<br />
EEPROM. A 6-pin header has also been added to this design to allow the XBee to be<br />
programmed via an FTDI 3.3 V USB to serial cable (part number TTL-232R-3 V3).<br />
If you intend to use an FTDI cable, be certain to purchase the 3.3 V version <strong>and</strong> not<br />
the 5.0 V version as the latter will almost certainly fry your XBee modem. The FTDI<br />
cable should only be used on a cape that is disconnected from the BeagleBone, never<br />
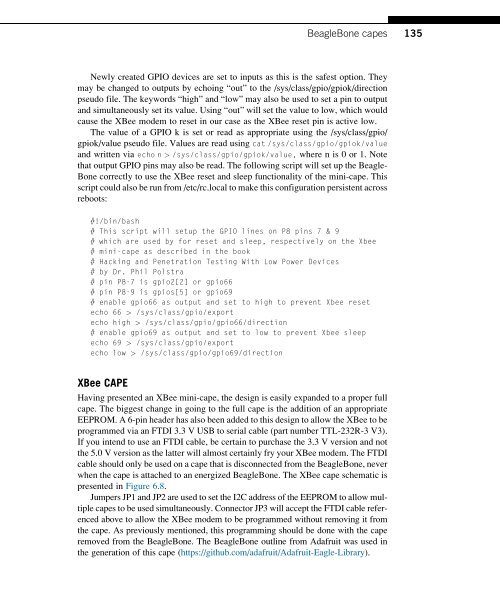
when the cape is attached to an energized BeagleBone. The XBee cape schematic is<br />
presented in Figure 6.8.<br />
Jumpers JP1 <strong>and</strong> JP2 are used to set the I2C address of the EEPROM to allow multiple<br />
capes to be used simultaneously. Connector JP3 will accept the FTDI cable referenced<br />
above to allow the XBee modem to be programmed <strong>with</strong>out removing it from<br />
the cape. As previously mentioned, this programming should be done <strong>with</strong> the cape<br />
removed from the BeagleBone. The BeagleBone outline from Adafruit was used in<br />
the generation of this cape (https://github.com/adafruit/Adafruit-Eagle-Library).