

Hacking_and_Penetration_Testing_with_Low_Power_Devices

Create successful ePaper yourself
Turn your PDF publications into a flip-book with our unique Google optimized e-Paper software.
BeagleBone capes<br />
139<br />
If you don’t plan on using the XBee sleep <strong>and</strong> reset functionality <strong>and</strong> you have<br />
another cape that would like to use pins P8-7 <strong>and</strong> P8-9, the script above should be<br />
modified. Change the total number of pins from b’\x00\x04\’ to b’\x00\x02’ <strong>and</strong> the<br />
line for setting P8-7 <strong>and</strong> P8-9 from b’\xc0\x0f\xc0\x0f’ to b’\x00’ * 4.<br />
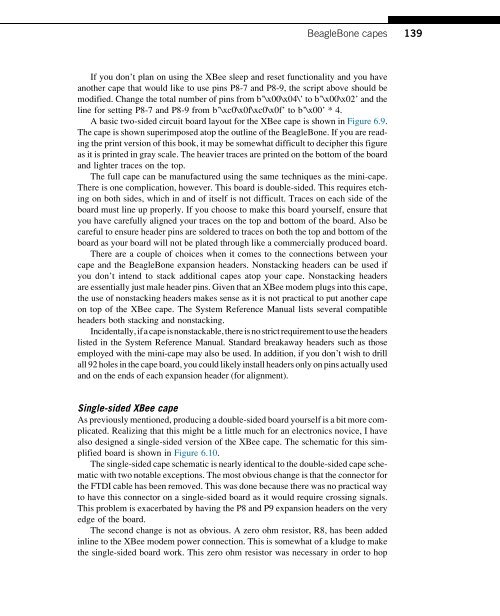
A basic two-sided circuit board layout for the XBee cape is shown in Figure 6.9.<br />
The cape is shown superimposed atop the outline of the BeagleBone. If you are reading<br />
the print version of this book, it may be somewhat difficult to decipher this figure<br />
as it is printed in gray scale. The heavier traces are printed on the bottom of the board<br />
<strong>and</strong> lighter traces on the top.<br />
The full cape can be manufactured using the same techniques as the mini-cape.<br />
There is one complication, however. This board is double-sided. This requires etching<br />
on both sides, which in <strong>and</strong> of itself is not difficult. Traces on each side of the<br />
board must line up properly. If you choose to make this board yourself, ensure that<br />
you have carefully aligned your traces on the top <strong>and</strong> bottom of the board. Also be<br />
careful to ensure header pins are soldered to traces on both the top <strong>and</strong> bottom of the<br />
board as your board will not be plated through like a commercially produced board.<br />
There are a couple of choices when it comes to the connections between your<br />
cape <strong>and</strong> the BeagleBone expansion headers. Nonstacking headers can be used if<br />
you don’t intend to stack additional capes atop your cape. Nonstacking headers<br />
are essentially just male header pins. Given that an XBee modem plugs into this cape,<br />
the use of nonstacking headers makes sense as it is not practical to put another cape<br />
on top of the XBee cape. The System Reference Manual lists several compatible<br />
headers both stacking <strong>and</strong> nonstacking.<br />
Incidentally,ifacapeisnonstackable,thereisnostrictrequirementtousetheheaders<br />
listed in the System Reference Manual. St<strong>and</strong>ard breakaway headers such as those<br />
employed <strong>with</strong> the mini-cape may also be used. In addition, if you don’t wish to drill<br />
all 92 holes in the cape board, you could likely install headers only on pins actually used<br />
<strong>and</strong> on the ends of each expansion header (for alignment).<br />
Single-sided XBee cape<br />
As previously mentioned, producing a double-sided board yourself is a bit more complicated.<br />
Realizing that this might be a little much for an electronics novice, I have<br />
also designed a single-sided version of the XBee cape. The schematic for this simplified<br />
board is shown in Figure 6.10.<br />
The single-sided cape schematic is nearly identical to the double-sided cape schematic<br />
<strong>with</strong> two notable exceptions. The most obvious change is that the connector for<br />
the FTDI cable has been removed. This was done because there was no practical way<br />
to have this connector on a single-sided board as it would require crossing signals.<br />
This problem is exacerbated by having the P8 <strong>and</strong> P9 expansion headers on the very<br />
edge of the board.<br />
The second change is not as obvious. A zero ohm resistor, R8, has been added<br />
inline to the XBee modem power connection. This is somewhat of a kludge to make<br />
the single-sided board work. This zero ohm resistor was necessary in order to hop