VersaLASER® (VLS) User Guide VLS2.30, VLS3.50
VersaLASER® (VLS) User Guide VLS2.30, VLS3.50
VersaLASER® (VLS) User Guide VLS2.30, VLS3.50

You also want an ePaper? Increase the reach of your titles
YUMPU automatically turns print PDFs into web optimized ePapers that Google loves.
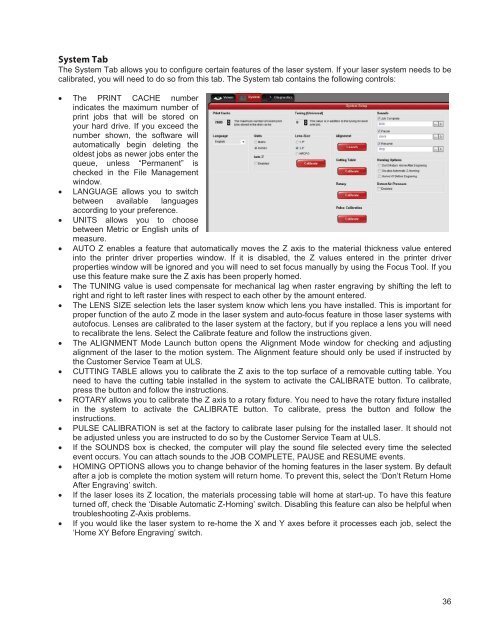
System Tab<br />
The System Tab allows you to configure certain features of the laser system. If your laser system needs to be<br />
calibrated, you will need to do so from this tab. The System tab contains the following controls:<br />
• The PRINT CACHE number<br />
indicates the maximum number of<br />
print jobs that will be stored on<br />
your hard drive. If you exceed the<br />
number shown, the software will<br />
automatically begin deleting the<br />
oldest jobs as newer jobs enter the<br />
queue, unless “Permanent” is<br />
checked in the File Management<br />
window.<br />
• LANGUAGE allows you to switch<br />
between available languages<br />
according to your preference.<br />
• UNITS allows you to choose<br />
between Metric or English units of<br />
measure.<br />
• AUTO Z enables a feature that automatically moves the Z axis to the material thickness value entered<br />
into the printer driver properties window. If it is disabled, the Z values entered in the printer driver<br />
properties window will be ignored and you will need to set focus manually by using the Focus Tool. If you<br />
use this feature make sure the Z axis has been properly homed.<br />
• The TUNING value is used compensate for mechanical lag when raster engraving by shifting the left to<br />
right and right to left raster lines with respect to each other by the amount entered.<br />
• The LENS SIZE selection lets the laser system know which lens you have installed. This is important for<br />
proper function of the auto Z mode in the laser system and auto-focus feature in those laser systems with<br />
autofocus. Lenses are calibrated to the laser system at the factory, but if you replace a lens you will need<br />
to recalibrate the lens. Select the Calibrate feature and follow the instructions given.<br />
• The ALIGNMENT Mode Launch button opens the Alignment Mode window for checking and adjusting<br />
alignment of the laser to the motion system. The Alignment feature should only be used if instructed by<br />
the Customer Service Team at ULS.<br />
• CUTTING TABLE allows you to calibrate the Z axis to the top surface of a removable cutting table. You<br />
need to have the cutting table installed in the system to activate the CALIBRATE button. To calibrate,<br />
press the button and follow the instructions.<br />
• ROTARY allows you to calibrate the Z axis to a rotary fixture. You need to have the rotary fixture installed<br />
in the system to activate the CALIBRATE button. To calibrate, press the button and follow the<br />
instructions.<br />
• PULSE CALIBRATION is set at the factory to calibrate laser pulsing for the installed laser. It should not<br />
be adjusted unless you are instructed to do so by the Customer Service Team at ULS.<br />
• If the SOUNDS box is checked, the computer will play the sound file selected every time the selected<br />
event occurs. You can attach sounds to the JOB COMPLETE, PAUSE and RESUME events.<br />
• HOMING OPTIONS allows you to change behavior of the homing features in the laser system. By default<br />
after a job is complete the motion system will return home. To prevent this, select the ‘Don’t Return Home<br />
After Engraving’ switch.<br />
• If the laser loses its Z location, the materials processing table will home at start-up. To have this feature<br />
turned off, check the ‘Disable Automatic Z-Homing’ switch. Disabling this feature can also be helpful when<br />
troubleshooting Z-Axis problems.<br />
• If you would like the laser system to re-home the X and Y axes before it processes each job, select the<br />
‘Home XY Before Engraving’ switch.<br />
36