VersaLASER® (VLS) User Guide VLS2.30, VLS3.50
VersaLASER® (VLS) User Guide VLS2.30, VLS3.50
VersaLASER® (VLS) User Guide VLS2.30, VLS3.50

You also want an ePaper? Increase the reach of your titles
YUMPU automatically turns print PDFs into web optimized ePapers that Google loves.
Loading and Processing Materials<br />
Before laser processing material, you will need to load material into the laser system and then focus the laser<br />
system onto the top surface of the material.<br />
Loading Material<br />
Open the top door to the laser system and place material to be laser processed onto the engraving table. You<br />
may need to manually move the support table down to allow clearance to fit thicker materials into the machine. If<br />
you are cutting, you can also use the cutting table (use of this accessory is described in the accessories section of<br />
the manual).<br />
CAUTION: Material to be laser processed must fit completely within the machine so that the top door to the<br />
laser system can be closed. The access door is safety interlocked and will not allow the laser to operate if the<br />
access door is not fully closed.<br />
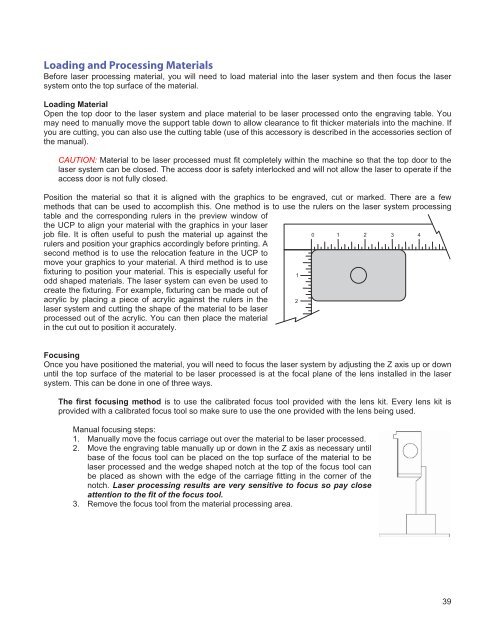
Position the material so that it is aligned with the graphics to be engraved, cut or marked. There are a few<br />
methods that can be used to accomplish this. One method is to use the rulers on the laser system processing<br />
table and the corresponding rulers in the preview window of<br />
the UCP to align your material with the graphics in your laser<br />
job file. It is often useful to push the material up against the<br />
rulers and position your graphics accordingly before printing. A<br />
second method is to use the relocation feature in the UCP to<br />
move your graphics to your material. A third method is to use<br />
fixturing to position your material. This is especially useful for<br />
odd shaped materials. The laser system can even be used to<br />
create the fixturing. For example, fixturing can be made out of<br />
acrylic by placing a piece of acrylic against the rulers in the<br />
laser system and cutting the shape of the material to be laser<br />
processed out of the acrylic. You can then place the material<br />
in the cut out to position it accurately.<br />
Focusing<br />
Once you have positioned the material, you will need to focus the laser system by adjusting the Z axis up or down<br />
until the top surface of the material to be laser processed is at the focal plane of the lens installed in the laser<br />
system. This can be done in one of three ways.<br />
The first focusing method is to use the calibrated focus tool provided with the lens kit. Every lens kit is<br />
provided with a calibrated focus tool so make sure to use the one provided with the lens being used.<br />
Manual focusing steps:<br />
1. Manually move the focus carriage out over the material to be laser processed.<br />
2. Move the engraving table manually up or down in the Z axis as necessary until<br />
base of the focus tool can be placed on the top surface of the material to be<br />
laser processed and the wedge shaped notch at the top of the focus tool can<br />
be placed as shown with the edge of the carriage fitting in the corner of the<br />
notch. Laser processing results are very sensitive to focus so pay close<br />
attention to the fit of the focus tool.<br />
3. Remove the focus tool from the material processing area.<br />
39