
You also want an ePaper? Increase the reach of your titles
YUMPU automatically turns print PDFs into web optimized ePapers that Google loves.
Preparation<br />
About Your Projector<br />
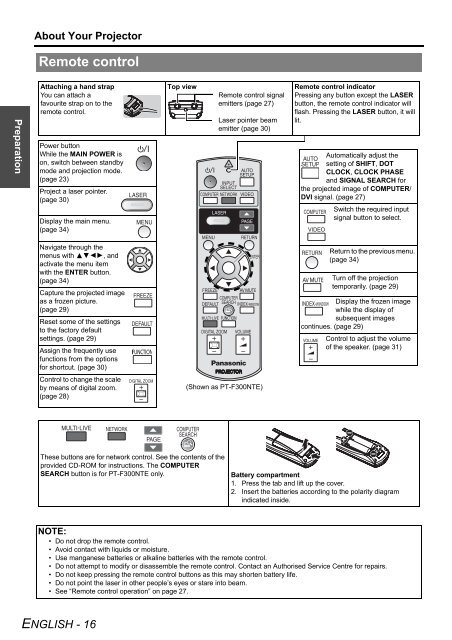
Remote control<br />
Attaching a hand strap<br />
You can attach a<br />
favourite strap on to the<br />
remote control.<br />
Power button<br />
While the MAIN POWER is<br />
on, switch between standby<br />
mode and projection mode.<br />
(page 23)<br />
Project a laser pointer.<br />
(page 30)<br />
Display the main menu.<br />
(page 34)<br />
Navigate through the<br />
menus with FGIH, and<br />
activate the menu item<br />
with the ENTER button.<br />
(page 34)<br />
Capture the projected image<br />
as a frozen picture.<br />
(page 29)<br />
Reset some of the settings<br />
to the factory default<br />
settings. (page 29)<br />
Assign the frequently use<br />
functions from the options<br />
for shortcut. (page 30)<br />
Control to change the scale<br />
by means of digital zoom.<br />
(page 28)<br />
NOTE:<br />
• Do not drop the remote control.<br />
• Avoid contact with liquids or moisture.<br />
• Use manganese batteries or alkaline batteries with the remote control.<br />
• Do not attempt to modify or disassemble the remote control. Contact an Authorised Service Centre for repairs.<br />
• Do not keep pressing the remote control buttons as this may shorten battery life.<br />
• Do not point the laser in other people’s eyes or stare into beam.<br />
• See “Remote control operation” on page 27.<br />
<strong>ENGLISH</strong> - 16<br />
Top view<br />
Remote control signal<br />
emitters (page 27)<br />
Laser pointer beam<br />
emitter (page 30)<br />
(Shown as PT-F300NTE)<br />
Remote control indicator<br />
Pressing any button except the LASER<br />
button, the remote control indicator will<br />
flash. Pressing the LASER button, it will<br />
lit.<br />
Automatically adjust the<br />
setting of SHIFT, DOT<br />
CLOCK, CLOCK PHASE<br />
and SIGNAL SEARCH for<br />
the projected image of COMPUTER/<br />
DVI signal. (page 27)<br />
Switch the required input<br />
signal button to select.<br />
Return to the previous menu.<br />
(page 34)<br />
Turn off the projection<br />
temporarily. (page 29)<br />
Display the frozen image<br />
while the display of<br />
subsequent images<br />
continues. (page 29)<br />
Control to adjust the volume<br />
of the speaker. (page 31)<br />
These buttons are for network control. See the contents of the<br />
provided CD-ROM for instructions. The COMPUTER<br />
SEARCH button is for PT-F300NTE only. Battery compartment<br />
1. Press the tab and lift up the cover.<br />
2. Insert the batteries according to the polarity diagram<br />
indicated inside.