
Create successful ePaper yourself
Turn your PDF publications into a flip-book with our unique Google optimized e-Paper software.
Settings<br />
PROJECTOR SETUP menu<br />
INSTALLATION<br />
When installing the projector, select the projection<br />
method according to the projector position. Press I H<br />
to cycle through the options. See “Projection method” on<br />
page 18.<br />
FRONT/DESK<br />
FRONT/CEILING<br />
REAR/DESK<br />
REAR/CEILING<br />
If you use the projector at high elevation, the HIGH<br />
ALTITUDE MODE setting needs to be ON to set the fan<br />
speed high. Press I H to select the required option.<br />
� OFF The fan speed is low.<br />
� ON The fan speed is high.<br />
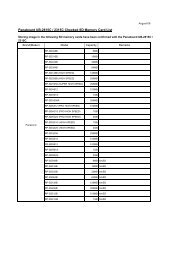
You can switch to the Panasonic past model's control<br />
commands for COMPUTER connection.<br />
<strong>ENGLISH</strong> - 44<br />
Setting on a desk/floor and<br />
projecting from front<br />
Mounting on the ceiling and<br />
projecting from front<br />
Setting on a desk/floor and<br />
projecting from rear<br />
Mounting on the ceiling and<br />
projecting from rear<br />
HIGH ALTITUDE MODE<br />
NOTE:<br />
• At 1 400 m (4 593 ft) above sea level, the setting must<br />
be ON.<br />
• The loudness of fan noise depends on the HIGH<br />
ALTITUDE MODE setting.<br />
EMULATE<br />
DEFAULT<br />
F100, FW100, F200, F300,<br />
FW300 models<br />
D3500 D3500 models<br />
D4000 D4000 models<br />
D/W5K series<br />
D5500, DW5000, D5600,<br />
DW5100, D5700 models<br />
L730 L520, L720 models<br />
L780 L750, L780 models<br />
L735 L735 models<br />
L785 L785 models<br />
LB/W80 LB75, LB80, LW80 models<br />
FUNCTION BUTTON<br />
You can assign a certain menu function to the<br />
FUNCTION button as shortcut. Press I H to select the<br />
required menu option, and the ENTER button.<br />
� VOLUME<br />
You can adjust the volume of the built-in monaural<br />
speaker and VARIABLE AUDIO OUT terminal.<br />
� I Decrease<br />
� H Increase<br />
� BALANCE<br />
You can adjust to hear the sound played equally<br />
through both right and left from VARIABLE AUDIO<br />
OUT, or shift the balance so more sound plays<br />
through the left or right side.<br />
� I More sound plays through the left<br />
side<br />
� H More sound plays through the right<br />
side<br />
� IN STANDBY MODE<br />
You can switch on/off the sound output in standby mode.<br />
� OFF No sound in standby mode.<br />
� ON Output audio in standby mode.<br />
� AUDIO IN SELECT<br />
You can switch the audio output method for<br />
COMPUTER1 IN, COMPUTER2 IN and DVI-D IN<br />
terminals.<br />
� DVI<br />
Options Functions Refer<br />
DISABLE<br />
Deactivate the FUNCTION<br />
button.<br />
-<br />
ASPECT Display the ASPECT menu. 38<br />
PICTURE MODE<br />
DAYLIGHT VIEW<br />
� COM.AUDIO IN 2<br />
Output audio that is input to the<br />
COMPUTER AUDIO 2.<br />
� AUDIO IN Output audio that is input to the<br />
AUDIO IN.<br />
� COMPUTER1<br />
Display the PICTURE MODE<br />
menu.<br />
Display the DAYLIGHT VIEW<br />
menu.<br />
NOTE:<br />
• Without any operation for 5 seconds, the displayed<br />
menu will be disappeared.<br />
AUDIO SETTING<br />
� COM.AUDIO IN 1<br />
Output audio that is input to the<br />
COMPUTER AUDIO 1.<br />
� AUDIO IN Output audio that is input to the<br />
AUDIO IN.<br />
35<br />
36