Operating instructions - FerrariDatabase.com
Operating instructions - FerrariDatabase.com
Operating instructions - FerrariDatabase.com

Create successful ePaper yourself
Turn your PDF publications into a flip-book with our unique Google optimized e-Paper software.
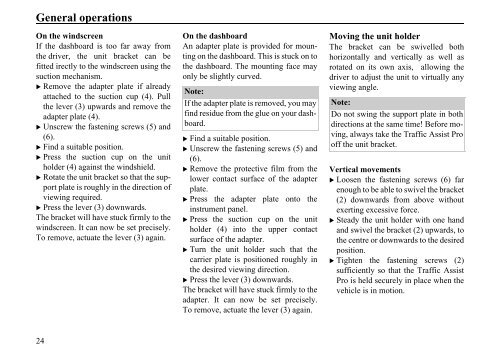
General operations<br />
On the windscreen<br />
If the dashboard is too far away from<br />
the driver, the unit bracket can be<br />
fitted irectly to the windscreen using the<br />
suction mechanism.<br />
� Remove the adapter plate if already<br />
attached to the suction cup (4). Pull<br />
the lever (3) upwards and remove the<br />
adapter plate (4).<br />
� Unscrew the fastening screws (5) and<br />
(6).<br />
� Find a suitable position.<br />
� Press the suction cup on the unit<br />
holder (4) against the windshield.<br />
� Rotate the unit bracket so that the support<br />
plate is roughly in the direction of<br />
viewing required.<br />
� Press the lever (3) downwards.<br />
The bracket will have stuck firmly to the<br />
windscreen. It can now be set precisely.<br />
To remove, actuate the lever (3) again.<br />
24<br />
On the dashboard<br />
An adapter plate is provided for mounting<br />
on the dashboard. This is stuck on to<br />
the dashboard. The mounting face may<br />
only be slightly curved.<br />
Note:<br />
If the adapter plate is removed, you may<br />
find residue from the glue on your dashboard.<br />
� Find a suitable position.<br />
� Unscrew the fastening screws (5) and<br />
(6).<br />
� Remove the protective film from the<br />
lower contact surface of the adapter<br />
plate.<br />
� Press the adapter plate onto the<br />
instrument panel.<br />
� Press the suction cup on the unit<br />
holder (4) into the upper contact<br />
surface of the adapter.<br />
� Turn the unit holder such that the<br />
carrier plate is positioned roughly in<br />
the desired viewing direction.<br />
� Press the lever (3) downwards.<br />
The bracket will have stuck firmly to the<br />
adapter. It can now be set precisely.<br />
To remove, actuate the lever (3) again.<br />
Moving the unit holder<br />
The bracket can be swivelled both<br />
horizontally and vertically as well as<br />
rotated on its own axis, allowing the<br />
driver to adjust the unit to virtually any<br />
viewing angle.<br />
Note:<br />
Do not swing the support plate in both<br />
directions at the same time! Before moving,<br />
always take the Traffic Assist Pro<br />
off the unit bracket.<br />
Vertical movements<br />
� Loosen the fastening screws (6) far<br />
enough to be able to swivel the bracket<br />
(2) downwards from above without<br />
exerting excessive force.<br />
� Steady the unit holder with one hand<br />
and swivel the bracket (2) upwards, to<br />
the centre or downwards to the desired<br />
position.<br />
� Tighten the fastening screws (2)<br />
sufficiently so that the Traffic Assist<br />
Pro is held securely in place when the<br />
vehicle is in motion.