- Page 2 and 3:
Advanced Photoshop Elements 5.0 For
- Page 4 and 5:
Contents Foreword vi Introduction v
- Page 6 and 7:
11 Producing Effective Graphics 267
- Page 8 and 9:
ADVANCED PHOTOSHOP ELEMENTS 5.0 FOR
- Page 10 and 11:
1The Next Level Book resources at:
- Page 12 and 13:
Elements is central >> Photoshop El
- Page 14 and 15:
The Full editor contains all the fa
- Page 16 and 17:
sources of pictures provided and fo
- Page 18 and 19:
changes and use the Auto Contrast f
- Page 20 and 21:
Take manual control of your tones >
- Page 22 and 23:
2Scanner and Camera ADVANCED Book r
- Page 24 and 25:
Image capture - input resolution AD
- Page 26 and 27:
ADVANCED PHOTOSHOP ELEMENTS 5.0 FOR
- Page 28 and 29:
Comparing bits ADVANCED PHOTOSHOP E
- Page 30 and 31:
Local changes are those that are mo
- Page 32 and 33:
ADVANCED PHOTOSHOP ELEMENTS 5.0 FOR
- Page 34 and 35:
ADVANCED PHOTOSHOP ELEMENTS 5.0 FOR
- Page 36 and 37:
‘How do I know if my scene has ei
- Page 38 and 39:
In- camera sharpness adjustment >>
- Page 40 and 41:
ADVANCED PHOTOSHOP ELEMENTS 5.0 FOR
- Page 42 and 43:
ADVANCED PHOTOSHOP ELEMENTS 5.0 FOR
- Page 44 and 45:
ADVANCED PHOTOSHOP ELEMENTS 5.0 FOR
- Page 46 and 47:
ADVANCED PHOTOSHOP ELEMENTS 5.0 FOR
- Page 48 and 49:
ADVANCED PHOTOSHOP ELEMENTS 5.0 FOR
- Page 50 and 51:
Film and print scanners ADVANCED PH
- Page 52 and 53:
Scanning resolution > Adjusting the
- Page 54 and 55:
Contrast changes >> Flat pictures c
- Page 56 and 57:
2.17 Dust and scratches Suitable fo
- Page 58 and 59:
ADVANCED PHOTOSHOP ELEMENTS 5.0 FOR
- Page 60 and 61:
Fixing common shooting problems ADV
- Page 62 and 63:
Fixing common scanning problems ADV
- Page 64 and 65:
3Processing Raw Files ADVANCED Book
- Page 66 and 67:
3.01 Enabling your Raw camera Suita
- Page 68 and 69:
ADVANCED PHOTOSHOP ELEMENTS 5.0 FOR
- Page 70 and 71:
ADVANCED PHOTOSHOP ELEMENTS 5.0 FOR
- Page 72 and 73:
ADVANCED PHOTOSHOP ELEMENTS 5.0 FOR
- Page 74 and 75:
The Settings menu ADVANCED PHOTOSHO
- Page 76 and 77:
ADVANCED PHOTOSHOP ELEMENTS 5.0 FOR
- Page 78 and 79:
Shadows ADVANCED PHOTOSHOP ELEMENTS
- Page 80 and 81:
Alternative ACR button layout displ
- Page 82 and 83:
Step 1 >> Once you have downloaded
- Page 84 and 85:
Step 12 >> The sharpening control i
- Page 86 and 87:
4Photo ADVANCED Book resources PHOT
- Page 88 and 89:
It is at this point in the process
- Page 90 and 91:
Changing names >> Rename a fi le by
- Page 92 and 93:
ADVANCED PHOTOSHOP ELEMENTS 5.0 FOR
- Page 94 and 95:
Another option is to view the photo
- Page 96 and 97:
Finding tagged photos or those cont
- Page 98 and 99:
ADVANCED PHOTOSHOP ELEMENTS 5.0 FOR
- Page 100 and 101:
ADVANCED PHOTOSHOP ELEMENTS 5.0 FOR
- Page 102 and 103:
4.12 Creating Image Stacks Suitable
- Page 104 and 105:
5Pathways to Editing in Elements AD
- Page 106 and 107:
5.01 Auto Smart Fix Suitable for El
- Page 108 and 109:
ADVANCED PHOTOSHOP ELEMENTS 5.0 FOR
- Page 110 and 111:
Zoom, Move, Crop, Red Eye Removal,
- Page 112 and 113:
Manual editing ADVANCED PHOTOSHOP E
- Page 114 and 115:
6Image Changes - Beyond the Basics
- Page 116 and 117:
ADVANCED PHOTOSHOP ELEMENTS 5.0 FOR
- Page 118 and 119:
Adjusting the magic >> The options
- Page 120 and 121:
Contract >> Reduce the size of the
- Page 122 and 123:
ADVANCED PHOTOSHOP ELEMENTS 5.0 FOR
- Page 124 and 125:
ADVANCED PHOTOSHOP ELEMENTS 5.0 FOR
- Page 126 and 127:
Blending modes and opacity ADVANCED
- Page 128 and 129:
ADVANCED PHOTOSHOP ELEMENTS 5.0 FOR
- Page 130 and 131:
Step 1 >> Select Image > Mode > Gra
- Page 132 and 133:
Step 1 >> Select the Hue/Saturation
- Page 134 and 135:
6.15 The new Convert to Black and W
- Page 136 and 137:
Advanced dodging and burning-in ADV
- Page 138 and 139:
Dodging and burning-in >> Dodging a
- Page 140 and 141:
Step 1 >> Create a new Levels adjus
- Page 142 and 143:
After duplicating image and changin
- Page 144 and 145:
Texture burn-in >> (a) Original ima
- Page 146 and 147:
Step 1 >> Select the Hue/Saturation
- Page 148 and 149:
Split toning Split tone >> With the
- Page 150 and 151:
ADVANCED PHOTOSHOP ELEMENTS 5.0 FOR
- Page 152 and 153:
Step 1 >> Make a selection of the p
- Page 154 and 155:
Grayscale mask border Grayscale mas
- Page 156 and 157:
Adding texture Step 1 >> Zoom in so
- Page 158 and 159:
Step 1 >> Create a new layer above
- Page 160 and 161:
Step 1 >> Make sure that your pictu
- Page 162 and 163:
Step 1 >> Make sure that your pictu
- Page 164 and 165:
7Darkroom ADVANCED Book resources P
- Page 166 and 167:
ADVANCED PHOTOSHOP ELEMENTS 5.0 FOR
- Page 168 and 169:
Step 4 >> Reduce the opacity of the
- Page 170 and 171:
ADVANCED PHOTOSHOP ELEMENTS 5.0 FOR
- Page 172 and 173: ADVANCED PHOTOSHOP ELEMENTS 5.0 FOR
- Page 174 and 175: Lith printing >> Recreating the hig
- Page 176 and 177: ADVANCED PHOTOSHOP ELEMENTS 5.0 FOR
- Page 178 and 179: selection still active the Hue/Satu
- Page 180 and 181: Step 1 >> Open the Levels feature f
- Page 182 and 183: Martin Evening of ‘Adobe Photosho
- Page 184 and 185: Step 1 >> Open a black and white pi
- Page 186 and 187: ADVANCED PHOTOSHOP ELEMENTS 5.0 FOR
- Page 188 and 189: ADVANCED PHOTOSHOP ELEMENTS 5.0 FOR
- Page 190 and 191: ADVANCED PHOTOSHOP ELEMENTS 5.0 FOR
- Page 192 and 193: Step 1 >> Carefully select the main
- Page 194 and 195: ADVANCED PHOTOSHOP ELEMENTS 5.0 FOR
- Page 196 and 197: Darken highlights Darken mid tones
- Page 198 and 199: ADVANCED PHOTOSHOP ELEMENTS 5.0 FOR
- Page 200 and 201: ADVANCED PHOTOSHOP ELEMENTS 5.0 FOR
- Page 202 and 203: Step 1 >> Open both images into the
- Page 204 and 205: Step 7 >> Use the Clone Stamp to ev
- Page 206 and 207: Step 1 >> With the image open in Ph
- Page 208 and 209: Step 1 >> Open the example image. N
- Page 210 and 211: Step 1 >> Start by making an oval s
- Page 212 and 213: Step 1 >> To create this effect we
- Page 214 and 215: 8Professional retouching Book resou
- Page 216 and 217: ADVANCED PHOTOSHOP ELEMENTS 5.0 FOR
- Page 218 and 219: 8.02 Softening freckles Suitable fo
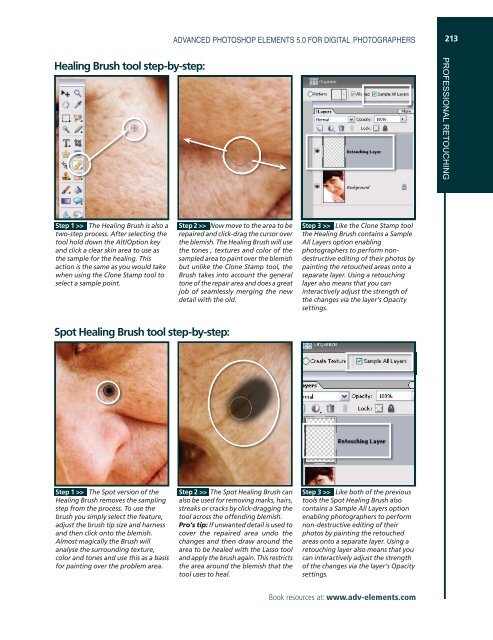
- Page 220 and 221: Spot Healing Brush In recognition o
- Page 224 and 225: 8.05 Tone down skin highlights and
- Page 226 and 227: 9Making Better Panoramas ADVANCED B
- Page 228 and 229: Starting a new panorama Editing in
- Page 230 and 231: Advanced shooting techniques ADVANC
- Page 232 and 233: ADVANCED PHOTOSHOP ELEMENTS 5.0 FOR
- Page 234 and 235: ADVANCED PHOTOSHOP ELEMENTS 5.0 FOR
- Page 236 and 237: DOF is controlled by three distinct
- Page 238 and 239: 9.07 Timing Suitable for Elements -
- Page 240 and 241: (b) Repair - In some instances it i
- Page 242 and 243: ADVANCED PHOTOSHOP ELEMENTS 5.0 FOR
- Page 244 and 245: Step 1 >> Open the images with diff
- Page 246 and 247: ADVANCED PHOTOSHOP ELEMENTS 5.0 FOR
- Page 248 and 249: Ensuring consistency >> Using the I
- Page 250 and 251: 9.16 High-resolution mosaics Suitab
- Page 252 and 253: Step 1 >> Select the Paper tab from
- Page 254 and 255: OPTION 1: Converting Photomerge out
- Page 256 and 257: ADVANCED PHOTOSHOP ELEMENTS 5.0 FOR
- Page 258 and 259: 10Extending Your Web Abilities ADVA
- Page 260 and 261: make for a better site. Just as the
- Page 262 and 263: ADVANCED PHOTOSHOP ELEMENTS 5.0 FOR
- Page 264 and 265: Step 1 >> Multi-select the images t
- Page 266 and 267: ADVANCED PHOTOSHOP ELEMENTS 5.0 FOR
- Page 268 and 269: ADVANCED PHOTOSHOP ELEMENTS 5.0 FOR
- Page 270 and 271: ADVANCED PHOTOSHOP ELEMENTS 5.0 FOR
- Page 272 and 273:
Step 1 >> Choose the web page color
- Page 274 and 275:
Step 1 >> Collect the web assets th
- Page 276 and 277:
11Producing Effective Graphics ADVA
- Page 278 and 279:
ADVANCED PHOTOSHOP ELEMENTS 5.0 FOR
- Page 280 and 281:
ADVANCED PHOTOSHOP ELEMENTS 5.0 FOR
- Page 282 and 283:
ADVANCED PHOTOSHOP ELEMENTS 5.0 FOR
- Page 284 and 285:
ADVANCED PHOTOSHOP ELEMENTS 5.0 FOR
- Page 286 and 287:
Leading Originally referring to the
- Page 288 and 289:
ADVANCED PHOTOSHOP ELEMENTS 5.0 FOR
- Page 290 and 291:
Step 1 >> To help ensure the accura
- Page 292 and 293:
Step 4 >> Apply a second layer styl
- Page 294 and 295:
ADVANCED PHOTOSHOP ELEMENTS 5.0 FOR
- Page 296 and 297:
Step 1 >> Open a suitable image doc
- Page 298 and 299:
Step 1 >> With a picture document a
- Page 300 and 301:
ADVANCED PHOTOSHOP ELEMENTS 5.0 FOR
- Page 302 and 303:
Step 13 >> Using a foreground to tr
- Page 304 and 305:
Step 1 >> With a soft-edged brush d
- Page 306 and 307:
11.14 Reducing your picture’s col
- Page 308 and 309:
Step 1 >> The contrast of the origi
- Page 310 and 311:
Step 1 >> Crop the image to a secti
- Page 312 and 313:
ADVANCED PHOTOSHOP ELEMENTS 5.0 FOR
- Page 314 and 315:
(b) Fade to white Step 1 >> To make
- Page 316 and 317:
12Free Form Photo Layouts ADVANCED
- Page 318 and 319:
Before you start - edit then layout
- Page 320 and 321:
Step 7 >> Extra pages and images ca
- Page 322 and 323:
Frame and picture combination chang
- Page 324 and 325:
Getting new photos to fi t >> The l
- Page 326 and 327:
Moving pages >> The position of pag
- Page 328 and 329:
ADVANCED PHOTOSHOP ELEMENTS 5.0 FOR
- Page 330 and 331:
Artwork and Effects > Favorites sec
- Page 332 and 333:
ADVANCED PHOTOSHOP ELEMENTS 5.0 FOR
- Page 334 and 335:
Print Preview ADVANCED PHOTOSHOP EL
- Page 336 and 337:
Background DIY Backgrounds in Photo
- Page 338 and 339:
13Photo Creations Book resources at
- Page 340 and 341:
ADVANCED PHOTOSHOP ELEMENTS 5.0 FOR
- Page 342 and 343:
13.01 Multimedia slide shows Suitab
- Page 344 and 345:
ADVANCED PHOTOSHOP ELEMENTS 5.0 FOR
- Page 346 and 347:
Step 4 >> Next save the project in
- Page 348 and 349:
ADVANCED PHOTOSHOP ELEMENTS 5.0 FOR
- Page 350 and 351:
ADVANCED PHOTOSHOP ELEMENTS 5.0 FOR
- Page 352 and 353:
ADVANCED PHOTOSHOP ELEMENTS 5.0 FOR
- Page 354 and 355:
ADVANCED PHOTOSHOP ELEMENTS 5.0 FOR
- Page 356 and 357:
14Finely Crafted Output Book resour
- Page 358 and 359:
digital printing different shades a
- Page 360 and 361:
ADVANCED PHOTOSHOP ELEMENTS 5.0 FOR
- Page 362 and 363:
ADVANCED PHOTOSHOP ELEMENTS 5.0 FOR
- Page 364 and 365:
Step 1 >> With your image open in E
- Page 366 and 367:
ADVANCED PHOTOSHOP ELEMENTS 5.0 FOR
- Page 368 and 369:
14.03 Multiple prints on a page Sui
- Page 370 and 371:
Color gamut >> The difference betwe
- Page 372 and 373:
ADVANCED PHOTOSHOP ELEMENTS 5.0 FOR
- Page 374 and 375:
Step 1 >> Windows users should sele
- Page 376 and 377:
sRGB versus Adobe RGB Printer ADVAN
- Page 378 and 379:
Step 4 >> Use the monitor’s built
- Page 380 and 381:
Step 1 >> Start by selecting the di
- Page 382 and 383:
Testing tones ADVANCED PHOTOSHOP EL
- Page 384 and 385:
Step 1 >> Print a full color test i
- Page 386 and 387:
Step 4 >> From the Print dialog cli
- Page 388 and 389:
ADVANCED PHOTOSHOP ELEMENTS 5.0 FOR
- Page 390 and 391:
Dye-based Inks - Most standard cart
- Page 392 and 393:
ADVANCED PHOTOSHOP ELEMENTS 5.0 FOR
- Page 394 and 395:
ADVANCED PHOTOSHOP ELEMENTS 5.0 FOR
- Page 396 and 397:
This approach works by sampling a g
- Page 398 and 399:
I still cringe saying it, but it is
- Page 400 and 401:
Appendices ADVANCED PHOTOSHOP ELEME
- Page 402 and 403:
The modes are grouped into several
- Page 404 and 405:
Minimize History states >> The Phot
- Page 406 and 407:
Power Retouche - Black & White Stud
- Page 408 and 409:
Caption Captions are another way to
- Page 410 and 411:
J >> JPEG A file format designed by
- Page 412 and 413:
Keyboard shortcuts General >> ADVAN
- Page 414 and 415:
Painting >> ADVANCED PHOTOSHOP ELEM
- Page 416 and 417:
Index ADVANCED PHOTOSHOP ELEMENTS 5
- Page 418 and 419:
Polaroid effect, 161 printers, 374-
- Page 420 and 421:
quality and compression, 258-9 Raw
- Page 422 and 423:
color management, 362 diffusion pri
- Page 424 and 425:
VCD/DVD with Menu project, 335-6, 3


