SDM-8400 HIG.book - Comtech EF Data
SDM-8400 HIG.book - Comtech EF Data
SDM-8400 HIG.book - Comtech EF Data

You also want an ePaper? Increase the reach of your titles
YUMPU automatically turns print PDFs into web optimized ePapers that Google loves.
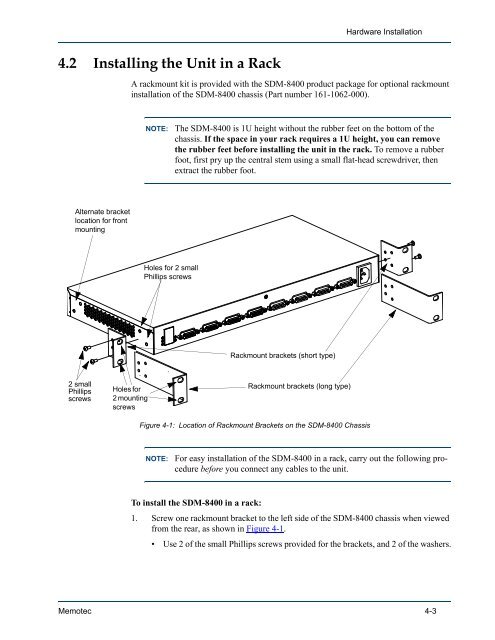
4.2 Installing the Unit in a Rack<br />
Alternate bracket<br />
location for front<br />
mounting<br />
2 small<br />
Phillips<br />
screws<br />
Hardware Installation<br />
A rackmount kit is provided with the <strong>SDM</strong>-<strong>8400</strong> product package for optional rackmount<br />
installation of the <strong>SDM</strong>-<strong>8400</strong> chassis (Part number 161-1062-000).<br />
Holes for<br />
2 mounting<br />
screws<br />
NOTE: The <strong>SDM</strong>-<strong>8400</strong> is 1U height without the rubber feet on the bottom of the<br />
chassis. If the space in your rack requires a 1U height, you can remove<br />
the rubber feet before installing the unit in the rack. To remove a rubber<br />
foot, first pry up the central stem using a small flat-head screwdriver, then<br />
extract the rubber foot.<br />
Holes for 2 small<br />
Phillips screws<br />
Rackmount brackets (short type)<br />
Rackmount brackets (long type)<br />
Figure 4-1: Location of Rackmount Brackets on the <strong>SDM</strong>-<strong>8400</strong> Chassis<br />
NOTE: For easy installation of the <strong>SDM</strong>-<strong>8400</strong> in a rack, carry out the following procedure<br />
before you connect any cables to the unit.<br />
To install the <strong>SDM</strong>-<strong>8400</strong> in a rack:<br />
1. Screw one rackmount bracket to the left side of the <strong>SDM</strong>-<strong>8400</strong> chassis when viewed<br />
from the rear, as shown in Figure 4-1.<br />
• Use 2 of the small Phillips screws provided for the brackets, and 2 of the washers.<br />
Memotec 4-3