- Page 3 and 4: Flash MX 2004 Games
- Page 5 and 6: Flash MX 2004 Games Art to ActionSc
- Page 7 and 8: Contents at a glance Introduction x
- Page 9 and 10: Contents in summary Introduction xi
- Page 11 and 12: Contents in summary Chapter 15: Maz
- Page 13 and 14: Introduction: Learn to write Action
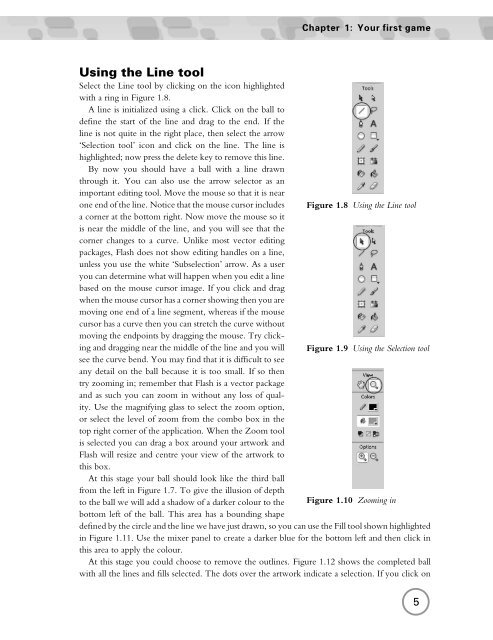
- Page 15 and 16: 1 Your first game Rather alarmingly
- Page 17: Chapter 1: Your first game view of
- Page 21 and 22: Chapter 1: Your first game Adding t
- Page 23 and 24: Chapter 1: Your first game is true
- Page 25 and 26: Chapter 1: Your first game would tr
- Page 27 and 28: _x = startX; _y = startY; moveX = 0
- Page 29: Section 1 Animation The first secti
- Page 32 and 33: Flash MX 2004 Games Using the drawi
- Page 34 and 35: Flash MX 2004 Games Figure 2.7 Stag
- Page 36 and 37: Flash MX 2004 Games The Pencil tool
- Page 38 and 39: Flash MX 2004 Games When you use th
- Page 40 and 41: Flash MX 2004 Games Figure 2.25 Sca
- Page 42 and 43: Flash MX 2004 Games To use a gradie
- Page 44 and 45: Flash MX 2004 Games tweening was se
- Page 46 and 47: Flash MX 2004 Games Figure 2.37 Usi
- Page 48 and 49: 3 Simple cut-out animation Flash is
- Page 50 and 51: Flash MX 2004 Games Figure 3.4 Sele
- Page 52 and 53: Flash MX 2004 Games Figure 3.7 Usin
- Page 54 and 55: Flash MX 2004 Games Figure 3.10 The
- Page 56 and 57: Flash MX 2004 Games pressing F5. Th
- Page 58 and 59: Flash MX 2004 Games WalkLeft TurnLe
- Page 60 and 61: 4 Using CGI programs to create anim
- Page 62 and 63: Flash MX 2004 Games that sometimes
- Page 64 and 65: Flash MX 2004 Games Figure 4.6 The
- Page 66 and 67: Flash MX 2004 Games Figure 4.9 The
- Page 68 and 69:
Flash MX 2004 Games As you get expe
- Page 70 and 71:
Flash MX 2004 Games colour layer us
- Page 72 and 73:
Flash MX 2004 Games A higher settin
- Page 74 and 75:
5 Background art All your games wil
- Page 76 and 77:
Flash MX 2004 Games Figure 5.3 A si
- Page 78 and 79:
Flash MX 2004 Games better to expor
- Page 80 and 81:
Flash MX 2004 Games if it is only d
- Page 82 and 83:
Figure 5.10 Using symbols to add te
- Page 84 and 85:
Flash MX 2004 Games independent whe
- Page 86 and 87:
Flash MX 2004 Games Using photograp
- Page 88 and 89:
Flash MX 2004 Games Website and you
- Page 90 and 91:
Flash MX 2004 Games 3 Choose ‘png
- Page 92 and 93:
Flash MX 2004 Games User input on m
- Page 94 and 95:
Flash MX 2004 Games Figure 6.8 Opti
- Page 97 and 98:
7 So what is a variable? After the
- Page 99 and 100:
Chapter 7: So what is a variable? a
- Page 101 and 102:
Chapter 7: So what is a variable? T
- Page 103 and 104:
Chapter 7: So what is a variable? B
- Page 105 and 106:
Chapter 7: So what is a variable? 3
- Page 107 and 108:
Chapter 7: So what is a variable? P
- Page 109 and 110:
Chapter 7: So what is a variable? 5
- Page 111 and 112:
Chapter 7: So what is a variable? n
- Page 113 and 114:
Chapter 7: So what is a variable? B
- Page 115 and 116:
8 In tip-top condition Should I go
- Page 117 and 118:
Chapter 8: In tip-top condition All
- Page 119 and 120:
Chapter 8: In tip-top condition Wit
- Page 121 and 122:
} } return false; Chapter 8: In tip
- Page 123 and 124:
Figure 8.5 Properties window for th
- Page 125 and 126:
Chapter 8: In tip-top condition to
- Page 127 and 128:
Chapter 8: In tip-top condition Tab
- Page 129 and 130:
Figure 8.12 The anchor point for th
- Page 131 and 132:
53 return 4; 54 } 55 } 56 } Listing
- Page 133 and 134:
Chapter 9: Using loops and the repe
- Page 135 and 136:
Chapter 9: Using loops Now instead
- Page 137 and 138:
do{ a++; if (a==10) continue; //Do
- Page 139 and 140:
Chapter 9: Using loops Two examples
- Page 141 and 142:
Figure 9.2 The Loops01 project at r
- Page 143 and 144:
Chapter 9: Using loops Creating sim
- Page 145 and 146:
Chapter 9: Using loops Creating phy
- Page 147 and 148:
1 //Initialise firing 2 for (i=0; i
- Page 149 and 150:
Chapter 9: Using loops heart of alm
- Page 151 and 152:
Chapter 10: Keep it modular a game
- Page 153 and 154:
Chapter 10: Keep it modular for(j=0
- Page 155 and 156:
Chapter 10: Keep it modular From a
- Page 157 and 158:
Chapter 10: Keep it modular To call
- Page 159 and 160:
4 pt2.init(20, 30); 5 pt2.sum(pt1);
- Page 161 and 162:
Chapter 10: Keep it modular a locat
- Page 163 and 164:
Chapter 10: Keep it modular 1 v1 =
- Page 165 and 166:
Chapter 10: Keep it modular Summary
- Page 167 and 168:
Chapter 11: Debugging would give th
- Page 169 and 170:
4 trace("n = " + n); 5 6 function s
- Page 171 and 172:
5 onClipEvent(enterFrame){ 6 count+
- Page 173 and 174:
10 name = "Box" + i; 11 eval(name).
- Page 175 and 176:
Chapter 11: Debugging 5 switch(i){
- Page 177 and 178:
Chapter 11: Debugging Using the Fla
- Page 179 and 180:
the Watch window, then you can see
- Page 181 and 182:
Figure 11.12 Debugging remotely Cha
- Page 183 and 184:
is presumed, www.niklever.net/flash
- Page 185 and 186:
Chapter 12: Using external files Th
- Page 187 and 188:
Chapter 12: Using external files Wh
- Page 189 and 190:
with a query string version: Chapte
- Page 191 and 192:
Figure 12.3 Developing the Weather
- Page 193 and 194:
function loaded(success){ if (succe
- Page 195:
Chapter 12: Using external files
- Page 199 and 200:
13 Small games to keep them loading
- Page 201 and 202:
Chapter 13: Small games to keep the
- Page 203 and 204:
Chapter 13: Small games to keep the
- Page 205 and 206:
Chapter 13: Small games to keep the
- Page 207 and 208:
Figure 13.7 Developing the Pong gam
- Page 209 and 210:
Chapter 13: Small games to keep the
- Page 211 and 212:
Chapter 13: Small games to keep the
- Page 213 and 214:
Chapter 13: Small games to keep the
- Page 215 and 216:
Chapter 13: Small games to keep the
- Page 217 and 218:
Chapter 13: Small games to keep the
- Page 219 and 220:
14 Quizzes Quizzes are a very popul
- Page 221 and 222:
Chapter 14: Quizzes For now we will
- Page 223 and 224:
Figure 14.5 Creating a user Chapter
- Page 225 and 226:
Figure 14.8 Setting user permission
- Page 227 and 228:
Remember that a querystring takes t
- Page 229 and 230:
Chapter 14: Quizzes 36 "\’, diffi
- Page 231 and 232:
Chapter 14: Quizzes the query strin
- Page 233 and 234:
s.Close(); conn.Close(); Response.W
- Page 235 and 236:
Chapter 14: Quizzes 1 function setQ
- Page 237 and 238:
5 status = "Question deleted"; 6 }
- Page 239 and 240:
Chapter 14: Quizzes Summary Most of
- Page 241 and 242:
Chapter 15: Mazes The strategy used
- Page 243 and 244:
Chapter 15: Mazes Notice that the f
- Page 245 and 246:
Chapter 15: Mazes 128, and exclude
- Page 247 and 248:
Figure 15.3 Creating the tunnel mod
- Page 249 and 250:
Chapter 15: Mazes Open ‘Examples\
- Page 251 and 252:
Chapter 15: Mazes sequence to show
- Page 253 and 254:
64 Tunnel.gotoAndPlay("T_Right"); 6
- Page 255 and 256:
Chapter 15: Mazes 32 dir = EAST; 33
- Page 257 and 258:
Chapter 15: Mazes Summary In common
- Page 259 and 260:
Figure 16.1 The traditional game Re
- Page 261 and 262:
5 cBoard = new Array(64); 6 pBoard
- Page 263 and 264:
Chapter 16: Board games 6 }else{ 7
- Page 265 and 266:
Chapter 16: Board games Once the pl
- Page 267 and 268:
Chapter 16: Board games Here ‘row
- Page 269 and 270:
19 }else{ 20 flip[2] = false; 21 }
- Page 271 and 272:
8 if (flip[6]) flipArrayLine(i, pie
- Page 273 and 274:
Chapter 16: Board games this way, i
- Page 275 and 276:
A simple example Figure 17.1 Develo
- Page 277 and 278:
Chapter 17: Platformers game much e
- Page 279 and 280:
Chapter 17: Platformers If the cat
- Page 281 and 282:
Chapter 17: Platformers 11 break; 1
- Page 283 and 284:
Chapter 17: Platformers 96 gotoAndP
- Page 285 and 286:
a metre. Therefore u − 20t = 0 an
- Page 287 and 288:
56 }else if (moveY-4){ 57 moveY -=
- Page 289 and 290:
13 name = "_root.Bin" + i; 14 dx =
- Page 291 and 292:
16 mc.scale = 1.0; 17 } 18 19 House
- Page 293 and 294:
Chapter 17: Platformers 68 }else if
- Page 295 and 296:
Chapter 17: Platformers array, ‘d
- Page 297 and 298:
Figure 18.1 Developing the football
- Page 299 and 300:
5 ScoreB = 0; 6 playerTeam = RED; 7
- Page 301 and 302:
50 Pitch.Red2.targetx = -96; 51 Pit
- Page 303 and 304:
Chapter 18: Sports simulations Havi
- Page 305 and 306:
Chapter 18: Sports simulations 37 k
- Page 307 and 308:
Chapter 18: Sports simulations 37 i
- Page 309 and 310:
Chapter 18: Sports simulations Upda
- Page 311 and 312:
26 break; 27 } 28 } 29 name = "_roo
- Page 313 and 314:
Chapter 18: Sports simulations 27 v
- Page 315 and 316:
Chapter 18: Sports simulations 1 fu
- Page 317 and 318:
Chapter 18: Sports simulations For
- Page 319 and 320:
Chapter 18: Sports simulations 22 _
- Page 321:
Section 4 Flash for mobiles The mob
- Page 324 and 325:
Flash MX 2004 Games Table 19.1 Synt
- Page 326 and 327:
Flash MX 2004 Games ‘Device sound
- Page 328 and 329:
Flash MX 2004 Games The game uses k
- Page 330 and 331:
Flash MX 2004 Games 316 Table 19.2
- Page 332 and 333:
20 Using Flash on a PocketPC Pocket
- Page 334 and 335:
Flash MX 2004 Games 1 2 3 Conker
- Page 336 and 337:
Flash MX 2004 Games 5 }else { 6 //
- Page 338 and 339:
Flash MX 2004 Games Figure 20.5 ‘
- Page 340 and 341:
Flash MX 2004 Games Reading the mai
- Page 343 and 344:
21 High score tables High score tab
- Page 345 and 346:
Chapter 21: High score tables Notic
- Page 347 and 348:
Figure 21.3 Creating an Access data
- Page 349 and 350:
Chapter 21: High score tables 12 Se
- Page 351 and 352:
Chapter 21: High score tables 1 so
- Page 353 and 354:
Chapter 21: High score tables ‘ge
- Page 355 and 356:
Chapter 21: High score tables Assum
- Page 357 and 358:
37 " has been set to " + score); 38
- Page 359 and 360:
Chapter 21: High score tables 19 fu
- Page 361 and 362:
22 Multi-player games using sockets
- Page 363 and 364:
Chapter 22: Multi-player games usin
- Page 365 and 366:
Chapter 22: Multi-player games usin
- Page 367 and 368:
The possible tags in this example a
- Page 369 and 370:
Chapter 22: Multi-player games usin
- Page 371 and 372:
Chapter 22: Multi-player games usin
- Page 373 and 374:
Chapter 22: Multi-player games usin
- Page 375 and 376:
Figure 23.1 Select Add/Remove Progr
- Page 377 and 378:
Figure 23.5 Configuring IIS Figure
- Page 379 and 380:
Figure 23.8 Running several simulta
- Page 381 and 382:
Chapter 23: Using Flash Communicati
- Page 383 and 384:
Chapter 23: Using Flash Communicati
- Page 385 and 386:
Figure 23.11 Live Log tab of the ad
- Page 387 and 388:
Chapter 23: Using Flash Communicati
- Page 389 and 390:
24 Embedding Flash In this chapter
- Page 391 and 392:
Chapter 24: Embedding Flash You can
- Page 393 and 394:
Figure 24.5 Choosing the source fil
- Page 395 and 396:
Chapter 24: Embedding Flash A dialo
- Page 397 and 398:
Chapter 24: Embedding Flash resourc
- Page 399 and 400:
Chapter 24: Embedding Flash can be
- Page 401 and 402:
Chapter 24: Embedding Flash 46 { 47
- Page 403 and 404:
Appendix A: Integrating Flash with
- Page 405 and 406:
Figure A.2 Importing the Flash inte
- Page 407 and 408:
Appendix A where ‘clipName’ is
- Page 409 and 410:
Appendix B: Tweening in code The ea
- Page 411 and 412:
Figure B.1 The graph of y = x 2 App
- Page 413 and 414:
Appendix B Joining together curves
- Page 415 and 416:
Appendix B want the result to start
- Page 417 and 418:
Figure B.7 Creating the tweening pr
- Page 419 and 420:
Appendix B Creating keyframes So fa
- Page 421 and 422:
and if the curve section is between
- Page 423 and 424:
} switch (channel){ case 0: return
- Page 425 and 426:
Bibliography Art The Illusion of Li
- Page 427 and 428:
Index 3D Studio Max animations, 54
- Page 429 and 430:
Buttons: concepts, 6, 113-15, 126-8
- Page 431 and 432:
fashions, 60 simplicity benefits, 3
- Page 433 and 434:
Floats: bugs, 96 concepts, 95-7 Flu
- Page 435 and 436:
Lightwave modeller, 46-54, 69, 226,
- Page 437 and 438:
Paint Bucket tool, 4, 5, 27-9 optio
- Page 439 and 440:
Set Score button, 340-2 Set-top box
- Page 441 and 442:
outline, 17 sections, 17, 21-8 usag


