ypoc - Sears Canada
ypoc - Sears Canada
ypoc - Sears Canada

Create successful ePaper yourself
Turn your PDF publications into a flip-book with our unique Google optimized e-Paper software.
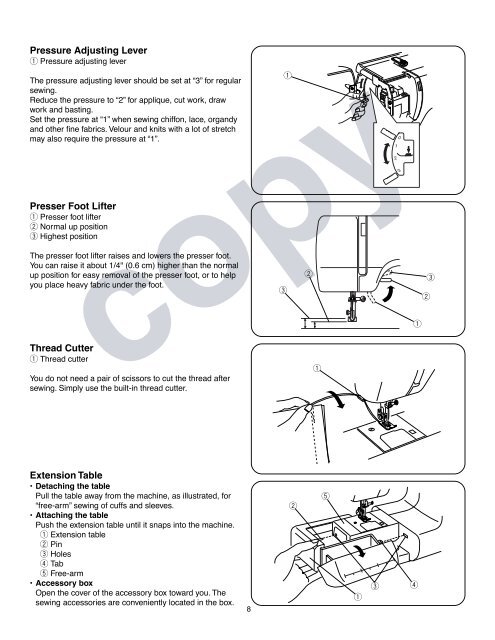
Pressure Adjusting Lever<br />
q Pressure adjusting lever<br />
The pressure adjusting lever should be set at “3” for regular<br />
sewing.<br />
Reduce the pressure to “2” for applique, cut work, draw<br />
work and basting.<br />
Set the pressure at “1” when sewing chiffon, lace, organdy<br />
and other fine fabrics. Velour and knits with a lot of stretch<br />
may also require the pressure at “1”.<br />
Presser Foot Lifter<br />
q Presser foot lifter<br />
w Normal up position<br />
e Highest position<br />
The presser foot lifter raises and lowers the presser foot.<br />
You can raise it about 1/4" (0.6 cm) higher than the normal<br />
up position for easy removal of the presser foot, or to help<br />
you place heavy fabric under the foot.<br />
Thread Cutter<br />
q Thread cutter<br />
You do not need a pair of scissors to cut the thread after<br />
sewing. Simply use the built-in thread cutter.<br />
copy<br />
e<br />
q<br />
w<br />
q<br />
q<br />
w<br />
e<br />
Extension Table<br />
• Detaching the table<br />
Pull the table away from the machine, as illustrated, for<br />
“free-arm” sewing of cuffs and sleeves.<br />
• Attaching the table<br />
Push the extension table until it snaps into the machine.<br />
q Extension table<br />
w Pin<br />
e Holes<br />
r Tab<br />
t Free-arm<br />
• Accessory box<br />
Open the cover of the accessory box toward you. The<br />
sewing accessories are conveniently located in the box.<br />
8<br />
w<br />
t<br />
q<br />
e<br />
r