ypoc - Sears Canada
ypoc - Sears Canada
ypoc - Sears Canada

Create successful ePaper yourself
Turn your PDF publications into a flip-book with our unique Google optimized e-Paper software.
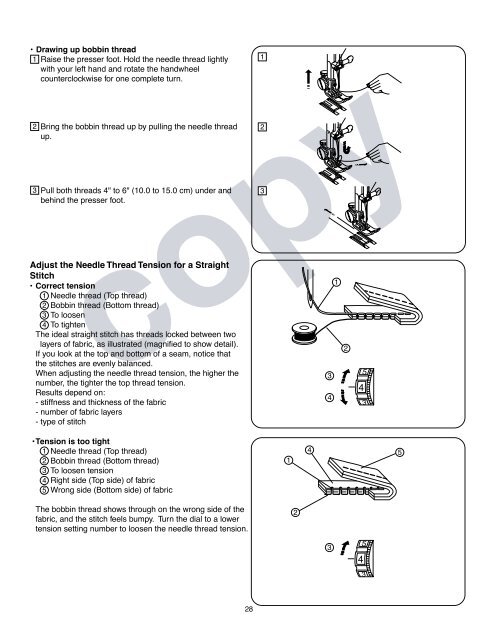
• Drawing up bobbin thread<br />
1 Raise the presser foot. Hold the needle thread lightly<br />
3<br />
with your left hand and rotate the handwheel<br />
counterclockwise for one complete turn.<br />
2 Bring the bobbin thread up by pulling the needle thread<br />
up.<br />
Pull both threads 4" to 6" (10.0 to 15.0 cm) under and<br />
behind the presser foot.<br />
1<br />
2<br />
3<br />
copy<br />
Adjust the Needle Thread Tension for a Straight<br />
Stitch<br />
• Correct tension<br />
1 Needle thread (Top thread)<br />
2 Bobbin thread (Bottom thread)<br />
3 To loosen<br />
4 To tighten<br />
The ideal straight stitch has threads locked between two<br />
layers of fabric, as illustrated (magnified to show detail).<br />
If you look at the top and bottom of a seam, notice that<br />
the stitches are evenly balanced.<br />
When adjusting the needle thread tension, the higher the<br />
number, the tighter the top thread tension.<br />
3<br />
1<br />
Results depend on:<br />
- stiffness and thickness of the fabric<br />
- number of fabric layers<br />
- type of stitch<br />
4<br />
2<br />
5<br />
4<br />
3<br />
•Tension is too tight<br />
1 Needle thread (Top thread)<br />
2 Bobbin thread (Bottom thread)<br />
3 To loosen tension<br />
4 Right side (Top side) of fabric<br />
5 Wrong side (Bottom side) of fabric<br />
1<br />
4<br />
5<br />
The bobbin thread shows through on the wrong side of the<br />
fabric, and the stitch feels bumpy. Turn the dial to a lower<br />
tension setting number to loosen the needle thread tension.<br />
2<br />
3<br />
5<br />
4<br />
3<br />
28