ypoc - Sears Canada
ypoc - Sears Canada
ypoc - Sears Canada

Create successful ePaper yourself
Turn your PDF publications into a flip-book with our unique Google optimized e-Paper software.
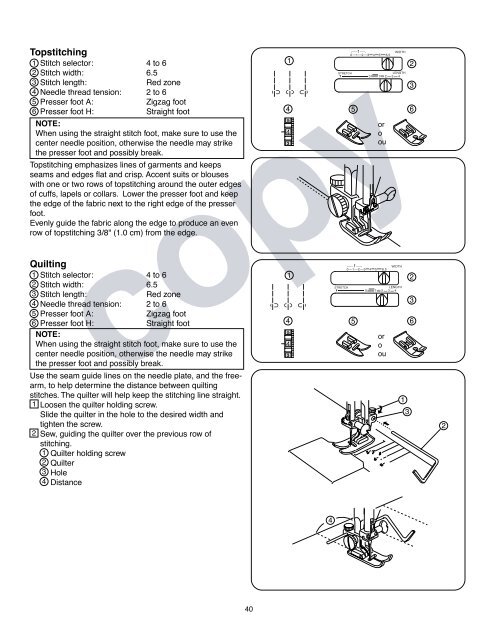
Topstitching<br />
1<br />
2<br />
Stitch selector:<br />
Stitch width:<br />
4 to 6<br />
6.5<br />
3 Stitch length:<br />
Red zone<br />
4 Needle thread tension: 2 to 6<br />
5 Presser foot A:<br />
Zigzag foot<br />
6 Presser foot H:<br />
Straight foot<br />
NOTE:<br />
When using the straight stitch foot, make sure to use the<br />
center needle position, otherwise the needle may strike<br />
the presser foot and possibly break.<br />
Topstitching emphasizes lines of garments and keeps<br />
seams and edges flat and crisp. Accent suits or blouses<br />
with one or two rows of topstitching around the outer edges<br />
of cuffs, lapels or collars. Lower the presser foot and keep<br />
the edge of the fabric next to the right edge of the presser<br />
foot.<br />
Evenly guide the fabric along the edge to produce an even<br />
row of topstitching 3/8" (1.0 cm) from the edge.<br />
Quilting<br />
copy<br />
1<br />
2<br />
Stitch selector:<br />
Stitch width:<br />
4 to 6<br />
6.5<br />
3 Stitch length:<br />
Red zone<br />
4 Needle thread tension: 2 to 6<br />
5 Presser foot A:<br />
Zigzag foot<br />
6 Presser foot H:<br />
Straight foot<br />
NOTE:<br />
When using the straight stitch foot, make sure to use the<br />
center needle position, otherwise the needle may strike<br />
the presser foot and possibly break.<br />
Use the seam guide lines on the needle plate, and the freearm,<br />
to help determine the distance between quilting<br />
1<br />
4<br />
5<br />
4<br />
3<br />
1<br />
4<br />
5<br />
4<br />
3<br />
5<br />
5<br />
or<br />
o<br />
ou<br />
or<br />
o<br />
ou<br />
2<br />
3<br />
6<br />
2<br />
3<br />
6<br />
stitches. The quilter will help keep the stitching line straight.<br />
1 Loosen the quilter holding screw.<br />
Slide the quilter in the hole to the desired width and<br />
tighten the screw.<br />
2 Sew, guiding the quilter over the previous row of<br />
stitching.<br />
1<br />
2<br />
3<br />
4<br />
Quilter holding screw<br />
Quilter<br />
Hole<br />
Distance<br />
1<br />
3<br />
2<br />
4<br />
40