ypoc - Sears Canada
ypoc - Sears Canada
ypoc - Sears Canada

Create successful ePaper yourself
Turn your PDF publications into a flip-book with our unique Google optimized e-Paper software.
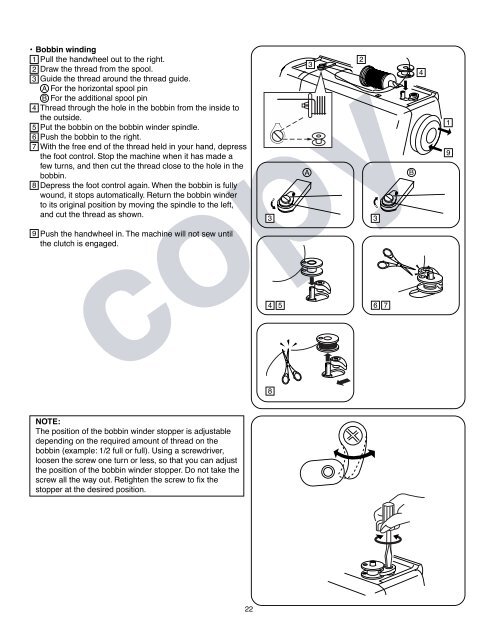
• Bobbin winding<br />
1 Pull the handwheel out to the right.<br />
2<br />
3<br />
4<br />
5<br />
6<br />
7<br />
8<br />
9<br />
Draw the thread from the spool.<br />
Guide the thread around the thread guide.<br />
A For the horizontal spool pin<br />
B For the additional spool pin<br />
Thread through the hole in the bobbin from the inside to<br />
the outside.<br />
Put the bobbin on the bobbin winder spindle.<br />
Push the bobbin to the right.<br />
With the free end of the thread held in your hand, depress<br />
the foot control. Stop the machine when it has made a<br />
few turns, and then cut the thread close to the hole in the<br />
bobbin.<br />
Depress the foot control again. When the bobbin is fully<br />
wound, it stops automatically. Return the bobbin winder<br />
to its original position by moving the spindle to the left,<br />
and cut the thread as shown.<br />
Push the handwheel in. The machine will not sew until<br />
the clutch is engaged.<br />
3<br />
copy<br />
4<br />
8<br />
5<br />
A<br />
3<br />
2<br />
3<br />
6<br />
7<br />
B<br />
4<br />
1<br />
9<br />
NOTE:<br />
The position of the bobbin winder stopper is adjustable<br />
depending on the required amount of thread on the<br />
bobbin (example: 1/2 full or full). Using a screwdriver,<br />
loosen the screw one turn or less, so that you can adjust<br />
the position of the bobbin winder stopper. Do not take the<br />
screw all the way out. Retighten the screw to fix the<br />
stopper at the desired position.<br />
22