vrc 410 bedienungs- und montageanleitung operating and ... - Vaillant
vrc 410 bedienungs- und montageanleitung operating and ... - Vaillant
vrc 410 bedienungs- und montageanleitung operating and ... - Vaillant
- No tags were found...

You also want an ePaper? Increase the reach of your titles
YUMPU automatically turns print PDFs into web optimized ePapers that Google loves.
DE GB FR<br />
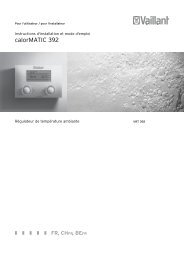
4.5 Heizkurve einstellen<br />
Die Heizkurve beschreibt die Abhänigkeit<br />
der erforderlichen Vorlauftemperatur<br />
von der Außentemperatur.<br />
Die Einstellung der Heizkurve hat Ihr<br />
Installateur bei der Erstinbetriebnahme<br />
vorgenommen. Im Normalfall ist keine<br />
Änderung mehr erforderlich.<br />
Falls bei niedrigen Außentemperaturen<br />
trotz voll geöffneter Thermostatventile <strong>und</strong><br />
geschlossener Türen <strong>und</strong> Fenster die gewünschte<br />
Raumtemperatur nicht erreicht<br />
wird, sollten Sie die Heizkurve<br />
korrigieren. Gehen Sie bitte wie folgt<br />
vor:<br />
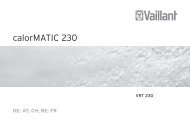
● Klappen Sie den Gerätedeckel (5)<br />
auf.<br />
● Drehen Sie den Schalter (4) auf das<br />
Symbol .<br />
Im Display erscheint eine blinkende<br />
Zahl <strong>und</strong> der Schriftzug „Hz-Kurve“.<br />
● Drehen Sie nun den Einsteller (3)<br />
- nach links, um den Wert zu<br />
verringern<br />
- nach rechts, um den Wert zu<br />
vergrößern.<br />
☞ Der neue Wert wird automatisch<br />
gespeichert. Sie müssen ihn also nicht<br />
mehr bestätigen.<br />
Setting the heating curve<br />
☞ The heating curve has been set by<br />
your installer when he commissioned<br />
your thermostat. Normally it is not<br />
necessary to change this setting.<br />
Should you, however, need to re-set<br />
the heating curve, proceed as follows:<br />
● Open the control cover (5).<br />
● Turn switch (4) to symbol .<br />
The display shows a flashing number<br />
<strong>and</strong> the word “Heat. Curve“.<br />
● Turn knob (3)<br />
- to the left, to decrease the value<br />
- to the right to increase the value<br />
☞ The new value is saved automatically,<br />
there is no need to confirm the new<br />
setting.<br />
☞ The heating curve must be set<br />
correctly to match the design<br />
requirements of the heating system.<br />
e.g. 80°C flow, 60°C return at -1°C<br />
outside temperature, the heat curve<br />
parameter should be set aro<strong>und</strong> 2.6<br />
to 2.8 to satisfy the heating dem<strong>and</strong>.<br />
Réglage de la courbe de chauffage<br />
☞ Le réglage de la courbe de chauffage<br />
a été effectué par votre installateur<br />
lors de la première mise en service.<br />
Normalement, aucune modification<br />
n'est plus nécessaire. Si vous désirez<br />
cependant modifier le réglage de la<br />
courbe de chauffage, veuillez<br />
procéder comme suit:<br />
●<br />
●<br />
Ouvrez le couvercle (5) de l'appareil.<br />
Placez le commutateur (4) sur le<br />
symbol .<br />
Un nombre qui clignote et l'inscription<br />
"Courbe chauf" apparaissent à<br />
l'écran.<br />
● Tournez maintenant le sélecteur (3)<br />
- vers la gauche, pour réduire la<br />
valeur,<br />
- vers la droite, pour faire augmenter<br />
la valeur.<br />
☞ La nouvelle valeur est mémorisée<br />
automatiquement. Vous n'êtes donc<br />
plus obligé(e) de la confirmer de<br />
nouveau.<br />
21