vrc 410 bedienungs- und montageanleitung operating and ... - Vaillant
vrc 410 bedienungs- und montageanleitung operating and ... - Vaillant
vrc 410 bedienungs- und montageanleitung operating and ... - Vaillant
- No tags were found...

You also want an ePaper? Increase the reach of your titles
YUMPU automatically turns print PDFs into web optimized ePapers that Google loves.
DE GB FR<br />
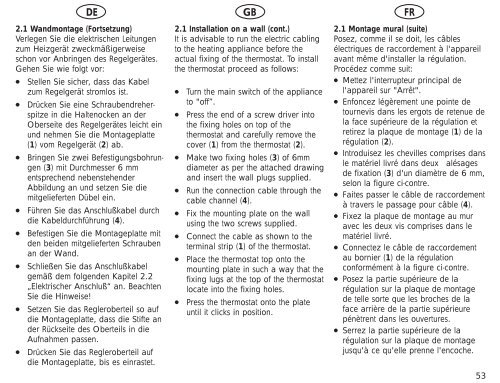
2.1 W<strong>and</strong>montage (Fortsetzung)<br />
Verlegen Sie die elektrischen Leitungen<br />
zum Heizgerät zweckmäßigerweise<br />
schon vor Anbringen des Regelgerätes.<br />
Gehen Sie wie folgt vor:<br />
● Stellen Sie sicher, dass das Kabel<br />
zum Regelgerät stromlos ist.<br />
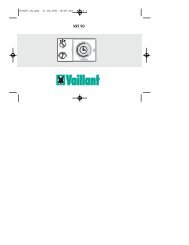
● Drücken Sie eine Schraubendreherspitze<br />
in die Haltenocken an der<br />
Oberseite des Regelgerätes leicht ein<br />
<strong>und</strong> nehmen Sie die Montageplatte<br />
(1) vom Regelgerät (2) ab.<br />
●<br />
●<br />
●<br />
●<br />
●<br />
●<br />
Bringen Sie zwei Befestigungsbohrungen<br />
(3) mit Durchmesser 6 mm<br />
entsprechend nebenstehender<br />
Abbildung an <strong>und</strong> setzen Sie die<br />
mitgelieferten Dübel ein.<br />
Führen Sie das Anschlußkabel durch<br />
die Kabeldurchführung (4).<br />
Befestigen Sie die Montageplatte mit<br />
den beiden mitgelieferten Schrauben<br />
an der W<strong>and</strong>.<br />
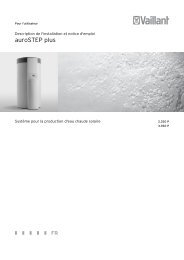
Schließen Sie das Anschlußkabel<br />
gemäß dem folgenden Kapitel 2.2<br />
„Elektrischer Anschluß“ an. Beachten<br />
Sie die Hinweise!<br />
Setzen Sie das Regleroberteil so auf<br />
die Montageplatte, dass die Stifte an<br />
der Rückseite des Oberteils in die<br />
Aufnahmen passen.<br />
Drücken Sie das Regleroberteil auf<br />
die Montageplatte, bis es einrastet.<br />
2.1 Installation on a wall (cont.)<br />
It is advisable to run the electric cabling<br />
to the heating appliance before the<br />
actual fixing of the thermostat. To install<br />
the thermostat proceed as follows:<br />
●<br />
●<br />
●<br />
●<br />
●<br />
●<br />
●<br />
●<br />
Turn the main switch of the appliance<br />
to "off”.<br />
Press the end of a screw driver into<br />
the fixing holes on top of the<br />
thermostat <strong>and</strong> carefully remove the<br />
cover (1) from the thermostat (2).<br />
Make two fixing holes (3) of 6mm<br />
diameter as per the attached drawing<br />
<strong>and</strong> insert the wall plugs supplied.<br />
Run the connection cable through the<br />
cable channel (4).<br />
Fix the mounting plate on the wall<br />
using the two screws supplied.<br />
Connect the cable as shown to the<br />
terminal strip (1) of the thermostat.<br />
Place the thermostat top onto the<br />
mounting plate in such a way that the<br />
fixing lugs at the top of the thermostat<br />
locate into the fixing holes.<br />
Press the thermostat onto the plate<br />
until it clicks in position.<br />
2.1 Montage mural (suite)<br />
Posez, comme il se doit, les câbles<br />
électriques de raccordement à l'appareil<br />
avant même d'installer la régulation.<br />
Procédez comme suit:<br />
● Mettez l'interrupteur principal de<br />
l'appareil sur "Arrêt".<br />
● Enfoncez légèrement une pointe de<br />
tournevis dans les ergots de retenue de<br />
la face supérieure de la régulation et<br />
retirez la plaque de montage (1) de la<br />
régulation (2).<br />
● Introduisez les chevilles comprises dans<br />
le matériel livré dans deux alésages<br />
de fixation (3) d'un diamètre de 6 mm,<br />
selon la figure ci-contre.<br />
● Faites passer le câble de raccordement<br />
à travers le passage pour câble (4).<br />
● Fixez la plaque de montage au mur<br />
avec les deux vis comprises dans le<br />
matériel livré.<br />
● Connectez le câble de raccordement<br />
au bornier (1) de la régulation<br />
conformément à la figure ci-contre.<br />
● Posez la partie supérieure de la<br />
régulation sur la plaque de montage<br />
de telle sorte que les broches de la<br />
face arrière de la partie supérieure<br />
pénètrent dans les ouvertures.<br />
● Serrez la partie supérieure de la<br />
régulation sur la plaque de montage<br />
jusqu'à ce qu'elle prenne l'encoche.<br />
53