ENGLISHSafety instructionsWhen using Power Tools, always observe the safety regulationsapplicable in your country to reduce the risk of fire, electric shock andpersonal injury. Read the following safety instructions before attemptingto operate this product. Keep these instructions in a safe place!General1 Keep work area cleanCluttered areas and benches can cause accidents.2 Consider work area environmentDo not expose Power Tools to humidity. Keep work area well lit.Do not use Power Tools in the presence of flammable liquids or gases.3 Guard against electric shockPrevent body contact with earthed surfaces (e.g. pipes, radiators,cookers and refrigerators).For use under extreme conditions (e.g. high humidity, when metalswarf is being produced, etc.) electric safety can be improved byinserting an isolating transformer or a (FI) earth-leakage circuit-breaker.4 Keep children awayDo not let children come into contact with the tool or extension cord.Supervision is required for those under 16 years of age.5 Extension cords for outdoor useWhen the tool is used outdoors, always use extension cords intendedfor outdoor use and marked accordingly.6 Store idle toolsWhen not in use, Power Tools must be stored in a dry place andlocked up securely, out of reach of children.7 Dress properlyDo not wear loose clothing or jewellery. They can be caught in movingparts. Preferably wear rubber gloves and non-slip footwear whenworking outdoors. Wear protective hair covering to keep long hair outof the way.8 Wear safety gogglesAlso use a face or dust mask in case the operations produce dust orflying particles.9 Beware of maximum sound pressureTake appropriate measures for the protection of hearing if the soundpressure of 85 dB(A) is exceeded.10 Secure workpieceUse clamps or a vice to hold the workpiece. It is safer and it frees bothhands to operate the tool.11 Do not overreachKeep proper footing and balance at all times.12 Avoid unintentional startingDo not carry the plugged-in tool with a finger on the switch.Be sure that the switch is released when plugging in.13 Stay alertWatch what you are doing. Use common sense.Do not operate the tool when you are tired.14 Disconnect toolShut off power and wait for the tool to come to a complete standstillbefore leaving it unattended. Unplug the tool when not in use, beforeservicing or changing accessories.15 Remove adjusting keys and wrenchesAlways check that adjusting keys and wrenches are removed from thetool before operating the tool.16 Use appropriate toolThe intended use is described in this instruction manual.Do not force small tools or attachments to do the job of a heavy-dutytool. The tool will do the job better and safer at the rate for which it wasintended.Warning! The use of any accessory or attachment and performance ofany operation with this tool, other than those recommended in thisinstruction manual may present a risk of personal injury.17 Do not abuse cordNever carry the tool by its cord or pull it to disconnect from the socket.Keep the cord away from heat, oil and sharp edges.18 Maintain tools with careKeep the tools in good condition and clean for better and saferperformance. Follow the instructions for maintenance and changingaccessories. Inspect the tool cords at regular intervals and,if damaged, have them repaired by an Elu authorized repair agent.Inspect the extension cords periodically and replace them if damaged.Keep all controls dry, clean and free from oil and grease.19 Check for damaged partsBefore using the tool, carefully check it for damage to ensure that it willoperate properly and perform its intended function. Check formisalignment and seizure of moving parts, breakage of parts and anyother conditions that may affect its operation. Have damaged guardsor other defective parts repaired or replaced as instructed.Do not use the tool if the switch is defective. Have the switch replacedby an Elu authorized repair agent.20 Have your tool repaired by an Elu authorized repair agentThis Power Tool is in accordance with the relevant safety regulations.To avoid danger, electric appliances must only be repaired by qualifiedtechnicians.Additional safety rules for flip-over saws• Do not use the saw to cut other than aluminium, wood or similar materials.• Connect the machine to a dust collection device when sawing wood.• Select the correct saw blade for the material to be cut.• Use correctly sharpened blades. Observe the maximum speed markedon the sawblade.• Use only saw blades recommended by the manufacturer and whichconform to EN847-1.• Make sure the floor area around the machine is level, well maintainedand free of loose materials e.g. chips and off-cuts.• Make sure adequate general or localized lighting is provided.• Wear suitable personal protective equipment when necessary, including:- hearing protection to reduce the risk of induced hearing loss;- respiratory protection to reduce the risk of inhalation of harmful dust;- gloves for handling saw blades and rough material. Saw bladesshould be carried in a holder wherever practicable.• Refrain from removing any cut-offs or other parts of the workpiece fromthe cutting area whilst the saw is running and the saw head is not inthe rest position.• Replace the table insert when worn.• Report faults in the machine, including guards or sawblades,to your dealer as soon as they are discovered.• Ensure that the upper portion of the saw blade is completely enclosedin the mitre sawing mode. Do not use the saw without the guards inposition, in good working order and properly maintained.• Ensure that the arm is securely fixed in the working position in thebench sawing mode.• Ensure that the arm is securely fixed when bevelling in the bench sawmode.• Take care when grooving during the bench saw operation by usingappropriate guarding system. Slotting is not allowed.Additional safety rules for mitre saws• Make sure that the blade rotates in the correct direction. Keep theblade sharp. Do not use blades of larger or smaller diameter thanrecommended. For the proper blade rating refer to the technical data.• Make sure all locking knobs and clamp handles are tight before startingany operation.• Check periodically that the motor air slots are clean and free of chips.• Disconnect the machine from the mains before carrying out anymaintenance work or when changing the blade.en - 2 19
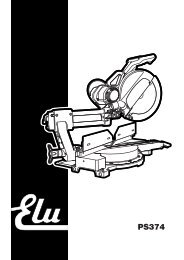
ENGLISH• Before using any accessory consult the instruction manual.The improper use of an accessory can cause damage.• Allow the motor to reach full speed before cutting.• Raise the blade from the kerf in the workpiece prior to releasing theswitch.• Do not wedge anything against the fan to hold the motor shaft.• Never place either hand in the blade area when the saw is connectedto the electrical power source.• Do not attempt to cut excessively small pieces.• Never attempt to stop a machine in motion rapidly by jamming a tool orother means against the blade; serious accidents can be causedunintentionally in this way.• Do not use cracked or damaged saw blades.• Do not use any abrasive discs.Additional safety rules for saw benches• Make sure that the blade rotates in the correct direction and that theteeth are pointing to the front of the saw bench.• Be sure all clamp handles are tight before starting any operation.• Be sure all blade and flanges are clean and the recessed sides of thecollar are against the blade. Tighten the arbor nut securely.• Keep the saw blade sharp and properly set.• Make sure that the riving knife is adjusted to the correct distance formthe blade - 3-8 mm.• Never operate the saw without the upper and lower guards in place.• Keep your hands out of the path of the saw blade.• Disconnect the saw from the mains supply before changing blades orcarrying out maintenance.• Use a push stick at all times, and ensure that you do not place handscloser than 150 mm from the saw blade while cutting.• Do not attempt to operate on anything but the designated voltage.• Do not apply lubricants to the blade when it is running.• Do not reach around behind the saw blade.Residual risksThe following risks are inherent to the use of this saw:- Injuries caused by touching the rotating partsIn spite of the application of the relevant safety regulations and theimplementation of safety devices, certain residual risks cannot beavoided. These are:- Impairment of hearing.- Risk of accidents caused by the uncovered parts of the rotating sawblade.- Risk of injury when changing the blade.- Risk of squeezing fingers when opening the guards.- Health hazards caused by breathing dust developed when sawingwood, especially oak, beech and MDF.Package contentsThe package contains:1 Partly assembled machine4 Legs1 Top guard for bench saw position1 Under-table guard for mitre saw position1 Plastic bag containing:1 pin spanner1 Allen key 6 mm1 Skinpack containing:1 dual height rip fence (E34969)1 push stick1 30 teeth TCT saw blade1 Instruction manual1 Exploded drawing• Check for damage to the tool, parts or accessories which may haveoccurred during transport.• Take the time to thoroughly read and understand this manual prior tooperation.• Remove the saw from the packaging material carefully.Description (fig. A1 - A4)Your Elu flip-over sawing machine has been designed to operate as a mitresaw or as a saw bench to perform the four main sawing operations ofripping, cross-cutting, bevelling and mitring easily, accurately and safely,using the following materials: wood, wood products, aluminium and plastic.Mitre saw modeIn mitre saw mode, the sawing machine is used in vertical, mitre or bevelposition.Saw bench modeTurned over on its central axis, the sawing machine is used to perform thestandard ripping operation and for sawing wide pieces by manuallyfeeding the workpiece into the blade.A11 On/off-switch1A Trigger switch2 Side panel3 Leg clamping wingnut4 Leg5 Foot6 Mitre saw table7 Fence8 Rotating table location plunger9 Fixed lower rear guard10 Fixed upper blade guard11 Dust extraction adapter12 Head lock release lever13 Blade bolt14 Outer flange15 Moving lower guard16 Rotating table17 Rotating table clamp18 Mitre scales19 Table release leverA220 Control handle21 Depth stop rod22 Height adjuster23 Dust extraction adapter24 Bevel clamp handle25 Saw table retention bracket26 Table locking device27 Riving knife clamp knob28 Motor housingSaw bench modeA329 Upper blade guard30 Riving knife31 Saw bench table32 Mitre fence (optional)33 Dual height parallel fence20 en - 3