SAGEM MF 5402 - Support
SAGEM MF 5402 - Support
SAGEM MF 5402 - Support
You also want an ePaper? Increase the reach of your titles
YUMPU automatically turns print PDFs into web optimized ePapers that Google loves.
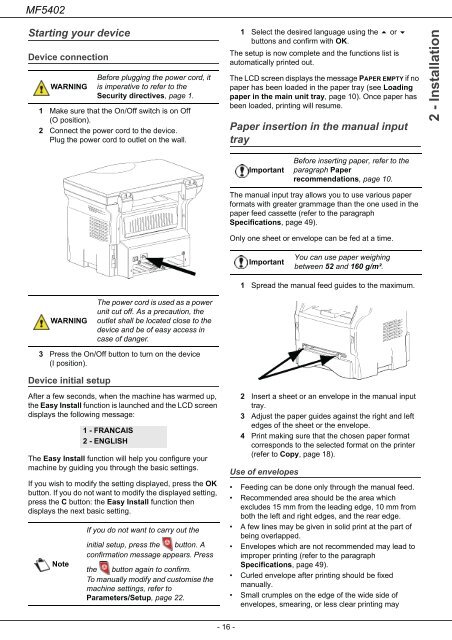
<strong>MF</strong><strong>5402</strong><br />
Starting your device<br />
Device connection<br />
WARNING<br />
1 Make sure that the On/Off switch is on Off<br />
(O position).<br />
2 Connect the power cord to the device.<br />
Plug the power cord to outlet on the wall.<br />
WARNING<br />
3 Press the On/Off button to turn on the device<br />
(I position).<br />
Device initial setup<br />
After a few seconds, when the machine has warmed up,<br />
the Easy Install function is launched and the LCD screen<br />
displays the following message:<br />
The Easy Install function will help you configure your<br />
machine by guiding you through the basic settings.<br />
If you wish to modify the setting displayed, press the OK<br />
button. If you do not want to modify the displayed setting,<br />
press the C button: the Easy Install function then<br />
displays the next basic setting.<br />
Note<br />
Before plugging the power cord, it<br />
is imperative to refer to the<br />
Security directives, page 1.<br />
The power cord is used as a power<br />
unit cut off. As a precaution, the<br />
outlet shall be located close to the<br />
device and be of easy access in<br />
case of danger.<br />
1 - FRANCAIS<br />
2 - ENGLISH<br />
If you do not want to carry out the<br />
initial setup, press the button. A<br />
confirmation message appears. Press<br />
the button again to confirm.<br />
To manually modify and customise the<br />
machine settings, refer to<br />
Parameters/Setup, page 22.<br />
- 16 -<br />
1 Select the desired language using the or <br />
buttons and confirm with OK.<br />
The setup is now complete and the functions list is<br />
automatically printed out.<br />
The LCD screen displays the message PAPER EMPTY if no<br />
paper has been loaded in the paper tray (see Loading<br />
paper in the main unit tray, page 10). Once paper has<br />
been loaded, printing will resume.<br />
Paper insertion in the manual input<br />
tray<br />
Important<br />
The manual input tray allows you to use various paper<br />
formats with greater grammage than the one used in the<br />
paper feed cassette (refer to the paragraph<br />
Specifications, page 49).<br />
Only one sheet or envelope can be fed at a time.<br />
Important<br />
1 Spread the manual feed guides to the maximum.<br />
2 Insert a sheet or an envelope in the manual input<br />
tray.<br />
3 Adjust the paper guides against the right and left<br />
edges of the sheet or the envelope.<br />
4 Print making sure that the chosen paper format<br />
corresponds to the selected format on the printer<br />
(refer to Copy, page 18).<br />
Use of envelopes<br />
Before inserting paper, refer to the<br />
paragraph Paper<br />
recommendations, page 10.<br />
You can use paper weighing<br />
between 52 and 160 g/m².<br />
• Feeding can be done only through the manual feed.<br />
• Recommended area should be the area which<br />
excludes 15 mm from the leading edge, 10 mm from<br />
both the left and right edges, and the rear edge.<br />
• A few lines may be given in solid print at the part of<br />
being overlapped.<br />
• Envelopes which are not recommended may lead to<br />
improper printing (refer to the paragraph<br />
Specifications, page 49).<br />
• Curled envelope after printing should be fixed<br />
manually.<br />
• Small crumples on the edge of the wide side of<br />
envelopes, smearing, or less clear printing may<br />
2 - Installation


