SAGEM MF 5402 - Support
SAGEM MF 5402 - Support
SAGEM MF 5402 - Support

Create successful ePaper yourself
Turn your PDF publications into a flip-book with our unique Google optimized e-Paper software.
<strong>MF</strong><strong>5402</strong><br />
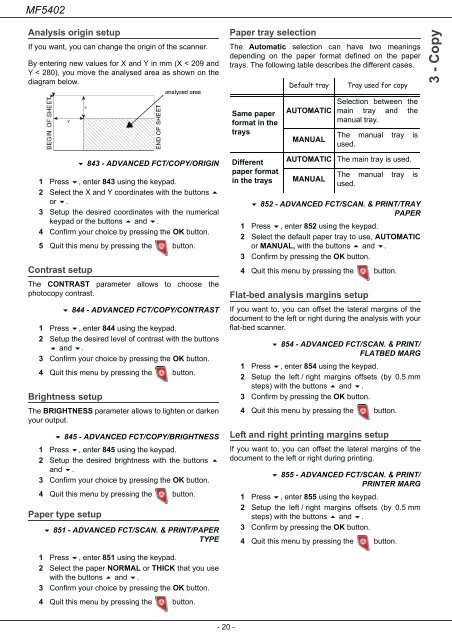
Analysis origin setup<br />
If you want, you can change the origin of the scanner.<br />
By entering new values for X and Y in mm (X < 209 and<br />
Y < 280), you move the analysed area as shown on the<br />
diagram below.<br />
843 - ADVANCED FCT/COPY/ORIGIN<br />
1 Press , enter 843 using the keypad.<br />
2 Select the X and Y coordinates with the buttons <br />
or .<br />
3 Setup the desired coordinates with the numerical<br />
keypad or the buttons and .<br />
4 Confirm your choice by pressing the OK button.<br />
5 Quit this menu by pressing the button.<br />
Contrast setup<br />
The CONTRAST parameter allows to choose the<br />
photocopy contrast.<br />
844 - ADVANCED FCT/COPY/CONTRAST<br />
1 Press , enter 844 using the keypad.<br />
2 Setup the desired level of contrast with the buttons<br />
and .<br />
3 Confirm your choice by pressing the OK button.<br />
4 Quit this menu by pressing the button.<br />
Brightness setup<br />
The BRIGHTNESS parameter allows to lighten or darken<br />
your output.<br />
845 - ADVANCED FCT/COPY/BRIGHTNESS<br />
1 Press , enter 845 using the keypad.<br />
2 Setup the desired brightness with the buttons <br />
and .<br />
3 Confirm your choice by pressing the OK button.<br />
4 Quit this menu by pressing the button.<br />
Paper type setup<br />
851 - ADVANCED FCT/SCAN. & PRINT/PAPER<br />
TYPE<br />
1 Press , enter 851 using the keypad.<br />
2 Select the paper NORMAL or THICK that you use<br />
with the buttons and .<br />
3 Confirm your choice by pressing the OK button.<br />
4 Quit this menu by pressing the button.<br />
- 20 -<br />
Paper tray selection<br />
The Automatic selection can have two meanings<br />
depending on the paper format defined on the paper<br />
trays. The following table describes the different cases.<br />
Same paper<br />
format in the<br />
trays<br />
Different<br />
paper format<br />
in the trays<br />
Default tray Tray used for copy<br />
AUTOMATIC<br />
MANUAL<br />
852 - ADVANCED FCT/SCAN. & PRINT/TRAY<br />
PAPER<br />
1 Press , enter 852 using the keypad.<br />
2 Select the default paper tray to use, AUTOMATIC<br />
or MANUAL, with the buttons and .<br />
3 Confirm by pressing the OK button.<br />
4 Quit this menu by pressing the button.<br />
Flat-bed analysis margins setup<br />
Selection between the<br />
main tray and the<br />
manual tray.<br />
The manual tray is<br />
used.<br />
AUTOMATIC The main tray is used.<br />
MANUAL<br />
The manual tray is<br />
used.<br />
If you want to, you can offset the lateral margins of the<br />
document to the left or right during the analysis with your<br />
flat-bed scanner.<br />
854 - ADVANCED FCT/SCAN. & PRINT/<br />
FLATBED MARG<br />
1 Press , enter 854 using the keypad.<br />
2 Setup the left / right margins offsets (by 0.5 mm<br />
steps) with the buttons and .<br />
3 Confirm by pressing the OK button.<br />
4 Quit this menu by pressing the button.<br />
Left and right printing margins setup<br />
If you want to, you can offset the lateral margins of the<br />
document to the left or right during printing.<br />
855 - ADVANCED FCT/SCAN. & PRINT/<br />
PRINTER MARG<br />
1 Press , enter 855 using the keypad.<br />
2 Setup the left / right margins offsets (by 0.5 mm<br />
steps) with the buttons and .<br />
3 Confirm by pressing the OK button.<br />
4 Quit this menu by pressing the button.<br />
3 - Copy