Creating a Map with ArcMap - Tufts University
Creating a Map with ArcMap - Tufts University
Creating a Map with ArcMap - Tufts University

You also want an ePaper? Increase the reach of your titles
YUMPU automatically turns print PDFs into web optimized ePapers that Google loves.
see a description of what it does):<br />
• If you can't get your bearings, try clicking on the Identify icon ( ) and then click on street<br />
centerlines or parks. Can you find Professors Row on the <strong>Tufts</strong> <strong>University</strong> Campus? (Hint:<br />
Choose Edit – Find, and type in Professors Row, then right-click on one of the results, and<br />
choose Flash Feature or Zoom to Feature)<br />
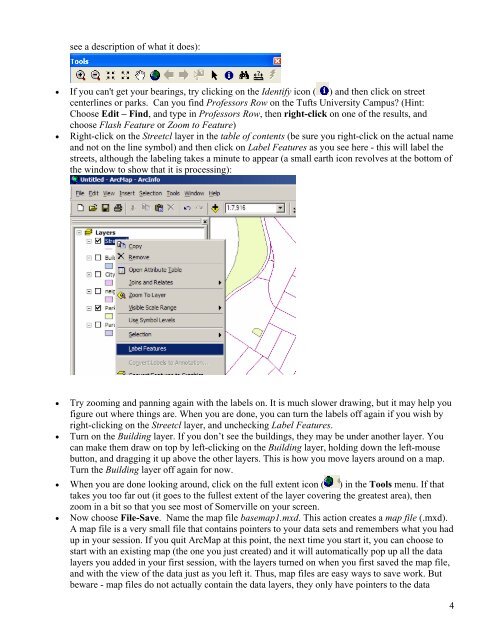
• Right-click on the Streetcl layer in the table of contents (be sure you right-click on the actual name<br />
and not on the line symbol) and then click on Label Features as you see here - this will label the<br />
streets, although the labeling takes a minute to appear (a small earth icon revolves at the bottom of<br />
the window to show that it is processing):<br />
• Try zooming and panning again <strong>with</strong> the labels on. It is much slower drawing, but it may help you<br />
figure out where things are. When you are done, you can turn the labels off again if you wish by<br />
right-clicking on the Streetcl layer, and unchecking Label Features.<br />
• Turn on the Building layer. If you don’t see the buildings, they may be under another layer. You<br />
can make them draw on top by left-clicking on the Building layer, holding down the left-mouse<br />
button, and dragging it up above the other layers. This is how you move layers around on a map.<br />
Turn the Building layer off again for now.<br />
• When you are done looking around, click on the full extent icon ( ) in the Tools menu. If that<br />
•<br />
takes you too far out (it goes to the fullest extent of the layer covering the greatest area), then<br />
zoom in a bit so that you see most of Somerville on your screen.<br />
Now choose File-Save. Name the map file basemap1.mxd. This action creates a map file (.mxd).<br />
A map file is a very small file that contains pointers to your data sets and remembers what you had<br />
up in your session. If you quit Arc<strong>Map</strong> at this point, the next time you start it, you can choose to<br />
start <strong>with</strong> an existing map (the one you just created) and it will automatically pop up all the data<br />
layers you added in your first session, <strong>with</strong> the layers turned on when you first saved the map file,<br />
and <strong>with</strong> the view of the data just as you left it. Thus, map files are easy ways to save work. But<br />
beware - map files do not actually contain the data layers, they only have pointers to the data<br />
4