Creating a Map with ArcMap - Tufts University
Creating a Map with ArcMap - Tufts University
Creating a Map with ArcMap - Tufts University

You also want an ePaper? Increase the reach of your titles
YUMPU automatically turns print PDFs into web optimized ePapers that Google loves.
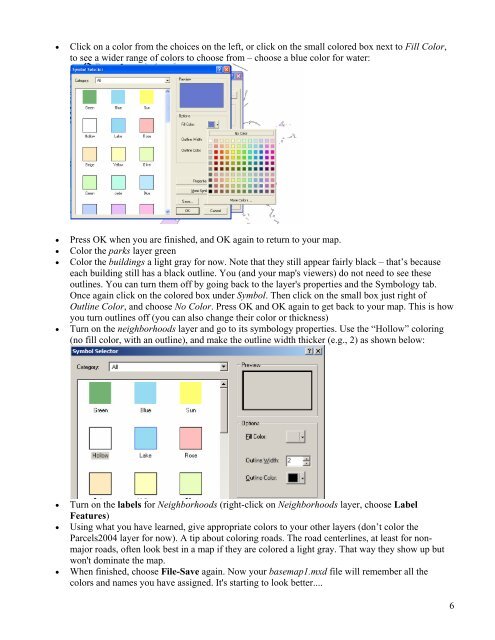
• Click on a color from the choices on the left, or click on the small colored box next to Fill Color,<br />
to see a wider range of colors to choose from – choose a blue color for water:<br />
• Press OK when you are finished, and OK again to return to your map.<br />
• Color the parks layer green<br />
• Color the buildings a light gray for now. Note that they still appear fairly black – that’s because<br />
each building still has a black outline. You (and your map's viewers) do not need to see these<br />
outlines. You can turn them off by going back to the layer's properties and the Symbology tab.<br />
Once again click on the colored box under Symbol. Then click on the small box just right of<br />
Outline Color, and choose No Color. Press OK and OK again to get back to your map. This is how<br />
you turn outlines off (you can also change their color or thickness)<br />
• Turn on the neighborhoods layer and go to its symbology properties. Use the “Hollow” coloring<br />
(no fill color, <strong>with</strong> an outline), and make the outline width thicker (e.g., 2) as shown below:<br />
• Turn on the labels for Neighborhoods (right-click on Neighborhoods layer, choose Label<br />
Features)<br />
• Using what you have learned, give appropriate colors to your other layers (don’t color the<br />
Parcels2004 layer for now). A tip about coloring roads. The road centerlines, at least for nonmajor<br />
roads, often look best in a map if they are colored a light gray. That way they show up but<br />
won't dominate the map.<br />
• When finished, choose File-Save again. Now your basemap1.mxd file will remember all the<br />
colors and names you have assigned. It's starting to look better....<br />
6