

FEMA P-499: Home Builder's Guide to Coastal Construction
FEMA P-499: Home Builder's Guide to Coastal Construction
FEMA P-499: Home Builder's Guide to Coastal Construction

Create successful ePaper yourself
Turn your PDF publications into a flip-book with our unique Google optimized e-Paper software.
7<br />
ROOFING<br />
5. Apply a single layer of ASTM D 226 Type I (#15) or ASTM D 4869 Type II felt. Tack underlayment <strong>to</strong> hold<br />
in place before installing shingles.<br />
6. In northern climates, after step 2, install self-adhering modified bitumen tape (4 inches wide, minimum)<br />
over sheathing joints; seal around deck penetrations with roof tape. Roll tape with roller.<br />
7. Apply a single layer of ASTM D 226 Type II (#30) or ASTM D 4869 Type IV felt. Attach per steps 8 and 9.<br />
Then install a single layer of self-adhering modified bitumen per steps 3 and 4, followed by installation of<br />
the shingles.<br />
8. Secure felt with low-profile, capped-head nails or thin metal disks (“tincaps”) attached with roofing nails.<br />
9. Fasten at approximately 6 inches on center along the laps and at approximately 12 inches on center along<br />
two rows in the field of the sheet between the side laps.<br />
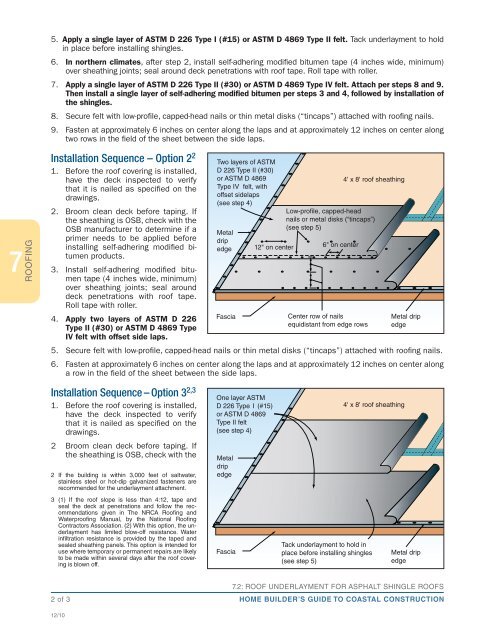
Installation Sequence – Option 2 2<br />
1. Before the roof covering is installed,<br />
have the deck inspected <strong>to</strong> verify<br />
that it is nailed as specified on the<br />
drawings.<br />
2. Broom clean deck before taping. If<br />
the sheathing is OSB, check with the<br />
OSB manufacturer <strong>to</strong> determine if a<br />
primer needs <strong>to</strong> be applied before<br />
installing self-adhering modified bitumen<br />
products.<br />
3. Install self-adhering modified bitumen<br />
tape (4 inches wide, minimum)<br />
over sheathing joints; seal around<br />
deck penetrations with roof tape.<br />
Roll tape with roller.<br />
4. Apply two layers of ASTM D 226<br />
Type II (#30) or ASTM D 4869 Type<br />
IV felt with offset side laps.<br />
5. Secure felt with low-profile, capped-head nails or thin metal disks (“tincaps”) attached with roofing nails.<br />
6. Fasten at approximately 6 inches on center along the laps and at approximately 12 inches on center along<br />
a row in the field of the sheet between the side laps.<br />
Installation Sequence – Option 3 2,3<br />
1. Before the roof covering is installed,<br />
have the deck inspected <strong>to</strong> verify<br />
that it is nailed as specified on the<br />
drawings.<br />
2 Broom clean deck before taping. If<br />
the sheathing is OSB, check with the<br />
2 If the building is within 3,000 feet of saltwater,<br />
stainless steel or hot-dip galvanized fasteners are<br />
recommended for the underlayment attachment.<br />
3 (1) If the roof slope is less than 4:12, tape and<br />
seal the deck at penetrations and follow the recommendations<br />
given in The NRCA Roofing and<br />
Waterproofing Manual, by the National Roofing<br />
Contrac<strong>to</strong>rs Association. (2) With this option, the underlayment<br />
has limited blow-off resistance. Water<br />
infiltration resistance is provided by the taped and<br />
sealed sheathing panels. This option is intended for<br />
use where temporary or permanent repairs are likely<br />
<strong>to</strong> be made within several days after the roof covering<br />
is blown off.<br />
2 of 3<br />
12/10<br />
Two layers of ASTM<br />
D 226 Type II (#30)<br />
or ASTM D 4869<br />
Type IV felt, with<br />
offset sidelaps<br />
(see step 4)<br />
Metal<br />
drip<br />
edge<br />
Fascia<br />
12" on center<br />
Center row of nails<br />
equidistant from edge rows<br />
4' x 8' roof sheathing<br />
Low-profile, capped-head<br />
nails or metal disks (“tincaps”)<br />
(see step 5)<br />
6" on center<br />
Metal drip<br />
edge<br />
7.2: ROOF UNDERLAYMENT FOR ASPHALT SHINGLE ROOFS<br />
HOME BUILDER’S GUIDE TO COASTAL CONSTRUCTION