

FEMA P-499: Home Builder's Guide to Coastal Construction
FEMA P-499: Home Builder's Guide to Coastal Construction
FEMA P-499: Home Builder's Guide to Coastal Construction

You also want an ePaper? Increase the reach of your titles
YUMPU automatically turns print PDFs into web optimized ePapers that Google loves.
Checking Soffit Material Installation<br />
As previously noted, the most critical soffit installations<br />
<strong>to</strong> check are those where vinyl or aluminum<br />
soffit panels are used. Soffits should be fastened <strong>to</strong><br />
the eave structure; they should not be loose in the<br />
channels. Pushing up on the soffit material and the<br />
channels used <strong>to</strong> support the material can be revealing.<br />
If it moves readily or is easy <strong>to</strong> deform, it probably<br />
is not attached very well. Similarly, if the width of the<br />
overhang is greater than 12 inches, there should be<br />
an intermediate support running along the middle of<br />
the soffit and the panels should be attached <strong>to</strong> this<br />
support in addition <strong>to</strong> the supports at the ends of the<br />
panels. If the reader is concerned about the installation<br />
but cannot be sure, there are a couple of <strong>to</strong>ols<br />
with a viewing screen connected <strong>to</strong> a small camera<br />
lens and light mounted at the end of a flexible tube<br />
that can be used <strong>to</strong> observe the connections. These<br />
devices allow inspection through a small hole that<br />
is drilled in an inconspicuous location that can be<br />
later filled with sealant. In order <strong>to</strong> ensure that there<br />
is a strong connection at the wall, there should be<br />
wood blocking running along the wall above the track<br />
where the soffit channel is attached and the channel<br />
should be fastened <strong>to</strong> that blocking. If there is no<br />
wood blocking, and there is either no vertical nailing<br />
surface on the channel or occasional tabs that have<br />
been cut and bent up <strong>to</strong> allow fastening <strong>to</strong> the wall,<br />
strengthening of the anchorage of the soffit material<br />
is clearly indicated.<br />
Remedial Measures<br />
If the inspection indicates a poorly attached soffit,<br />
the best way <strong>to</strong> ensure that the soffit material is adequately<br />
anchored in place is <strong>to</strong> remove it and install<br />
adequate wood blocking <strong>to</strong> allow solid anchorage of<br />
the soffit material. In some cases, it may be possible<br />
<strong>to</strong> remove the soffit material and reinstall it. However,<br />
it is also likely that some or all of the material will<br />
need <strong>to</strong> be replaced, so make sure that it can be<br />
matched before it is removed. Short of removing and<br />
properly reinstalling the soffit material, testing has<br />
shown that the anchorage can be greatly improved<br />
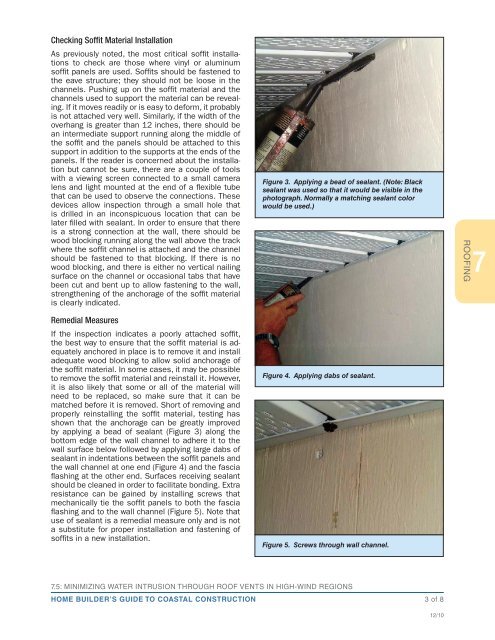
by applying a bead of sealant (Figure 3) along the<br />
bot<strong>to</strong>m edge of the wall channel <strong>to</strong> adhere it <strong>to</strong> the<br />
wall surface below followed by applying large dabs of<br />
sealant in indentations between the soffit panels and<br />
the wall channel at one end (Figure 4) and the fascia<br />
flashing at the other end. Surfaces receiving sealant<br />
should be cleaned in order <strong>to</strong> facilitate bonding. Extra<br />
resistance can be gained by installing screws that<br />
mechanically tie the soffit panels <strong>to</strong> both the fascia<br />
flashing and <strong>to</strong> the wall channel (Figure 5). Note that<br />
use of sealant is a remedial measure only and is not<br />
a substitute for proper installation and fastening of<br />
soffits in a new installation.<br />
7.5: MINIMIZING WATER INTRUSION THROUGH ROOF VENTS IN HIGH-WIND REGIONS<br />
HOME BUILDER’S GUIDE TO COASTAL CONSTRUCTION<br />
Figure 3. Applying a bead of sealant. (Note: Black<br />
sealant was used so that it would be visible in the<br />
pho<strong>to</strong>graph. Normally a matching sealant color<br />
would be used.)<br />
Figure 4. Applying dabs of sealant.<br />
Figure 5. Screws through wall channel.<br />
3 of 8<br />
12/10<br />
ROOFING<br />
7