

FEMA P-499: Home Builder's Guide to Coastal Construction
FEMA P-499: Home Builder's Guide to Coastal Construction
FEMA P-499: Home Builder's Guide to Coastal Construction

You also want an ePaper? Increase the reach of your titles
YUMPU automatically turns print PDFs into web optimized ePapers that Google loves.
Roof-<strong>to</strong>-Wall and<br />
Deck-<strong>to</strong>-Wall Flashing<br />
HOME BUILDER’S GUIDE TO COASTAL CONSTRUCTION Technical Fact Sheet No. 5.2<br />
Purpose: To emphasize the importance of proper roof and deck flashing, and <strong>to</strong> provide typical and enhanced<br />
flashing techniques for coastal homes.<br />
Key Issues<br />
n Poor performance of flashing<br />
and subsequent water<br />
intrusion is a common problem<br />
for coastal homes.<br />
n Enhanced flashing techniques<br />
are recommended in<br />
areas that frequently experience<br />
high winds and driving<br />
rain.<br />
n Water penetration at deck<br />
ledgers can cause wood<br />
dry rot and corrosion of<br />
connec<strong>to</strong>rs leading <strong>to</strong> deck<br />
collapse.<br />
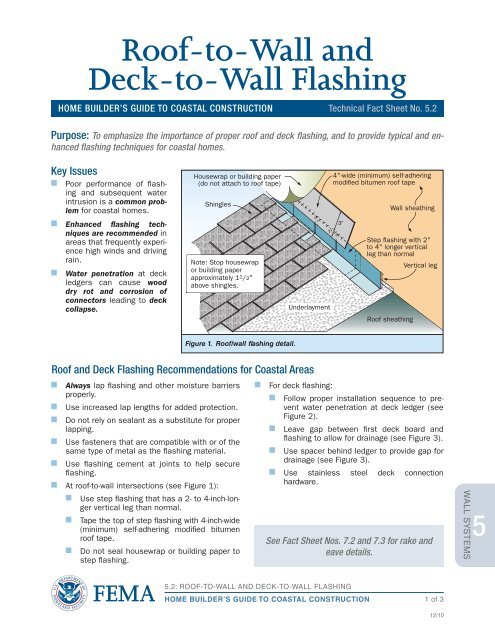
Figure 1. Roof/wall flashing detail.<br />
Roof and Deck Flashing Recommendations for <strong>Coastal</strong> Areas<br />
n Always lap flashing and other moisture barriers<br />
properly.<br />
n Use increased lap lengths for added protection.<br />
n Do not rely on sealant as a substitute for proper<br />
lapping.<br />
n Use fasteners that are compatible with or of the<br />
same type of metal as the flashing material.<br />
n Use flashing cement at joints <strong>to</strong> help secure<br />
flashing.<br />
n At roof-<strong>to</strong>-wall intersections (see Figure 1):<br />
n Use step flashing that has a 2- <strong>to</strong> 4-inch-longer<br />
vertical leg than normal.<br />
n Tape the <strong>to</strong>p of step flashing with 4-inch-wide<br />
(minimum) self-adhering modified bitumen<br />
roof tape.<br />
n Do not seal housewrap or building paper <strong>to</strong><br />
step flashing.<br />
n For deck flashing:<br />
n Follow proper installation sequence <strong>to</strong> prevent<br />
water penetration at deck ledger (see<br />
Figure 2).<br />
n Leave gap between first deck board and<br />
flashing <strong>to</strong> allow for drainage (see Figure 3).<br />
n Use spacer behind ledger <strong>to</strong> provide gap for<br />
drainage (see Figure 3).<br />
n Use stainless steel deck connection<br />
hardware.<br />
See Fact Sheet Nos. 7.2 and 7.3 for rake and<br />
eave details.<br />
5.2: ROOF-TO-WALL AND DECK-TO-WALL FLASHING<br />
HOME BUILDER’S GUIDE TO COASTAL CONSTRUCTION<br />
1 of 3<br />
12/10<br />
WALL SYSTEMS<br />
5