19XR (PIC II) Hermetic Centrifugal Liquid Chillers 50 Hz - Carrier
19XR (PIC II) Hermetic Centrifugal Liquid Chillers 50 Hz - Carrier
19XR (PIC II) Hermetic Centrifugal Liquid Chillers 50 Hz - Carrier
You also want an ePaper? Increase the reach of your titles
YUMPU automatically turns print PDFs into web optimized ePapers that Google loves.
5 - INITIAL START-UP<br />
5.1 - Preparation<br />
Before starting the chiller, check that the:<br />
1. Power is on to the main starter, oil pump relay, tower fan<br />
starter, oil heater relay, and the chiller control centre.<br />
2. Cooling tower water is at proper level and at or below<br />
design entering temperature.<br />
3. Chiller is charged with refrigerant and all refrigerant and<br />
oil valves are in their proper operating position.<br />
4. Oil is at the proper level in the reservoir sight glasses.<br />
5. Oil reservoir temperature is above 60°C or refrigerant<br />
temperature plus 28°C.<br />
6. Valves in the evaporator and condenser water circuits are<br />
open. NOTE: If pumps are not automatic, make sure water<br />
is circulating properly.<br />
NOTE: If the pumps are not automatic, check that the water<br />
is circulating correctly.<br />
WARNING: Do not permit water or brine that is warmer than<br />
52°C to flow through the cooler or condenser. Refrigerant<br />
overpressure may discharge through the relief devices and<br />
result in the loss of refrigerant charge.<br />
7. 'Control test' screen access<br />
At the control screen press the scroll keys to access the<br />
start-up menu option (Terminate lockout option).<br />
46<br />
Press the selection that permits chiller start-up and answer<br />
'YES' to restart it in operating mode. The unit is locked at<br />
the factory to prevent accidental start-up.<br />
5.2 - Dry Run to Test Start-Up Sequence<br />
1. Disengage the main motor disconnect (QF101 for the<br />
factory-mounted starter) on the starter front panel. This<br />
should only disconnect the motor power. Power to the<br />
controls, oil pump, and starter control circuit should still<br />
be energized.<br />
2. Look at the default screen on the local interface: the Status<br />
message in the upper left-hand corner will read, “Manually<br />
Stopped’’. Press CCN or Local to start. If the chiller controls<br />
do not go into a start mode, go to the Schedule screen and<br />
override the schedule or change the occupied time. Press the<br />
LOCAL softkey to begin the start-up sequences.<br />
3. Check that chilled water and condenser water pumps<br />
energize.<br />
4. Check that the oil pump starts and pressurizes the lubrication<br />
system. After the oil pump has run about 45 seconds,<br />
the starter will be energized and go through its start-up<br />
sequence.<br />
5. Check the main contactor for proper operation.<br />
6. The <strong>PIC</strong> <strong>II</strong> will eventually show an alarm for motor amps<br />
not sensed. Reset this alarm and continue with the initial<br />
start-up.<br />
5.3 - Check Rotation<br />
1. Engage the main motor disconnect on the front of the<br />
starter panel. The motor is now ready for rotation check.<br />
2. After the default screen Status message states “Ready for<br />
Start’’ press the LOCAL softkey; start-up checks will be<br />
made by the control.<br />
3. When the starter is energized and the motor begins to<br />
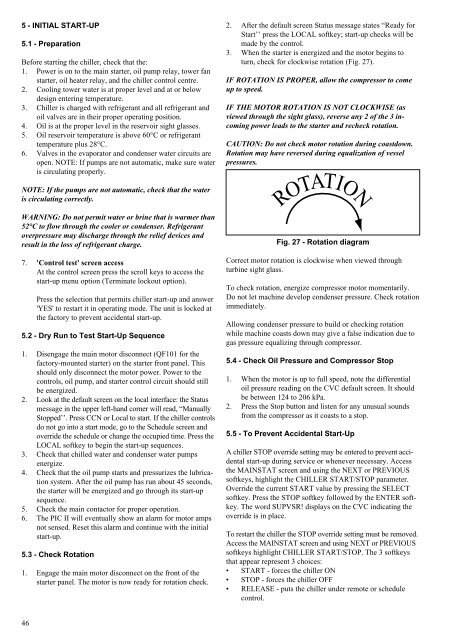
turn, check for clockwise rotation (Fig. 27).<br />
IF ROTATION IS PROPER, allow the compressor to come<br />
up to speed.<br />
IF THE MOTOR ROTATION IS NOT CLOCKWISE (as<br />
viewed through the sight glass), reverse any 2 of the 3 incoming<br />
power leads to the starter and recheck rotation.<br />
CAUTION: Do not check motor rotation during coastdown.<br />
Rotation may have reversed during equalization of vessel<br />
pressures.<br />
ROTATION<br />
Fig. 27 - Rotation diagram<br />
Correct motor rotation is clockwise when viewed through<br />
turbine sight glass.<br />
To check rotation, energize compressor motor momentarily.<br />
Do not let machine develop condenser pressure. Check rotation<br />
immediately.<br />
Allowing condenser pressure to build or checking rotation<br />
while machine coasts down may give a false indication due to<br />
gas pressure equalizing through compressor.<br />
5.4 - Check Oil Pressure and Compressor Stop<br />
1. When the motor is up to full speed, note the differential<br />
oil pressure reading on the CVC default screen. It should<br />
be between 124 to 206 kPa.<br />
2. Press the Stop button and listen for any unusual sounds<br />
from the compressor as it coasts to a stop.<br />
5.5 - To Prevent Accidental Start-Up<br />
A chiller STOP override setting may be entered to prevent accidental<br />
start-up during service or whenever necessary. Access<br />
the MAINSTAT screen and using the NEXT or PREVIOUS<br />
softkeys, highlight the CHILLER START/STOP parameter.<br />
Override the current START value by pressing the SELECT<br />
softkey. Press the STOP softkey followed by the ENTER softkey.<br />
The word SUPVSR! displays on the CVC indicating the<br />
override is in place.<br />
To restart the chiller the STOP override setting must be removed.<br />
Access the MAINSTAT screen and using NEXT or PREVIOUS<br />
softkeys highlight CHILLER START/STOP. The 3 softkeys<br />
that appear represent 3 choices:<br />
START - forces the chiller ON<br />
STOP - forces the chiller OFF<br />
RELEASE - puts the chiller under remote or schedule<br />
control.


