


Create successful ePaper yourself
Turn your PDF publications into a flip-book with our unique Google optimized e-Paper software.
I’ve found the more realistic you can present their idea in the real world, the<br />
more approvals you’ll win.<br />
8. Revisions. Turns out the client liked the design, but they just want some color<br />
changes. So I’ll go back and make those changes, log my time spent on them and<br />
show the client new revised proofs. If they hate the design (unlikely, because<br />
they already approved the sketch and concept) then we reassess the budget and<br />
how much they can afford to start over. This rarely happens.<br />
9. Final design. They give me a final approval on the design, and then I send<br />
the invoice for the remaining hours. Once they’re all paid up, I prepare the final<br />
files for print. Usually that just means organizing the PSD or AI files, saving out<br />
flattened high res versions, etc. I don’t typically do color separations for tees, we<br />
save that job for the printer.<br />
10. Send the files. At Go Media we like to burn everything on a disc and mail the<br />
final files to the client. We also send them online via YouSendIt. Both ways to<br />
make sure they get the file.<br />
That’s typically how I personally work. But in reality at Go Media, we have a<br />
project manager in place who usually takes the incoming project and deals with<br />
budgets and briefs. Once that’s ironed out, it’s handed off to the designer who<br />
finishes the project. We have this in place so that the designer isn’t worrying<br />
about closing sales on new leads and can focus on what they do best, the art.<br />
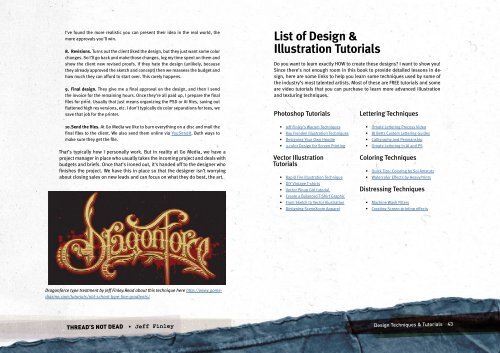
Dragonforce type treatment by Jeff Finley.Read about this technique here http://www.gomediazine.com/tutorials/old-school-type-line-gradients/<br />
THREAD’S NOT DEAD • Jeff Finley<br />
List of Design &<br />
Illustration Tutorials<br />
Do you want to learn exactly HOW to create these designs? I want to show you!<br />
Since there’s <strong>not</strong> enough room in this book to provide detailed lessons in design,<br />
here are some links to help you learn some techniques used by some of<br />
the industry’s most talented artists. Most of these are FREE tutorials and some<br />
are video tutorials that you can purchase to learn more advanced illustration<br />
and texturing techniques.<br />
Photoshop Tutorials<br />
• Jeff Finley’s Wacom Techniques<br />
• Ray Frenden Illustration Techniques<br />
• Designing Your Own Hoodie<br />
• 3-color Design for Screen Printing<br />
Vector Illustration<br />
Tutorials<br />
• Rapid Fire Illustration Technique<br />
• DIY Vintage T-shirts<br />
• Vector Pinup Girl tutorial<br />
• Create a Balanced T-Shirt Graphic<br />
• From Sketch to Vector Illustration<br />
• Designing SceneXcore Apparel<br />
Lettering Techniques<br />
• Ornate Lettering Process Video<br />
• BJ Betts Custom Lettering Guides<br />
• Calligraphy and Penmanship<br />
• Ornate Lettering in AI and PS<br />
Coloring Techniques<br />
• Quick Tips: Coloring by Sol Amstutz<br />
• Watercolor Effects by HeavyPrints<br />
Distressing Techniques<br />
• Machine Wash Filters<br />
• Creating Screen-printing effects<br />
Design Techniques & Tutorials 43