Installation Guide - Eset
Installation Guide - Eset
Installation Guide - Eset

Create successful ePaper yourself
Turn your PDF publications into a flip-book with our unique Google optimized e-Paper software.
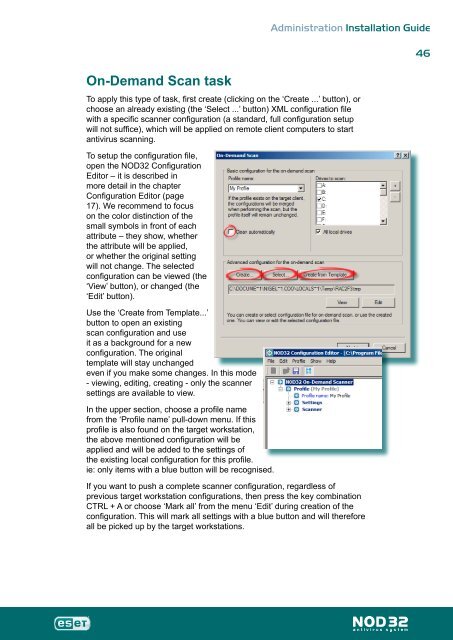
On-Demand Scan task<br />
Administration <strong>Installation</strong> <strong>Guide</strong><br />
To apply this type of task, first create (clicking on the ‘Create ...’ button), or<br />
choose an already existing (the ‘Select ...’ button) XML configuration file<br />
with a specific scanner configuration (a standard, full configuration setup<br />
will not suffice), which will be applied on remote client computers to start<br />
antivirus scanning.<br />
To setup the configuration file,<br />
open the NOD32 Configuration<br />
Editor – it is described in<br />
more detail in the chapter<br />
Configuration Editor (page<br />
17). We recommend to focus<br />
on the color distinction of the<br />
small symbols in front of each<br />
attribute – they show, whether<br />
the attribute will be applied,<br />
or whether the original setting<br />
will not change. The selected<br />
configuration can be viewed (the<br />
‘View’ button), or changed (the<br />
‘Edit’ button).<br />
Use the ‘Create from Template...’<br />
button to open an existing<br />
scan configuration and use<br />
it as a background for a new<br />
configuration. The original<br />
template will stay unchanged<br />
even if you make some changes. In this mode<br />
- viewing, editing, creating - only the scanner<br />
settings are available to view.<br />
In the upper section, choose a profile name<br />
from the ‘Profile name’ pull-down menu. If this<br />
profile is also found on the target workstation,<br />
the above mentioned configuration will be<br />
applied and will be added to the settings of<br />
the existing local configuration for this profile.<br />
ie: only items with a blue button will be recognised.<br />
If you want to push a complete scanner configuration, regardless of<br />
previous target workstation configurations, then press the key combination<br />
CTRL + A or choose ‘Mark all’ from the menu ‘Edit’ during creation of the<br />
configuration. This will mark all settings with a blue button and will therefore<br />
all be picked up by the target workstations.<br />
46