Installation Guide - Eset
Installation Guide - Eset
Installation Guide - Eset

You also want an ePaper? Increase the reach of your titles
YUMPU automatically turns print PDFs into web optimized ePapers that Google loves.
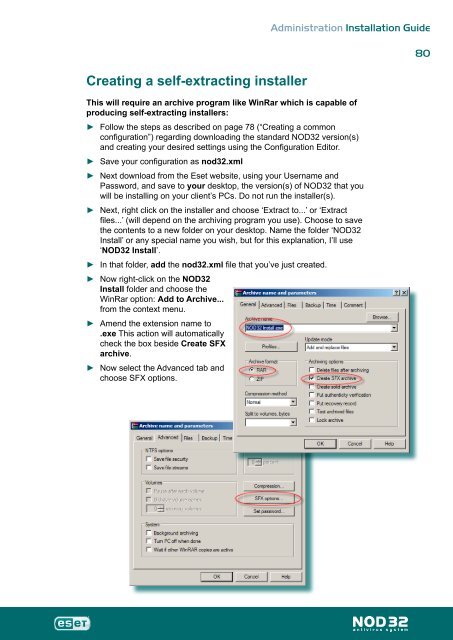
Creating a self-extracting installer<br />
Administration <strong>Installation</strong> <strong>Guide</strong><br />
This will require an archive program like WinRar which is capable of<br />
producing self-extracting installers:<br />
►<br />
►<br />
►<br />
►<br />
►<br />
►<br />
►<br />
►<br />
Follow the steps as described on page 78 (“Creating a common<br />
configuration”) regarding downloading the standard NOD32 version(s)<br />
and creating your desired settings using the Configuration Editor.<br />
Save your configuration as nod32.xml<br />
Next download from the <strong>Eset</strong> website, using your Username and<br />
Password, and save to your desktop, the version(s) of NOD32 that you<br />
will be installing on your client’s PCs. Do not run the installer(s).<br />
Next, right click on the installer and choose ‘Extract to...’ or ‘Extract<br />
files...’ (will depend on the archiving program you use). Choose to save<br />
the contents to a new folder on your desktop. Name the folder ‘NOD32<br />
Install’ or any special name you wish, but for this explanation, I’ll use<br />
‘NOD32 Install’.<br />
In that folder, add the nod32.xml file that you’ve just created.<br />
Now right-click on the NOD32<br />
Install folder and choose the<br />
WinRar option: Add to Archive...<br />
from the context menu.<br />
Amend the extension name to<br />
.exe This action will automatically<br />
check the box beside Create SFX<br />
archive.<br />
Now select the Advanced tab and<br />
choose SFX options.<br />
80