

Sym Jet Euro X servicemanual - Scootergrisen
Sym Jet Euro X servicemanual - Scootergrisen
Sym Jet Euro X servicemanual - Scootergrisen

You also want an ePaper? Increase the reach of your titles
YUMPU automatically turns print PDFs into web optimized ePapers that Google loves.
15. ELECTRICAL EQUIPMENT<br />
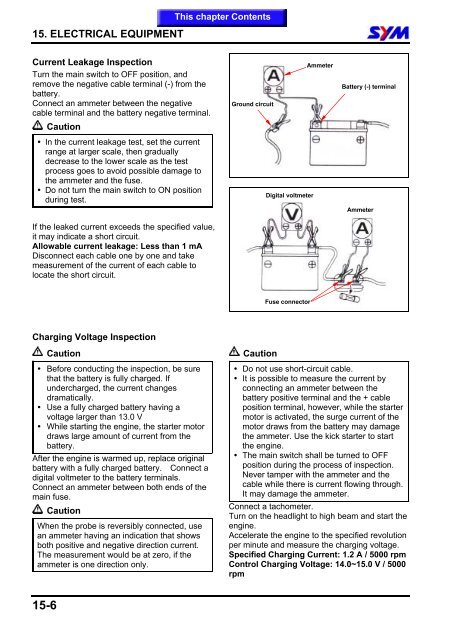
Current Leakage Inspection<br />
Turn the main switch to OFF position, and<br />
remove the negative cable terminal (-) from the<br />
battery.<br />
Connect an ammeter between the negative<br />
cable terminal and the battery negative terminal.<br />
Caution<br />
In the current leakage test, set the current<br />
range at larger scale, then gradually<br />
decrease to the lower scale as the test<br />
process goes to avoid possible damage to<br />
the ammeter and the fuse.<br />
Do not turn the main switch to ON position<br />
during test.<br />
If the leaked current exceeds the specified value,<br />
it may indicate a short circuit.<br />
Allowable current leakage: Less than 1 mA<br />
Disconnect each cable one by one and take<br />
measurement of the current of each cable to<br />
locate the short circuit.<br />
Charging Voltage Inspection<br />
15-6<br />
Caution<br />
Before conducting the inspection, be sure<br />
that the battery is fully charged. If<br />
undercharged, the current changes<br />
dramatically.<br />
Use a fully charged battery having a<br />
voltage larger than 13.0 V<br />
While starting the engine, the starter motor<br />
draws large amount of current from the<br />
battery.<br />
After the engine is warmed up, replace original<br />
battery with a fully charged battery. Connect a<br />
digital voltmeter to the battery terminals.<br />
Connect an ammeter between both ends of the<br />
main fuse.<br />
Caution<br />
When the probe is reversibly connected, use<br />
an ammeter having an indication that shows<br />
both positive and negative direction current.<br />
The measurement would be at zero, if the<br />
ammeter is one direction only.<br />
This chapter Contents<br />
Ground circuit<br />
Caution<br />
Digital voltmeter<br />
Fuse connector<br />
Ammeter<br />
Battery (-) terminal<br />
Ammeter<br />
Do not use short-circuit cable.<br />
It is possible to measure the current by<br />
connecting an ammeter between the<br />
battery positive terminal and the + cable<br />
position terminal, however, while the starter<br />
motor is activated, the surge current of the<br />
motor draws from the battery may damage<br />
the ammeter. Use the kick starter to start<br />
the engine.<br />
The main switch shall be turned to OFF<br />
position during the process of inspection.<br />
Never tamper with the ammeter and the<br />
cable while there is current flowing through.<br />
It may damage the ammeter.<br />
Connect a tachometer.<br />
Turn on the headlight to high beam and start the<br />
engine.<br />
Accelerate the engine to the specified revolution<br />
per minute and measure the charging voltage.<br />
Specified Charging Current: 1.2 A / 5000 rpm<br />
Control Charging Voltage: 14.0~15.0 V / 5000<br />
rpm


