

Sym Jet Euro X servicemanual - Scootergrisen
Sym Jet Euro X servicemanual - Scootergrisen
Sym Jet Euro X servicemanual - Scootergrisen

You also want an ePaper? Increase the reach of your titles
YUMPU automatically turns print PDFs into web optimized ePapers that Google loves.
9. CRANKCASE/CRANKSHAFT<br />
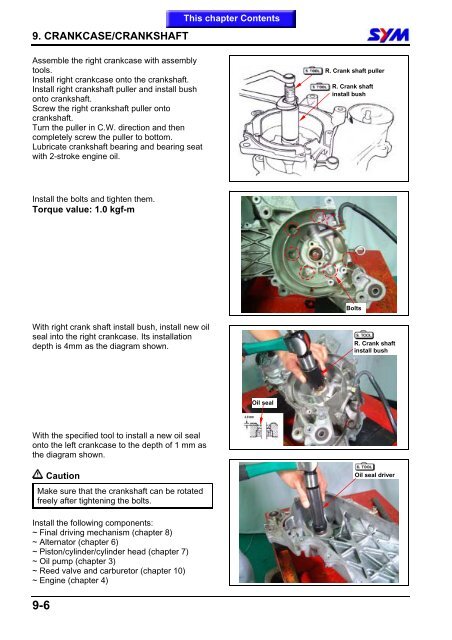
Assemble the right crankcase with assembly<br />
tools.<br />
Install right crankcase onto the crankshaft.<br />
Install right crankshaft puller and install bush<br />
onto crankshaft.<br />
Screw the right crankshaft puller onto<br />
crankshaft.<br />
Turn the puller in C.W. direction and then<br />
completely screw the puller to bottom.<br />
Lubricate crankshaft bearing and bearing seat<br />
with 2-stroke engine oil.<br />
Install the bolts and tighten them.<br />
Torque value: 1.0 kgf-m<br />
With right crank shaft install bush, install new oil<br />
seal into the right crankcase. Its installation<br />
depth is 4mm as the diagram shown.<br />
With the specified tool to install a new oil seal<br />
onto the left crankcase to the depth of 1 mm as<br />
the diagram shown.<br />
9-6<br />
Caution<br />
Make sure that the crankshaft can be rotated<br />
freely after tightening the bolts.<br />
Install the following components:<br />
~ Final driving mechanism (chapter 8)<br />
~ Alternator (chapter 6)<br />
~ Piston/cylinder/cylinder head (chapter 7)<br />
~ Oil pump (chapter 3)<br />
~ Reed valve and carburetor (chapter 10)<br />
~ Engine (chapter 4)<br />
This chapter Contents<br />
Oil seal<br />
R. Crank shaft puller<br />
R. Crank shaft<br />
install bush<br />
Bolts<br />
R. Crank shaft<br />
install bush<br />
Oil seal driver


