LANTEK User Manual - Ideal Industries
LANTEK User Manual - Ideal Industries
LANTEK User Manual - Ideal Industries

Create successful ePaper yourself
Turn your PDF publications into a flip-book with our unique Google optimized e-Paper software.
Chapter 6<br />
Fiber Optics Diagnostics (TRACETEK)<br />
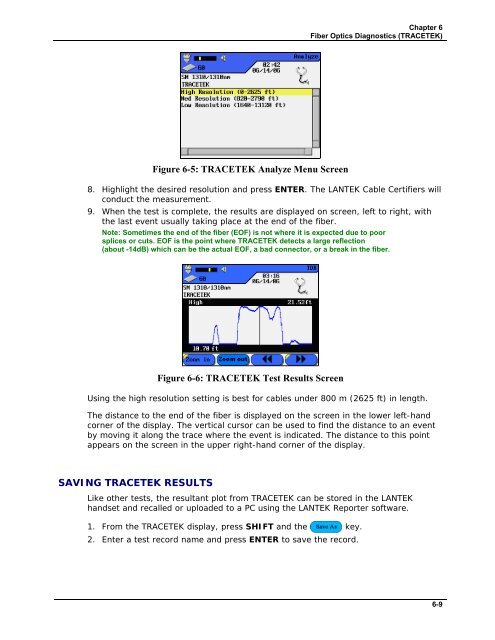
Figure 6-5: TRACETEK Analyze Menu Screen<br />
8. Highlight the desired resolution and press ENTER. The <strong>LANTEK</strong> Cable Certifiers will<br />
conduct the measurement.<br />
9. When the test is complete, the results are displayed on screen, left to right, with<br />
the last event usually taking place at the end of the fiber.<br />
Note: Sometimes the end of the fiber (EOF) is not where it is expected due to poor<br />
splices or cuts. EOF is the point where TRACETEK detects a large reflection<br />
(about -14dB) which can be the actual EOF, a bad connector, or a break in the fiber.<br />
Figure 6-6: TRACETEK Test Results Screen<br />
Using the high resolution setting is best for cables under 800 m (2625 ft) in length.<br />
The distance to the end of the fiber is displayed on the screen in the lower left-hand<br />
corner of the display. The vertical cursor can be used to find the distance to an event<br />
by moving it along the trace where the event is indicated. The distance to this point<br />
appears on the screen in the upper right-hand corner of the display.<br />
SAVING TRACETEK RESULTS<br />
Like other tests, the resultant plot from TRACETEK can be stored in the <strong>LANTEK</strong><br />
handset and recalled or uploaded to a PC using the <strong>LANTEK</strong> Reporter software.<br />
1. From the TRACETEK display, press SHIFT and the key.<br />
2. Enter a test record name and press ENTER to save the record.<br />
6-9