X515C DF & X510C Manual - Lowrance
X515C DF & X510C Manual - Lowrance
X515C DF & X510C Manual - Lowrance
You also want an ePaper? Increase the reach of your titles
YUMPU automatically turns print PDFs into web optimized ePapers that Google loves.
sure that your selected location will work under all conditions, make a<br />
test run with the boat on plane and observe the bottom signal. You'll<br />
need to figure some way to prop the transducer into position while you<br />
make your test run. (A brick or two might be sufficient to hold it in<br />
place.)<br />
5. When you're satisfied with a location, mark it and proceed with<br />
the installation.<br />
Shoot-thru-hull Installation<br />
If you are installing the transducer on a hull with floatation material<br />
sandwiched within the hull, refer to the text "Hulls With Flotation Materials"<br />
beginning on page 18.<br />
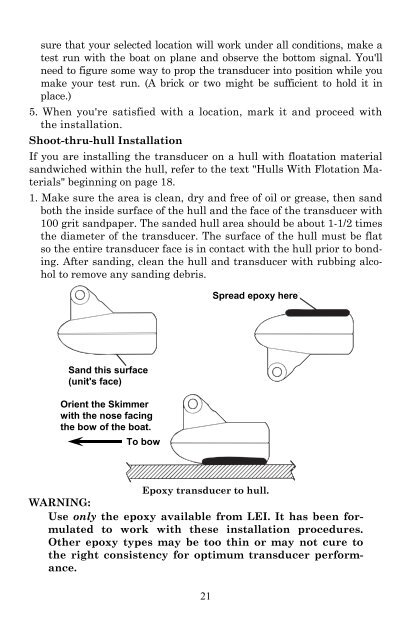
1. Make sure the area is clean, dry and free of oil or grease, then sand<br />
both the inside surface of the hull and the face of the transducer with<br />
100 grit sandpaper. The sanded hull area should be about 1-1/2 times<br />
the diameter of the transducer. The surface of the hull must be flat<br />
so the entire transducer face is in contact with the hull prior to bonding.<br />
After sanding, clean the hull and transducer with rubbing alcohol<br />
to remove any sanding debris.<br />
Spread epoxy here<br />
Sand this surface<br />
(unit's face)<br />
Orient the Skimmer<br />
with the nose facing<br />
the bow of the boat.<br />
To bow<br />
Epoxy transducer to hull.<br />
WARNING:<br />
Use only the epoxy available from LEI. It has been formulated<br />
to work with these installation procedures.<br />
Other epoxy types may be too thin or may not cure to<br />
the right consistency for optimum transducer performance.<br />
21


