WL76* Digital Series YL76* Digital Series - Toshiba-OM.net
WL76* Digital Series YL76* Digital Series - Toshiba-OM.net
WL76* Digital Series YL76* Digital Series - Toshiba-OM.net

Create successful ePaper yourself
Turn your PDF publications into a flip-book with our unique Google optimized e-Paper software.
CONNECTING YOUR TV<br />
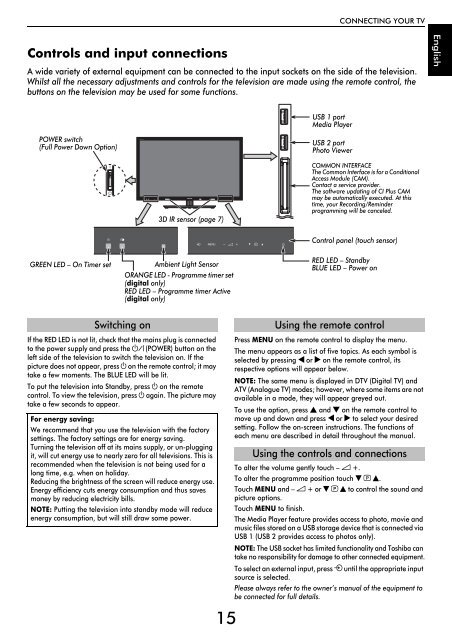
Controls and input connections<br />
A wide variety of external equipment can be connected to the input sockets on the side of the television.<br />
Whilst all the necessary adjustments and controls for the television are made using the remote control, the<br />
buttons on the television may be used for some functions.<br />
English<br />
USB 1 port<br />
Media Player<br />
POWER switch<br />
(Full Power Down Option)<br />
USB 2 port<br />
Photo Viewer<br />
3D IR sensor (page 7)<br />
C<strong>OM</strong>MON INTERFACE<br />
The Common Interface is for a Conditional<br />
Access Module (CAM).<br />
Contact a service provider.<br />
The software updating of CI Plus CAM<br />
may be automatically executed. At this<br />
time, your Recording/Reminder<br />
programming will be canceled.<br />
Control panel (touch sensor)<br />
GREEN LED – On Timer set<br />
Ambient Light Sensor<br />
ORANGE LED - Programme timer set<br />
(digital only)<br />
RED LED – Programme timer Active<br />
(digital only)<br />
RED LED – Standby<br />
BLUE LED – Power on<br />
Switching on<br />
If the RED LED is not lit, check that the mains plug is connected<br />
to the power supply and press the ! (POWER) button on the<br />
left side of the television to switch the television on. If the<br />
picture does not appear, press 1 on the remote control; it may<br />
take a few moments. The BLUE LED will be lit.<br />
To put the television into Standby, press 1 on the remote<br />
control. To view the television, press 1 again. The picture may<br />
take a few seconds to appear.<br />
For energy saving:<br />
We recommend that you use the television with the factory<br />
settings. The factory settings are for energy saving.<br />
Turning the television off at its mains supply, or un-plugging<br />
it, will cut energy use to nearly zero for all televisions. This is<br />
recommended when the television is not being used for a<br />
long time, e.g. when on holiday.<br />
Reducing the brightness of the screen will reduce energy use.<br />
Energy efficiency cuts energy consumption and thus saves<br />
money by reducing electricity bills.<br />
NOTE: Putting the television into standby mode will reduce<br />
energy consumption, but will still draw some power.<br />
15<br />
Using the remote control<br />
Press MENU on the remote control to display the menu.<br />
The menu appears as a list of five topics. As each symbol is<br />
selected by pressing C or c on the remote control, its<br />
respective options will appear below.<br />
NOTE: The same menu is displayed in DTV (<strong>Digital</strong> TV) and<br />
ATV (Analogue TV) modes; however, where some items are not<br />
available in a mode, they will appear greyed out.<br />
To use the option, press B and b on the remote control to<br />
move up and down and press C or c to select your desired<br />
setting. Follow the on-screen instructions. The functions of<br />
each menu are described in detail throughout the manual.<br />
Using the controls and connections<br />
To alter the volume gently touch – 2 +.<br />
To alter the programme position touch b p B.<br />
Touch MENU and – 2 + or b p B to control the sound and<br />
picture options.<br />
Touch MENU to finish.<br />
The Media Player feature provides access to photo, movie and<br />
music files stored on a USB storage device that is connected via<br />
USB 1 (USB 2 provides access to photos only).<br />
NOTE: The USB socket has limited functionality and <strong>Toshiba</strong> can<br />
take no responsibility for damage to other connected equipment.<br />
To select an external input, press o until the appropriate input<br />
source is selected.<br />
Please always refer to the owner’s manual of the equipment to<br />
be connected for full details.