WL76* Digital Series YL76* Digital Series - Toshiba-OM.net
WL76* Digital Series YL76* Digital Series - Toshiba-OM.net
WL76* Digital Series YL76* Digital Series - Toshiba-OM.net

Create successful ePaper yourself
Turn your PDF publications into a flip-book with our unique Google optimized e-Paper software.
SETTING UP YOUR TV<br />
English<br />
a<br />
b<br />
c<br />
Ant/Cable/Satellite (if available)<br />
From this menu, you can set the RF input configuration.<br />
Press MENU, and select SETUP menu.<br />
Use b to highlight Ant/Cable/Satellite and use C or<br />
c to select Antenna, Cable or Satellite.<br />
NOTE: When you attempt to change the Ant/Cable/<br />
Satellite setting, a warning message will appear<br />
followed by PIN entry (if PIN has been set) and a<br />
prompt for Auto Tuning.<br />
When Ant/Cable/Satellite is set to Cable, the<br />
following setting options will be provided in the Auto<br />
Tuning screen.<br />
Press B or b to select an item, and then press C or c<br />
to select your desired option.<br />
DTV End Frequency:<br />
This sets the frequency at which the scan will end.<br />
DTV Modulation:<br />
You can choose from five QAM modulation settings.<br />
DTV Symbol Rate:<br />
This is the baud rate (KS/s) of the scan.<br />
DTV Network ID:<br />
This is the Network ID to be utilized for the scan. This item is<br />
greyed out when DTV Scan Type is set to “Full Scan”.<br />
Satellite Settings<br />
From the SETUP menu, you can add the satellites that you wish<br />
to tune and configure detailed settings for each one<br />
individually.<br />
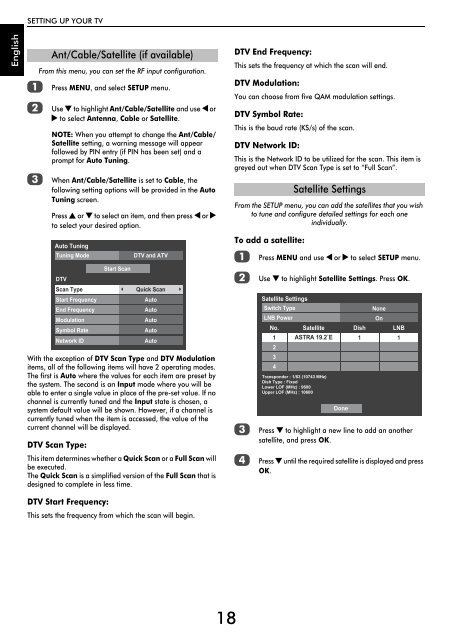
Auto Tuning<br />
Tuning Mode<br />
DTV<br />
Scan Type<br />
Start Frequency<br />
End Frequency<br />
Modulation<br />
Symbol Rate<br />
Network ID<br />
Start Scan<br />
DTV and ATV<br />
Quick Scan<br />
Auto<br />
Auto<br />
Auto<br />
Auto<br />
Auto<br />
With the exception of DTV Scan Type and DTV Modulation<br />
items, all of the following items will have 2 operating modes.<br />
The first is Auto where the values for each item are preset by<br />
the system. The second is an Input mode where you will be<br />
able to enter a single value in place of the pre-set value. If no<br />
channel is currently tuned and the Input state is chosen, a<br />
system default value will be shown. However, if a channel is<br />
currently tuned when the item is accessed, the value of the<br />
current channel will be displayed.<br />
DTV Scan Type:<br />
This item determines whether a Quick Scan or a Full Scan will<br />
be executed.<br />
The Quick Scan is a simplified version of the Full Scan that is<br />
designed to complete in less time.<br />
DTV Start Frequency:<br />
This sets the frequency from which the scan will begin.<br />
To add a satellite:<br />
a<br />
b<br />
c<br />
d<br />
Press MENU and use C or c to select SETUP menu.<br />
Use b to highlight Satellite Settings. Press OK.<br />
Satellite Settings<br />
Switch Type<br />
LNB Power<br />
No. Satellite<br />
Dish LNB<br />
1 ASTRA 19.2˚E 1 1<br />
2<br />
3<br />
4<br />
Transponder : 1/83 (10743 MHz)<br />
Dish Type : Fixed<br />
Lower LOF (MHz) : 9600<br />
Upper LOF (MHz) : 10600<br />
Done<br />
None<br />
On<br />
Press b to highlight a new line to add an another<br />
satellite, and press OK.<br />
Press b until the required satellite is displayed and press<br />
OK.<br />
18